
Overview
Lesson 1 of 1
The PT210D course is geared for professionals that are transitioning from traditional surround formats. Additionally, this course is well-suited for experienced Dolby mixers that are interested in deepening their skills and learning best practices. This course will thoroughly cover the essential tools and move on to comprehensive professional workflows.
The objectives of the course are:
- External renderer configuration
- Dolby Atmos production best practices
Who Should Take This Course
This course is designed for:
- Professionals transitioning from traditional surround formats to Dolby Atmos
- Experienced Dolby Atmos mixers interested in deepening their skills and learning best practices.
- Students and professionals interested in Pro Tools Dolby official certification.
Learning Objectives
After completing this course, learners will be able to:
- bulletConfigure Renderers running on Mastering Workstations
- bulletWith with advanced Renderer Operations and Settings
- bulletWork with Multiple Bed configurations
- bulletPerform QC (Quality Control) for Dolby Atmos Master Files
Course Prerequisites
Completion of the following courses and passing of the associated certification exams:
- PT101 Pro Tools Fundamentals I
- PT110 Pro Tools Fundamentals II
- PT201 Pro Tools Production I
- PT205D Pro Tools | Dolby Production I
Additional Resources
The following resources are provided in support of the course content.
Glossary
Click below to open the Glossary in a separate tab that you can reference throughout the course.
Appendix A – Dolby Atmos Delivery Codecs
This appendix provided at the end of the course describes three codecs used to deliver Atmos content to the home: Dolby TrueHD, Dolby Digital Plus with Atmos Content, and Dolby AC-4 IMS (Immersive Stereo).
Appendix B – Dolby Atmos Content Delivery Signal Flow
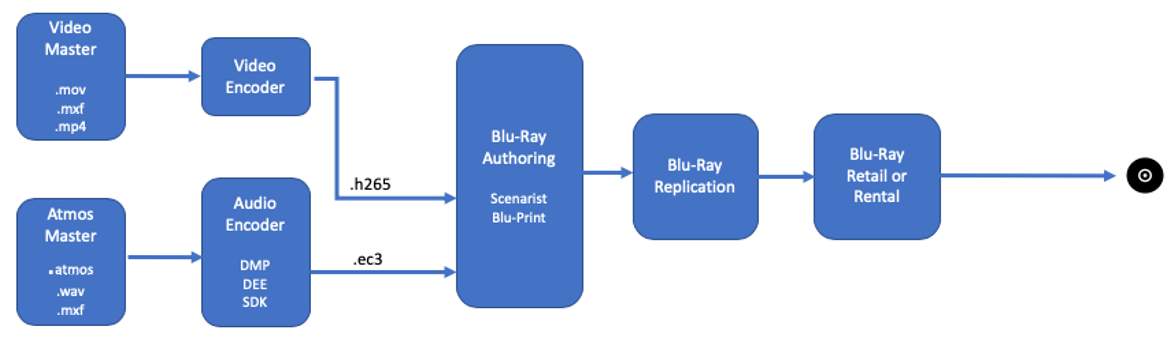
This appendix provided at the end of the course describes the signal flow in two Dolby Atmos delivery modes: over the top (OTT) streaming delivery, and Blu-ray delivery of Dolby Atmos.
RMWs with MADI I/O
Lesson 1 of 6
Three configurations are available for RMWs that use MADI for sending digital audio to and from Pro Tools: Two with Windows-based RMWs and one configuration with Mac-based RMWs.
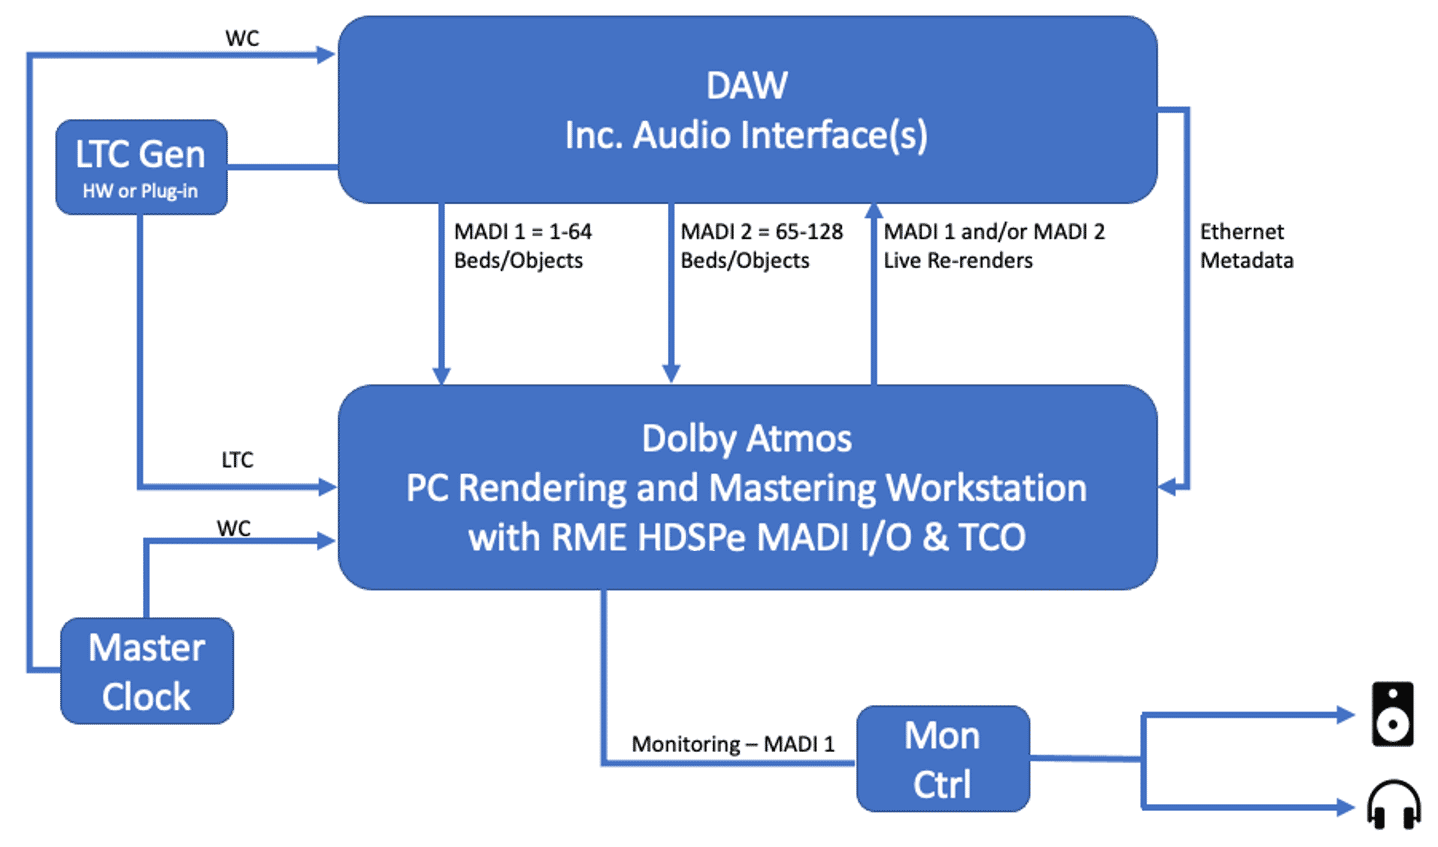
Primary Components of a Windows-Based MADI System using two RME HDSPe MADI I/O and one TCO card
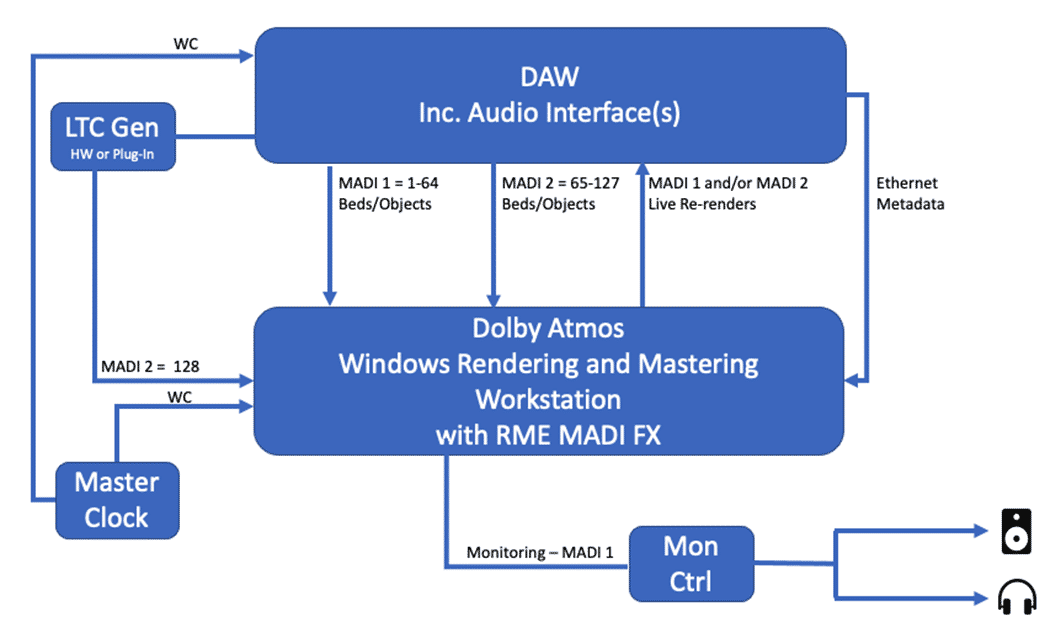
Primary Components of a Windows-Based MADI System using the RME MADI FX card
Primary Components of a Windows or Mac-Based MADI System using the RME MADIfaceXT interface
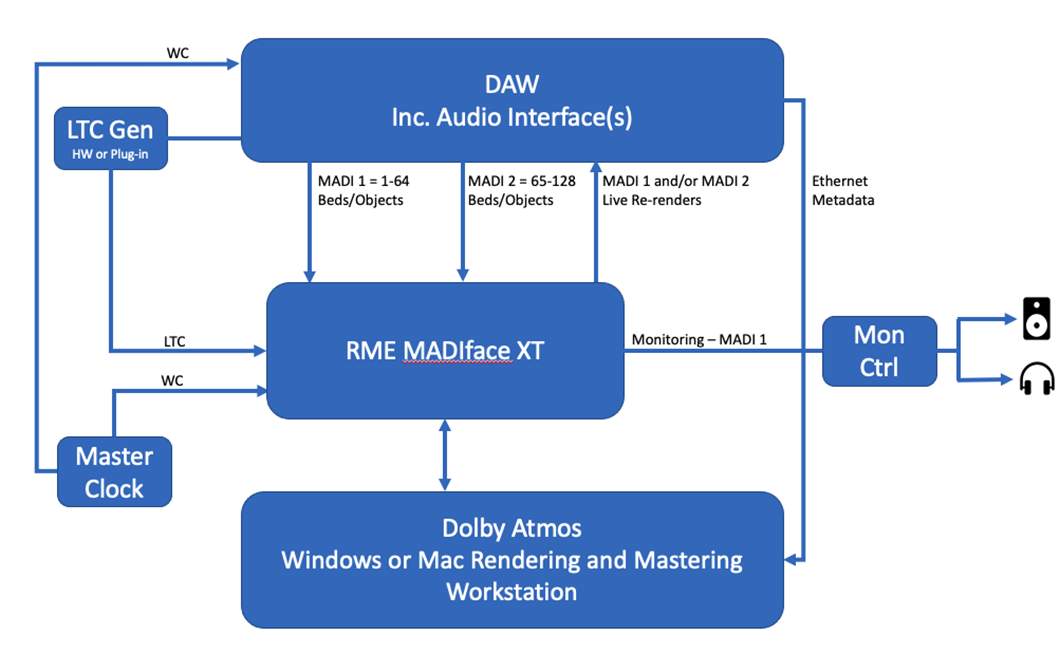
A Dolby Atmos RMW using MADI I/O and a qualified DAW consists of these primary components:
- RME HDSPe configuration
- Two RME HDSPe MADI cards preinstalled for 128 channels of I/O
- One RME TCO card preinstalled for LTC and clock input
- Dolby Atmos Renderer software installed and authorized with a supplied Dolby Atmos Mastering Suite license
- RME MADI FX configuration
- One MADI FX card preinstalled for a minimum of 128 channels of I/O
- Dolby Atmos Renderer software installed and authorized with a supplied Dolby Atmos Mastering Suite license
- Pro Tools with native Atmos panning and direct connection to the Renderer or Pro Tools using the Dolby Atmos Music Panner Plug-in
- Hardware to connect 128 channels of MADI I/O
- Dolby Atmos Renderer Remote software (included with the Renderer installer)
- bulletA synchronization peripheral to generate LTC for the RMW and for clocking the DAW to the same Word Clock (WC) source as the RMW or the Dolby LTC Generator plug-in.
There are three recommended configurations when using an RMW with MADI I/O:
| Dolby Atmos RMW, running on a custom Dell 7920 workstation or Mac computer with: | A synchronization peripheral such as the AVID SYNC HD to generate LTC for the RMW and for clocking the DAW to the same house Word Clock (WC) source. | Mac-based DAW running supported software, with: |
|---|---|---|
| Two RME HDSPe MADI cards preinstalled for 128 channels of I/O | Supported DAW software | |
| One RME TCO card preinstalled for LTC and clock input | Hardware to connect 128 channels of I/O (such as two HDX cards in a Pro Tools Ultimate system) and MADI interface(s) | |
| Dolby Atmos Renderer software installed and authorized with a supplied Dolby Atmos Mastering Suite license | Dolby Atmos Renderer Remote software (included with the Renderer installer) |
| Dolby Atmos RMW, running on a custom Dell 7920 workstation or Mac computer with: | A synchronization peripheral such as the AVID SYNC HD to generate LTC for the RMW and for clocking the DAW to the same house Word Clock (WC) source. | Mac-based DAW running supported software, with: |
|---|---|---|
| One RME MADI FX card preinstalled for 128 channels of I/O (one channel used to receive LTC) | Supported DAW software | |
| Dolby Atmos Renderer software installed and authorized with a supplied Dolby Atmos Mastering Suite license | Dolby Atmos Renderer Remote software (included with the Renderer installer) |
| Dolby Atmos RMW, running on a custom Dell 7920 workstation or Mac computer with: | A synchronization peripheral such as the AVID SYNC HD to generate LTC for the RMW and for clocking the DAW to the same house Word Clock (WC) source. | Mac-based DAW running supported software, with: |
|---|---|---|
| One RME MADIface XT USB 3.0 Interface with 128 channels of I/O (one channel used to receive LTC) | Supported DAW software | |
| Dolby Atmos Renderer software installed and authorized with a supplied Dolby Atmos Mastering Suite license | Dolby Atmos Renderer Remote software (included with the Renderer installer) |
The Renderer Remote can optionally be installed on a separate Mac or Windows-based system to conserve screen real estate on the DAW system.
Windows RMWs using RME DSPe MADI and TCO cards or RME HDSPe MADI FX
The Dell 7920 will come with the necessary RME drivers and firmware installed. Two applications will be installed alongside the Dolby Atmos Renderer:
- Hammerfall DSP Settings Control Panel (HDSPe cards) or HDSPe FX Settings Control Panel (MADI FX card)
- TotalMix FX
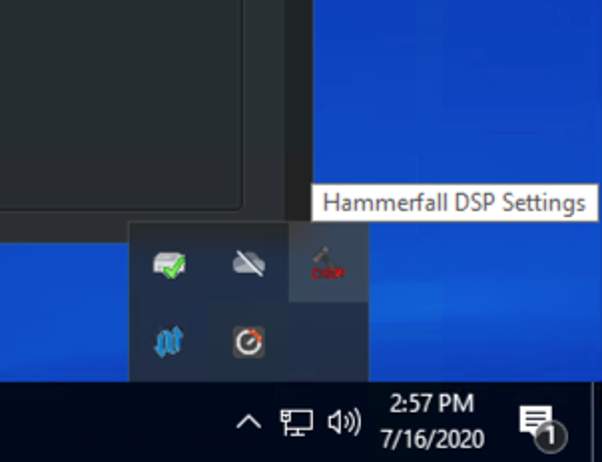
Both applications are accessible via the hidden icon symbol ^ on the right side of the Windows 10 taskbar, as shown below.
These utilities are not used in the regular operation of the RMW, though they must be configured in a specific way for operation.

Do not upgrade the RME drivers or firmware.
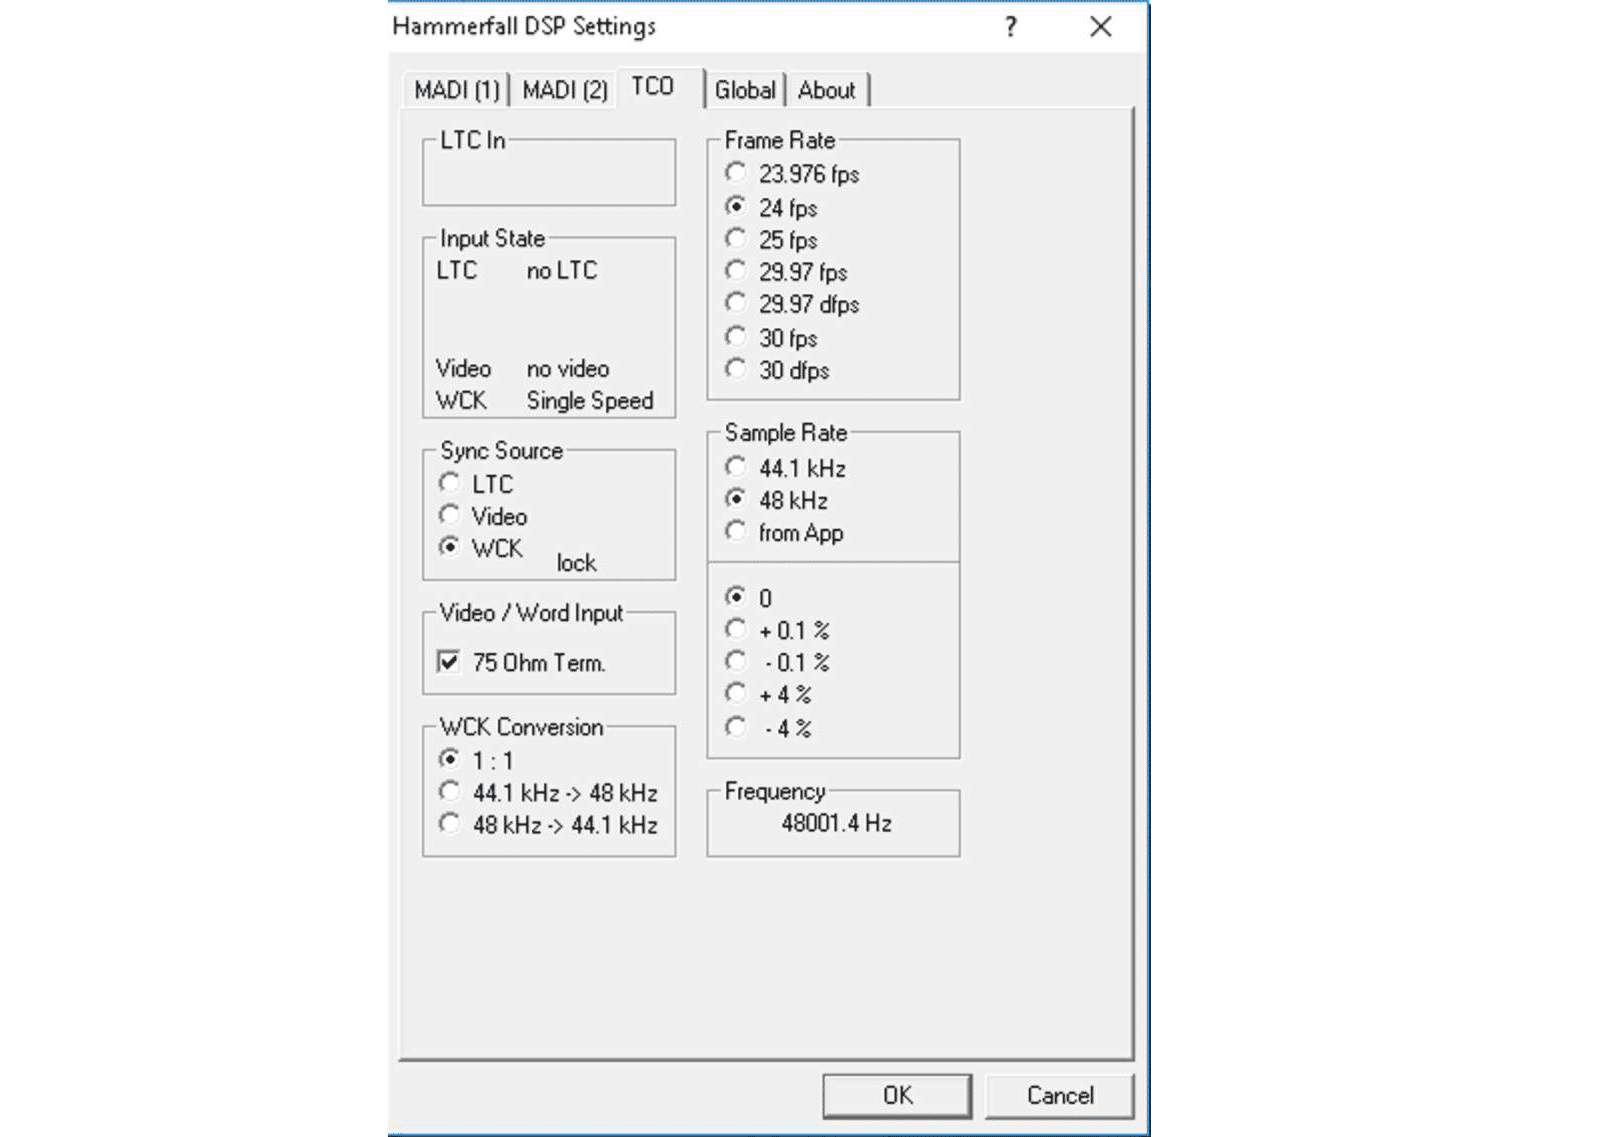
Hammerfall DSP Settings
The Hammerfall DSP Settings control panel can be accessed by the user to set the frame rate for the hardware and verify the proper sync settings per card.
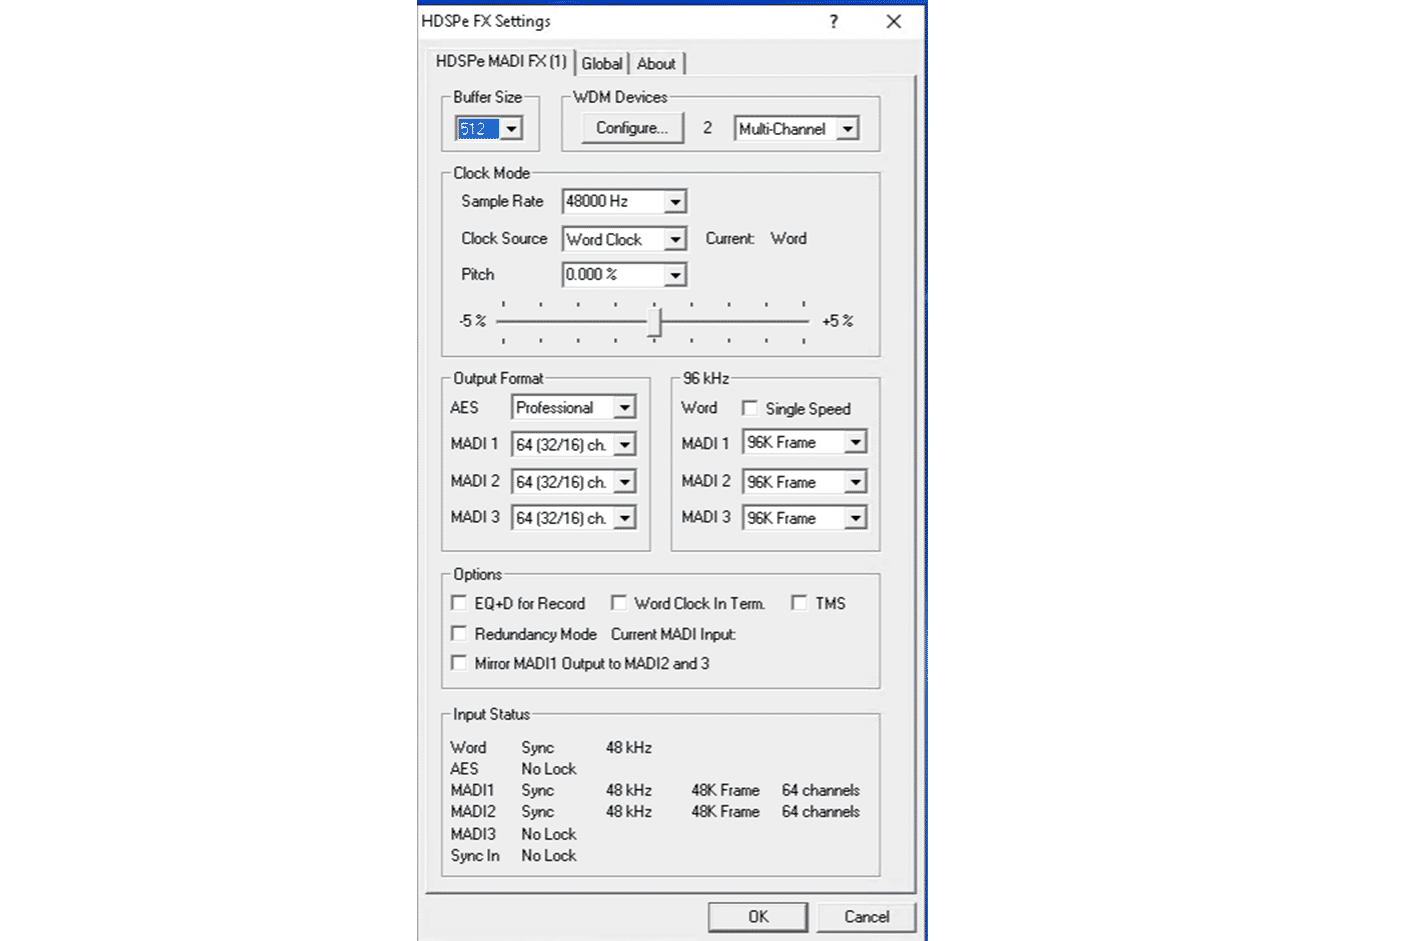
HDSPe FX Settings
If using the RME HDSPe MADI FX card, settings are made in the HDSPe FX Settings application. Users do not need to set the frame rate in this application:
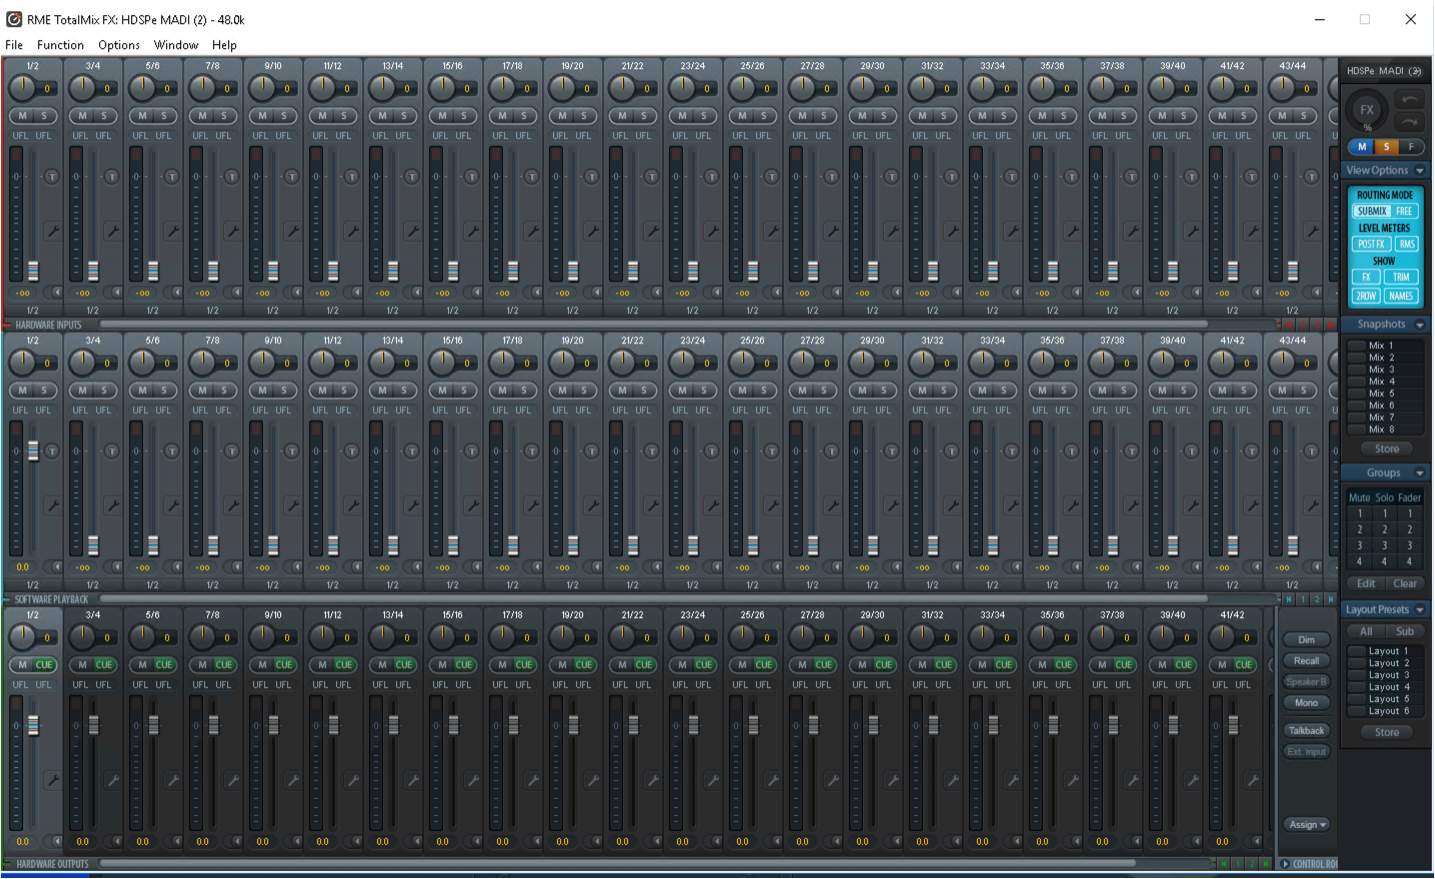
TotalMix FX
The TotalMix FX application comes from the reseller with one modification applied that resets outputs 1 and 2 to unity gain. The TotalMix FX application otherwise has no role and should only be used for troubleshooting. Making any gain, routing, or DSP adjustments will interfere with the proper function of the Dolby Atmos Renderer.
The RME TCO card accepts the clocking signal for the RMW and Dolby Atmos Renderer. Typically, this is Word Clock from a Master Clock. The RME TCO card also accepts the LTC input for synchronizing the Renderer with the DAW.
If using the RME HDSPe MADI FX card, Word Clock will be connected to WC In on the card and LTC will be sent via channel 128.
It is important that Word Clock be distributed rather than daisy-chained between devices.
Mac or Windows RMWs using RME MADIface XT
A Mac or Windows-based MADI RMW will come with the necessary drivers and firmware installed, as well as the Fireface USB settings and TotalMix utilities. These utilities are not used in the regular operation of the RMW, though they must be configured in a specific way for operation.
The Fireface USB Settings should be configured as follows for a 48 kHz workflow (see image):
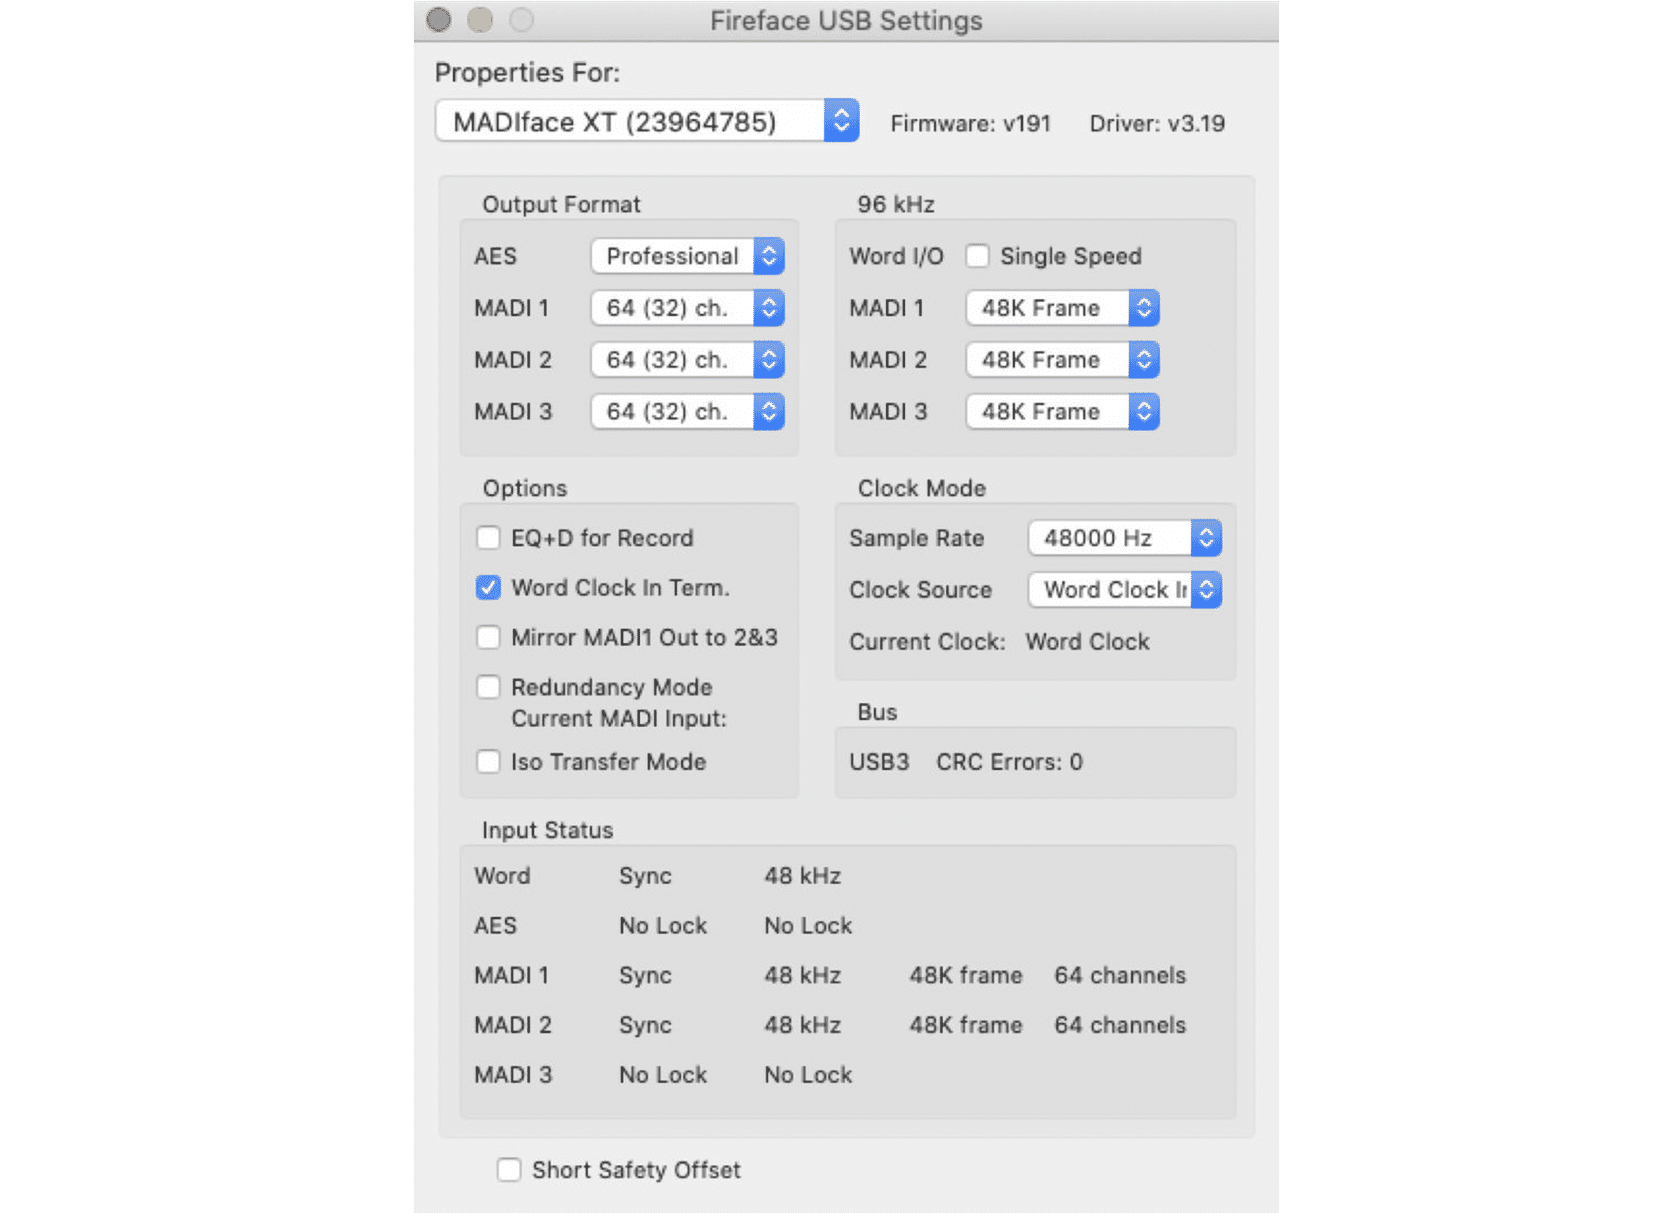
The only time these settings need to change is when switching to a 96 kHz workflow.
On the MADIface XT card, LTC is configured to come into the Mic 1 XLR input of the unit. The signal is then forwarded by the TotalMix application to channel 129 of the Renderer. An RMW purchased from a verified reseller should already have these changes made.
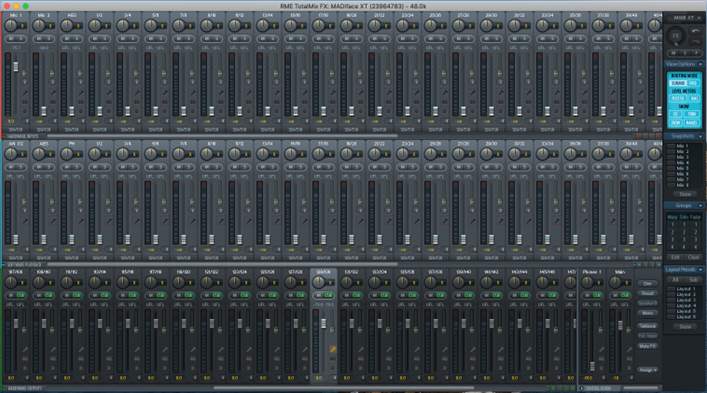
Manual configuration of TotalMix for MADI systems using the MADIface XT card:
Step 1
With TotalMix open, ensure that the Matrix View is showing (press X).
Step 2
On the bottom row (Hardware Outputs), scroll to output 129/130. Click the wrench icon to reveal the channel settings. x
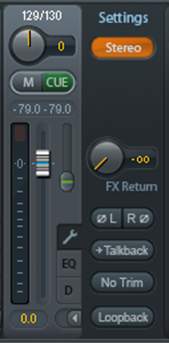
Step 3
Click the Stereo button to split the channel into 2 mono channels.

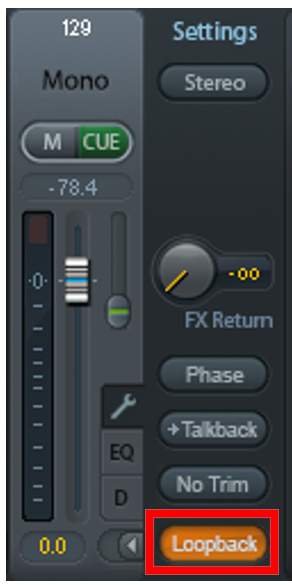
Step 4
On channel 129, click the Loopback button to enable Loopback.
Step 5
In the top row (Hardware Inputs), route the output of Mic 1 to 129 by clicking the bottom of the channel (it may say AN 1/2) and selecting channel 129 from the drop-down list.
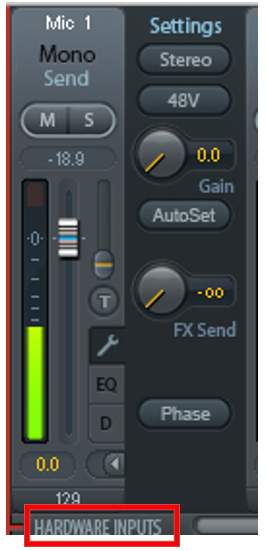
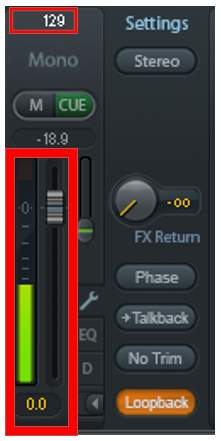
Signal should now be routed from Hardware Input 1 to Hardware Output 129.
Note: It is important to ensure that no other parameters are changed in TotalMix, as this can reroute signals. Note that using the scroll wheel in the application can often lead to inadvertent parameter changes.
96 kHz workflows for Windows-based MADI systems
Additional steps must be taken on Windows-based MADI systems when working at 96 kHz.
In the RME Hammerfall DSP Settings control panel:

- TCO Tab: Set the Sample Rate to “from App” and the correct Frame Rate.
- Use 48k Frame to maintain 64 channels per card.
- MADI 1 + MADI 2 Tabs: Set the Sample Rate to 96 kHz and Buffer Size to 1024.
- In order to change the sample rate the buffer must be set to 1024.
- Once the sample rate drop-down is active and changed to 96 kHz, the buffer size will be set automatically to 2048.
- Reset buffer back to 1024.
- Repeat in the second MADI tab for the 2nd MADI card.
A properly configured RMW licensed with the Dolby Atmos Mastering Suite can handle recording and playback of 96 tracks at 96 kHz. With older Windows-based hardware such as the Dell 7910, this should be limited to 64 tracks at 96 kHz. Care should be taken when exceeding the recommended track count. High track counts coupled with very active Object Audio Metadata can result in errors. These will appear in the logs as missed deadline errors.
RMWs with Dante I/O
Lesson 2 of 6
Dolby Atmos Mastering Suite v3.0 introduced support for both Windows and Mac-based RMWs that use the Dante audio-over-IP protocol for audio input and output. The Dante-based workstation configuration is quite similar between both platforms.
Dante-based RMWs require fewer connections to operate but more complex to set up than MADI-based systems, due to their routing and configuration.
Before working with Dante for the first time, it is recommended to review the “Getting Started with Dante” and “Dante Controller 101” videos available from Audinate:
Getting Started with Dante
The Getting Started with Dante 8-part series of videos provides a high-level practical view of Dante audio networking. It is the perfect place to begin understanding how to setup and use a Dante system, no matter what kind of installation or setting your work requires.GO TO VIDEOS
Dante Controller 101
Dante Controller software is the key to managing a Dante audio network, providing a simple and clear view of all your devices and settings. This series of short videos shows you how to use all the essential functions and features of Dante Controller, from making connections to managing latency between endpoints.GO TO VIDEOS
Primary Components of a Dante-Based System
A Dolby Atmos RMW using Dante I/O and a qualified DAW consists of the following primary components:
| Dolby Atmos RMW, a dedicated machine (approved Mac or Windows-based) with a Dolby-specified hardware configuration, with: | Mac-based digital audio workstation system running supported software, with: | A Dante-compatible network switch with all devices connected in a “star” topology |
|---|---|---|
| Focusrite RedNet PCIeR Dante card preinstalled | Supported DAW software | Each device on the network must connect directly to the Dante-compatible Ethernet switch. |
| A Mac Mini or Mac Pro 6 will require the use of an approved PCIe Thunderbolt Expansion Chassis. This will be Thunderbolt 2 or 3, depending on the Mac model. | Hardware to connect 128 channels of I/O (such as two HDX cards in a Pro Tools system) and Dante interface(s) | |
| Dolby Atmos Renderer software installed and authorized with a Dolby Atmos Mastering Suite license | Dolby Atmos Renderer Remote software | |
| Audinate analog-to-Dante converter for LTC | The Renderer Remote can optionally be installed on a separate Mac or Windows system to conserve screen real estate on the DAW system. |
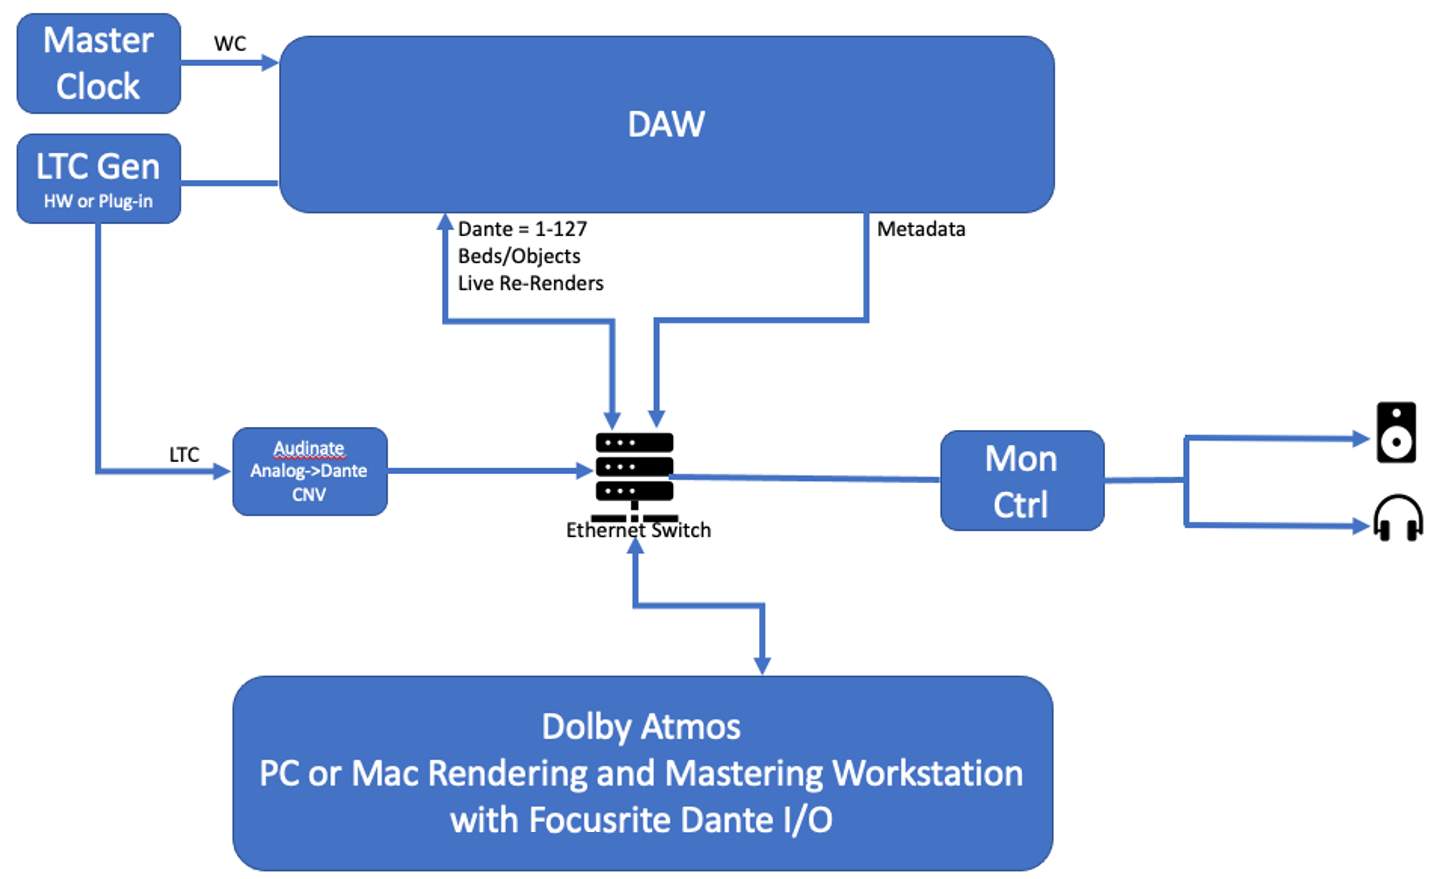
A synchronization peripheral, such as the AVID SYNC HD or SYNC X, to generate LTC for the RMW and for clocking Pro Tools to the same Word Clock source as the RMW is recommended. Alternatively, the Dolby LTC Generator plug-in running in Pro Tools can be used.
Dante Control Software
The Dante RMW will come with two additional software applications:
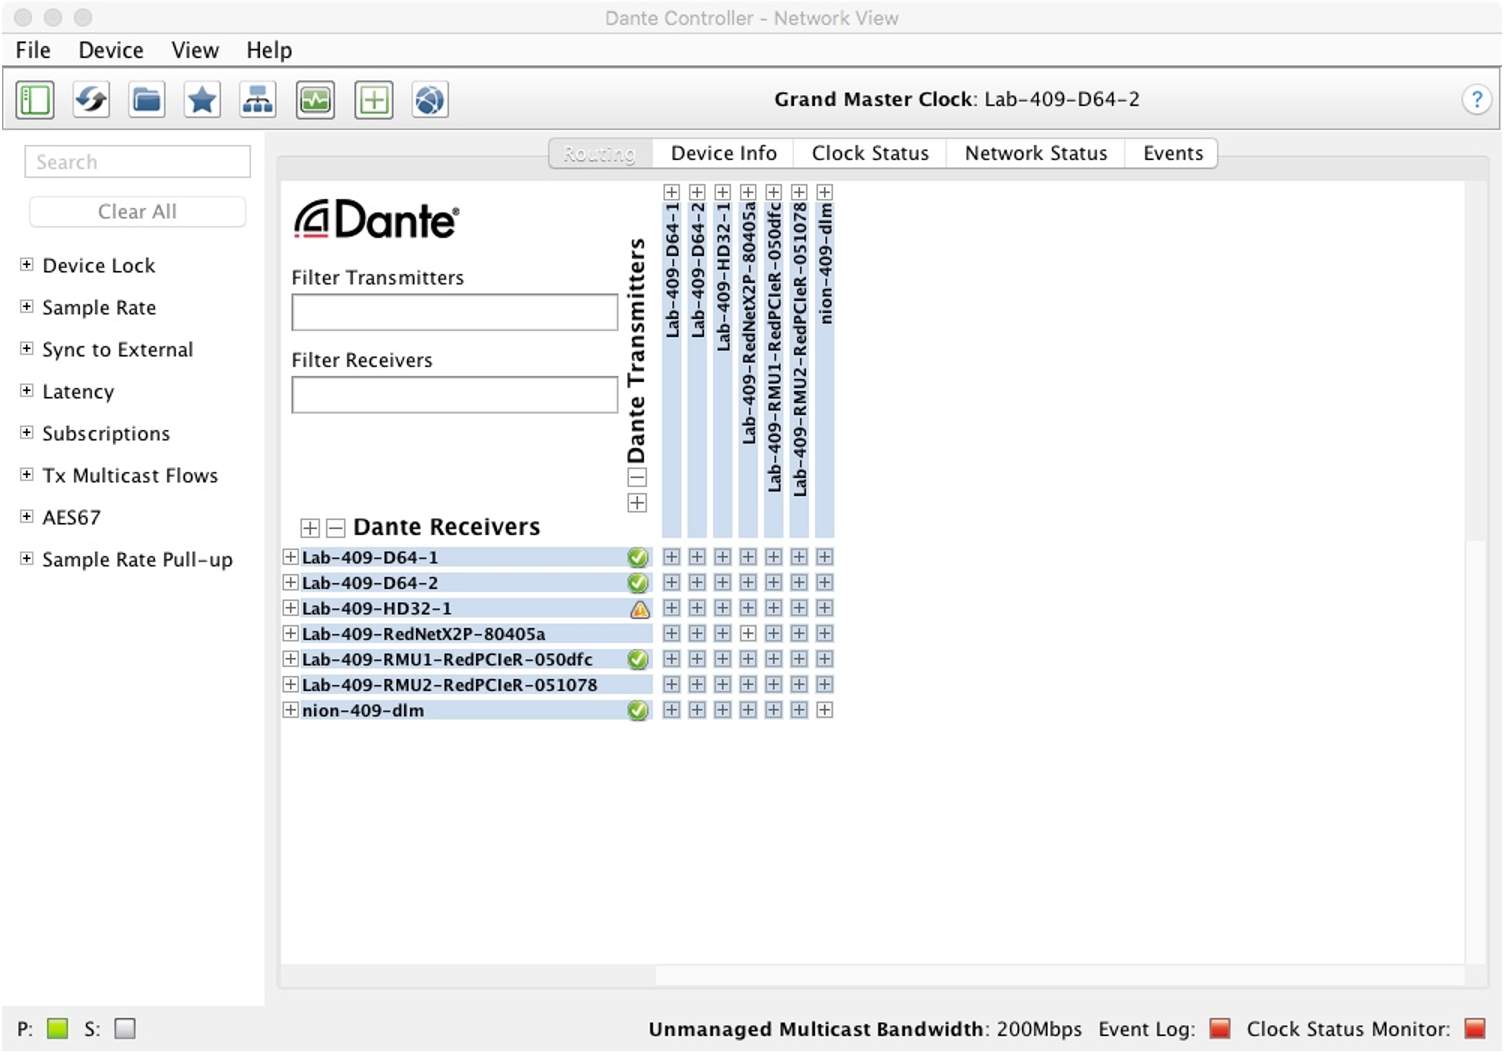
The Audinate Dante Controller
- Used to route signals between the DAW, RMW, and Monitoring System
- Can be run from either the RMW or the DAW
- Sets the clock source and sample rate for the Dante network
The Focusrite Rednet Application
- Will be aware of other Focusrite Dante devices on the network, if any are present
- Should be set to follow settings from the Audinate Dante Controller
- Requires verifying sample rate and clock settings
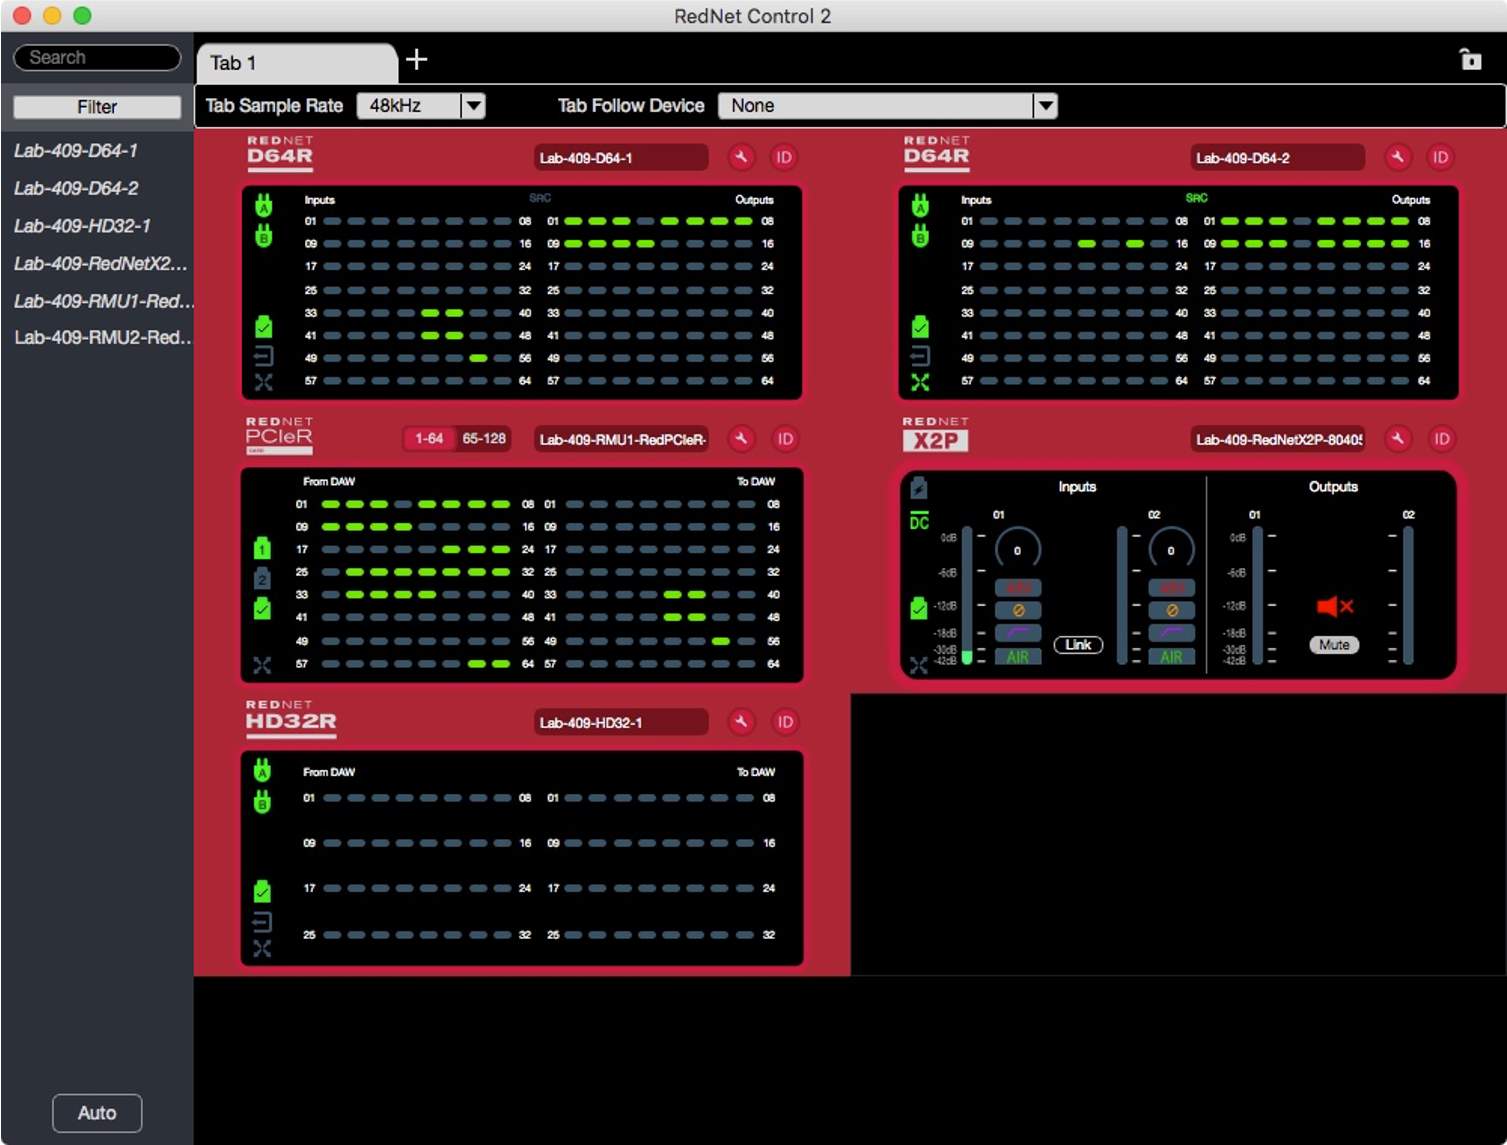

On a Windows-based RMW, the Focusrite Rednet PCIeR settings panel will also be available to set the buffer size.
The buffer size should be set to 512 samples. This setting is accessed from the Rednet Control application as shown below.
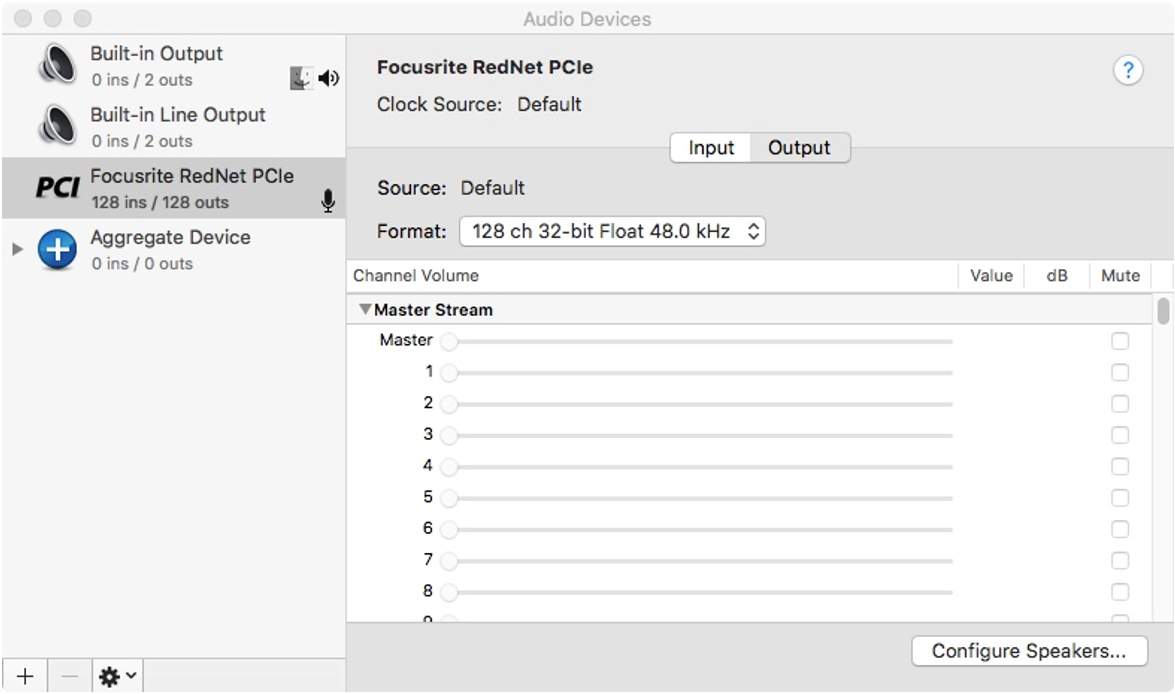
On a Mac-based RMW, the Focusrite Rednet PCIeR card will appear as an Audio Device in Applications/Utilities/Audio MIDI setup. The Input and Output Format must be set as follows:
- 128-Ch 32-bit Float 48kHz
Accessing All Dante Channels
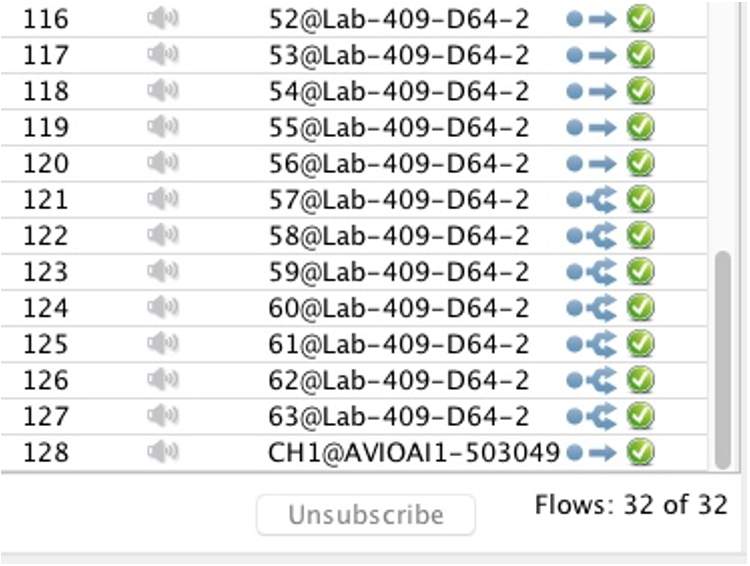
In order to retain use of Renderer inputs 125–127, a multicast flow must be set up on the last eight transmit channels of the Dante device, used for Renderer inputs 121–128
Play Video
Clocking in a Dante Environment
Installations will vary, but in most cases one device (typically a DAW audio interface) receives Word Clock from an external master clock. In the Dante Controller, the audio interface is set to clock to an external source and is set as the MC for the Dante Network. All other devices should be set to slave. It is important that there be only one master clock source in a Dante network.
Alternatively, if a facility has a master network Precision Time Protocol (PTP) clock, that should be used as the network master, with all other devices set to slave.
Dante and Other Networks
The Mac DAW and Dante RMW will often exist in an environment with two or more networks. It is important to keep these segregated, with all Dante devices on a dedicated switch or subnet separate from regular network traffic.
The same switch/subnet can be used to route both Dante audio and panning/size metadata from the DAW. Alternatively, the communication between the DAW and RMW can be established using a separate network connected to an additional network interface card on the RMW.
Synchronizing Pro Tools and the Dolby Atmos Renderer
Lesson 3 of 6
In most use cases, the Dolby Atmos Renderer chases the DAW transport. When the Renderer is running on a dedicated workstation, the synchronization source is LTC.
The LTC source for an RMW can be a synchronization peripheral or the Dolby LTC generator plug-in can be used as an alternative on DAWs without a synchronization peripheral.
Use of MIDI Time Code (MTC) is also an option. However, Linear Time Code (LTC) is recommended over MTC, especially for punch-in operations.
Using the Dolby LTC Generator Plug-In
Depending on the configuration, this bus should be mapped to output 128 for use with an external Renderer or 129 for use with an internal Renderer.
Using Avid SYNC HD to Generate LTC
| Synchronization Options | |
|---|---|
| LTC and MADI RMWs | LTC and Dante RMWs |
| On both Mac-based and Windows-based MADI RMW, synchronization can be provided by a synchronization peripheral that generates LTC from the DAW (such as an AVID SYNC HD). LTC is connected directly to the RME TCO Synchronization Card. In the Dolby Atmos Renderer, the External Sync Source set to ASIO. This configurations only applies to systems using HDSPE MADI cards. | On both Mac-based and Windows-based Dante RMWs LTC is received using an audio channel. In the Dolby Atmos Renderer, the External Sync Source set is to LTC over audio, and the input channel is specified. |
| On both Mac-based and Windows-based MADI RMW, synchronization can be provided via a channel of the MADI peripheral, eliminating the need for a dedicated LTC peripheral. This will, however, require one channel of audio input to be used for synchronization. | With Dante systems using a synchronization peripheral the LTC analog audio signal must be converted to Dante using an analog-to-Dante converter. This requires some extra steps in the Audinate Dante Controller. |
| On a Mac-based MADI RMW LTC is received using an audio channel. In the Dolby Atmos Renderer, the External Sync Source set is to LTC over audio, and the input channel is specified. | The analog-to-Dante converter carrying the LTC needs to be routed to the desired audio input. Typically, this is receive channel 128 on the Focusrite PCIeR card. In order to retain use of Renderer inputs 125–127, a multicast flow must be set up on the last eight transmit channels of the Dante device, used for Renderer inputs 121–128, so that the analog-to-Dante converter used for LTC can be routed without occupying receive channels. (See the image below.) |
LTC is connected via the analog Mic/Line input of the MADIfaceXT and routed internally via the RME TotalMix application. Alternatively, the LTC analog audio signal can be converted to MADI. | |
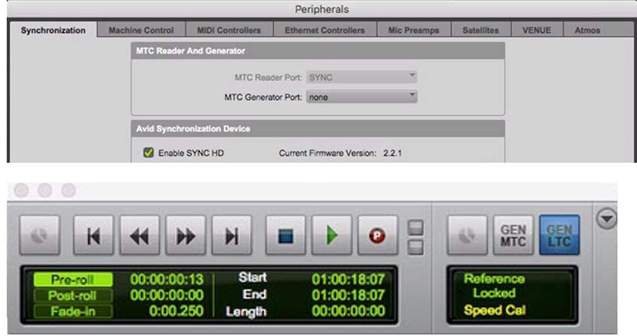
To use the AVID SYNC HD or Pro Tools | Sync X to generate LTC, do one of the following:
- Enable the Avid Synchronization Device in Setup > Peripherals > Synchronization and select LTC in the Synchronization section of the Edit Window.
- Enable the Avid Synchronization Device in Setup > Peripherals > Synchronization and select GEN LTC in the Transport window.

If GEN LTC or LTC is not visible, click the drop-down arrow at the top right of the Transport window or Edit Window toolbar and check the box to show the Synchronization view.
RMW Renderer Preferences and Settings
Lesson 4 of 6
When running a Remote Mastering Workstation, the Renderer software must be properly configured to communicate with the Pro Tools DAW computer.
The Driver tab is where primary configuration for the available I/O hardware and software takes place. This should be set based on the configuration used.
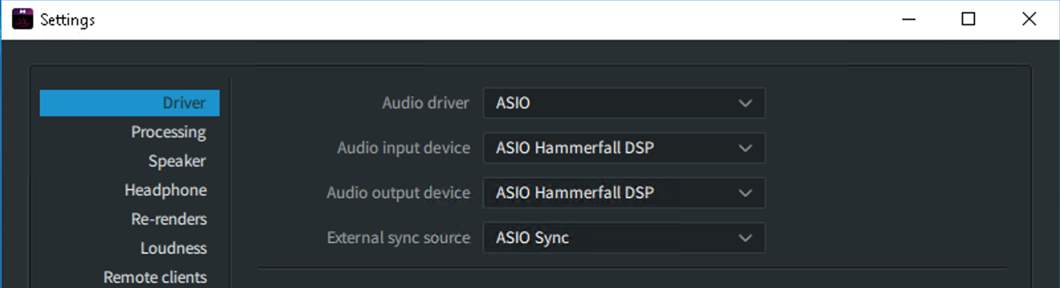
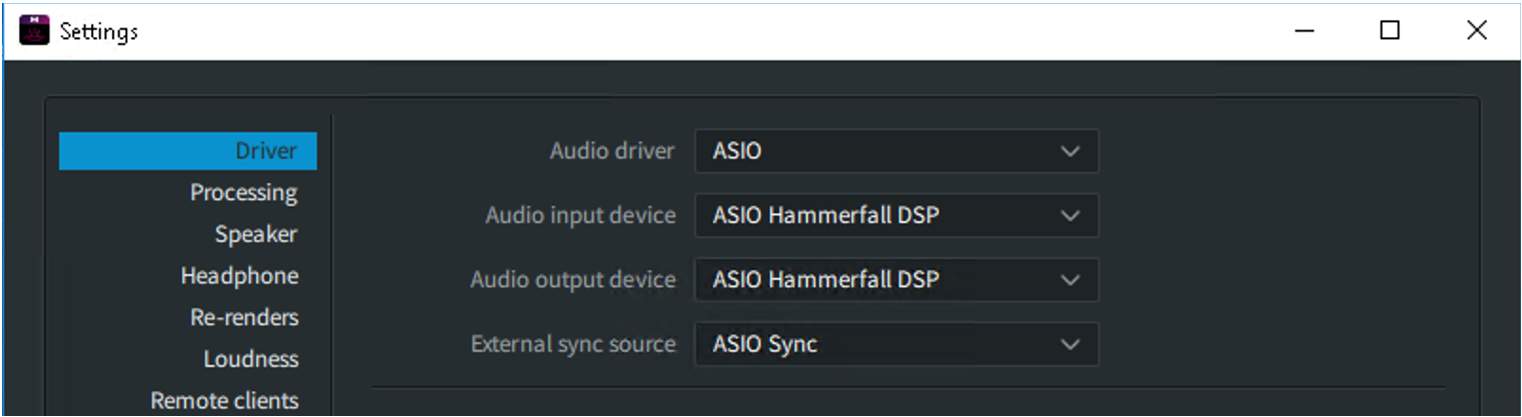
On Windows-based MADI systems using HDSPe cards, configure the settings as follows:
- Audio driver: ASIO
- Audio input device: ASIO Hammerfall DSP
- Audio output device: ASIO Hammerfall DSP
- External sync source: ASIO Sync
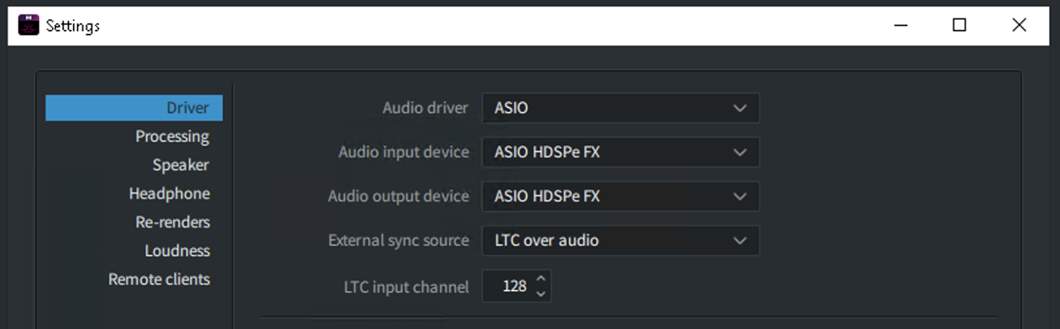
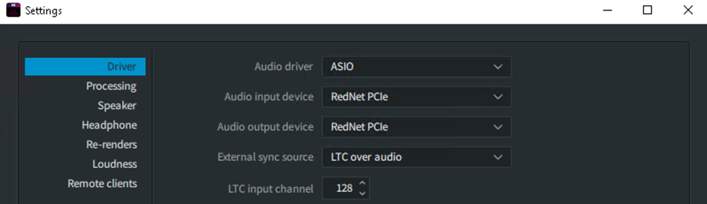
On Windows-based MADI systems using the MADI FX card, configure the settings as follows:
- Audio driver: ASIO
- Audio input device: ASIO HDSPe FX
- Audio output device: ASIO HDSPe FX
- External sync source: LTC over audio
- LTC input channel 128
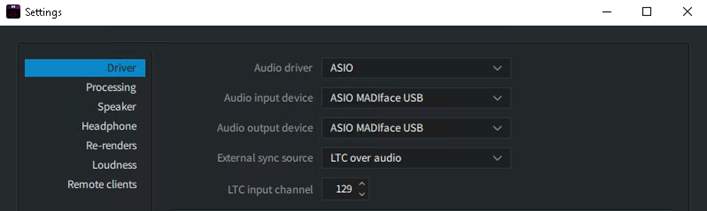
On Windows-based MADI systems using the MADIfaceXT USB interface, configure the settings as follows:
- Audio driver: ASIO
- Audio input device: ASIO MADIfaceUSB
- Audio output device: ASIO MADIface USB
- External sync source: LTC over audio
- LTC input channel 129
On Windows-based Dante systems, configure the settings as follows:
- Audio driver: ASIO
- Audio input device: ASIO Focusrite Rednet PCIe
- Audio output device: ASIO Focusrite Rednet PCIe
- External sync source: LTC over audio
- LTC input channel: 128
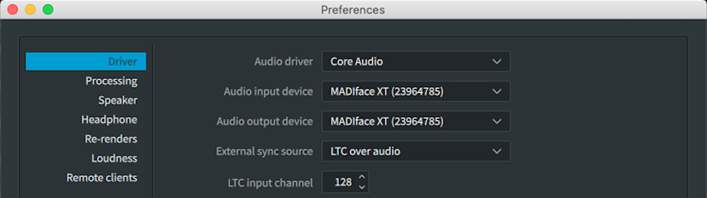
On Mac-based MADI systems using the MADIfaceXT USB interface, configure the settings as follows:
- Audio driver: Core Audio
- Audio input device: RME MADIface XT
- Audio output device: RME MADIface XT
- External sync source: LTC over audio (set by Core Audio driver selection)
- LTC input channel: 128 over MADI or 129 via Analog Mic/Line Input
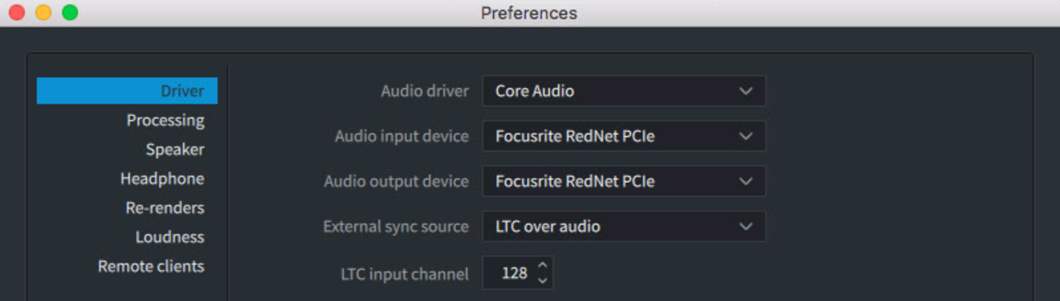
On Mac-based Dante systems, configure the settings as follows:
- Audio driver: Core Audio
- Audio input device: Focusrite Rednet PCIe
- Audio output device: Focusrite Rednet PCIe
- External sync source: LTC over audio (set by Core Audio driver selection)
- LTC input channel: 128
Use of MIDI Time Code (MTC) is also an option. However, Linear Time Code (LTC) is recommended over MTC, especially for punch-in operations.
On Windows-based MADI systems, the frame rate must also be set on the TCO card via the Hammerfall DSP Settings control panel (opened from hidden icons on the task bar). The frame rate must match the Renderer settings for both new and open master files to chase LTC.
Sample rate
48 kHz or 96 kHz
Renderer Remote Server Section
The Server Select section in the Renderer Remote application allows an IP address or host name to be selected or entered in order to enable communication between the Renderer Remote and Dolby Atmos Renderer on a Rendering and Mastering Workstation (RMW). The Server section is not included in the Dolby Atmos Renderer. Click each icon (i) to learn about the details of this section before proceeding.

Pulling I/O Configuration from the Renderer
Lesson 1 of 6
As an alternative to manually setting up your Pro Tools I/O Setup dialog box, the I/O configuration can be pulled from the Renderer. This can be especially useful if a more complex input configuration has been defined in the Renderer.
- 11First clear all asssignments in the Output and Bus tabs.
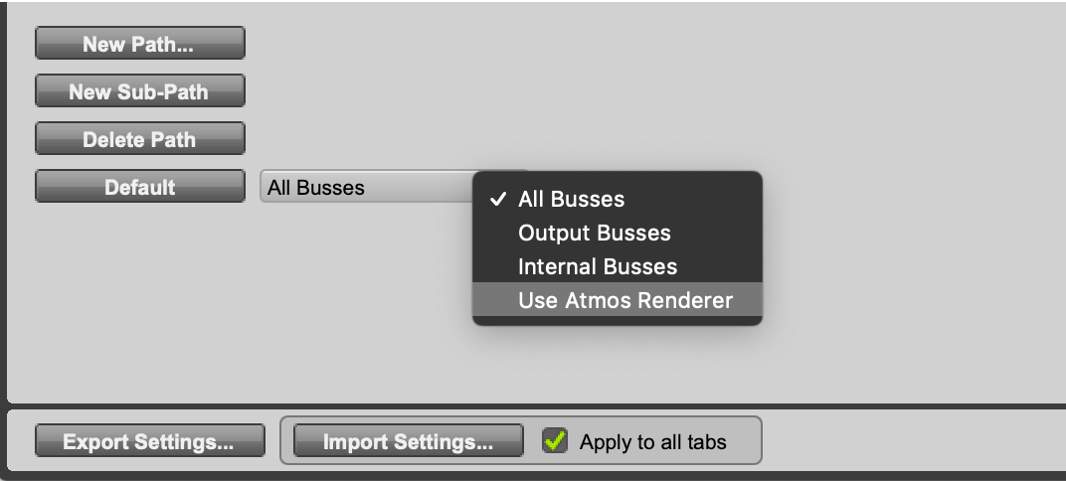
- 22From the Bus tab, click on the drop-down menu to the right of the Default button and change from All Busses to Use Atmos Renderer. Click Default and both the Output and Bus tabs will automatically populate using the input configuration as currently set in the Renderer.
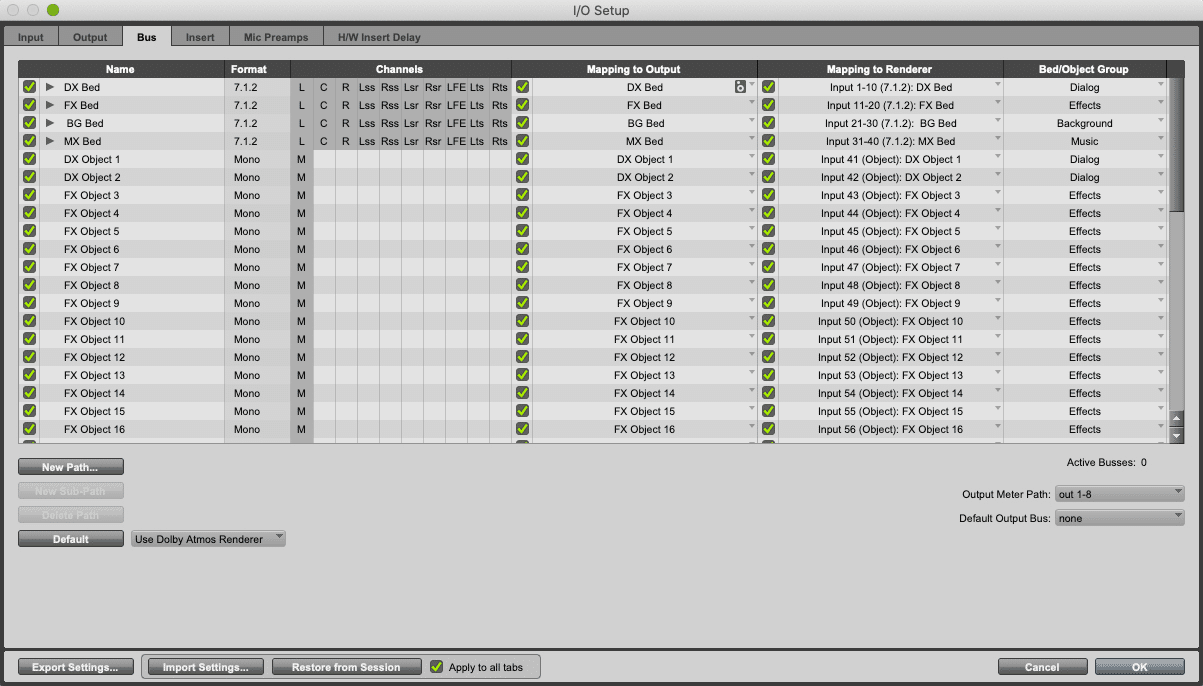
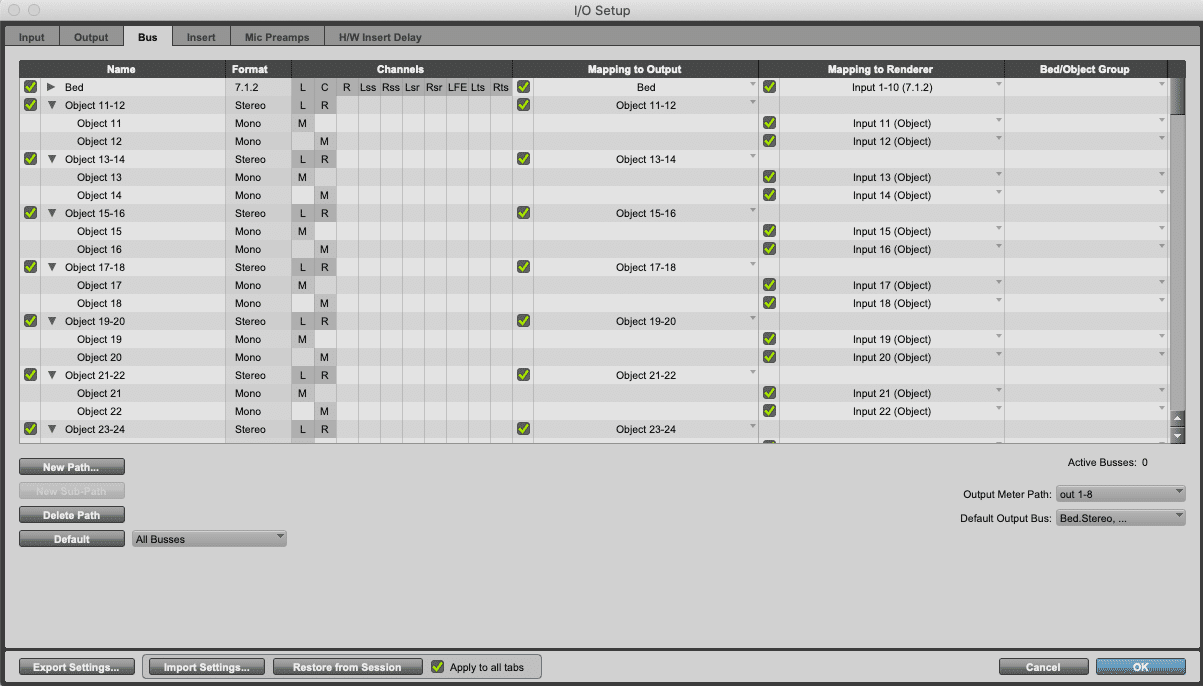
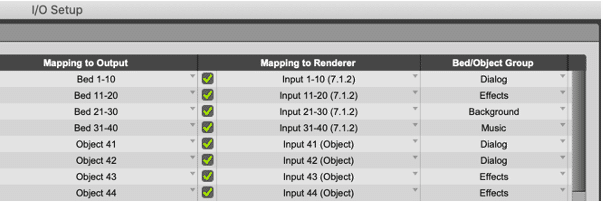
When pulling the I/O configuration from the Renderer any existing group names and assignments will also be created in the Bed/Object column of the Bus tab. Group naming and assignments can be controlled from the Renderer or independently in Pro Tools as well as from an imported ADM BWF file (discussed later in this lesson). An example of a multiple Bed I/O configuration with additional input description and group names and assignment populated is shown below.
It is important to realize that the Bed/Object Group column does not “push” any information to the Renderer. It is used exclusively to include Group names and assignments when bouncing a mix to ADM BWF. This will be discussed in a later module.
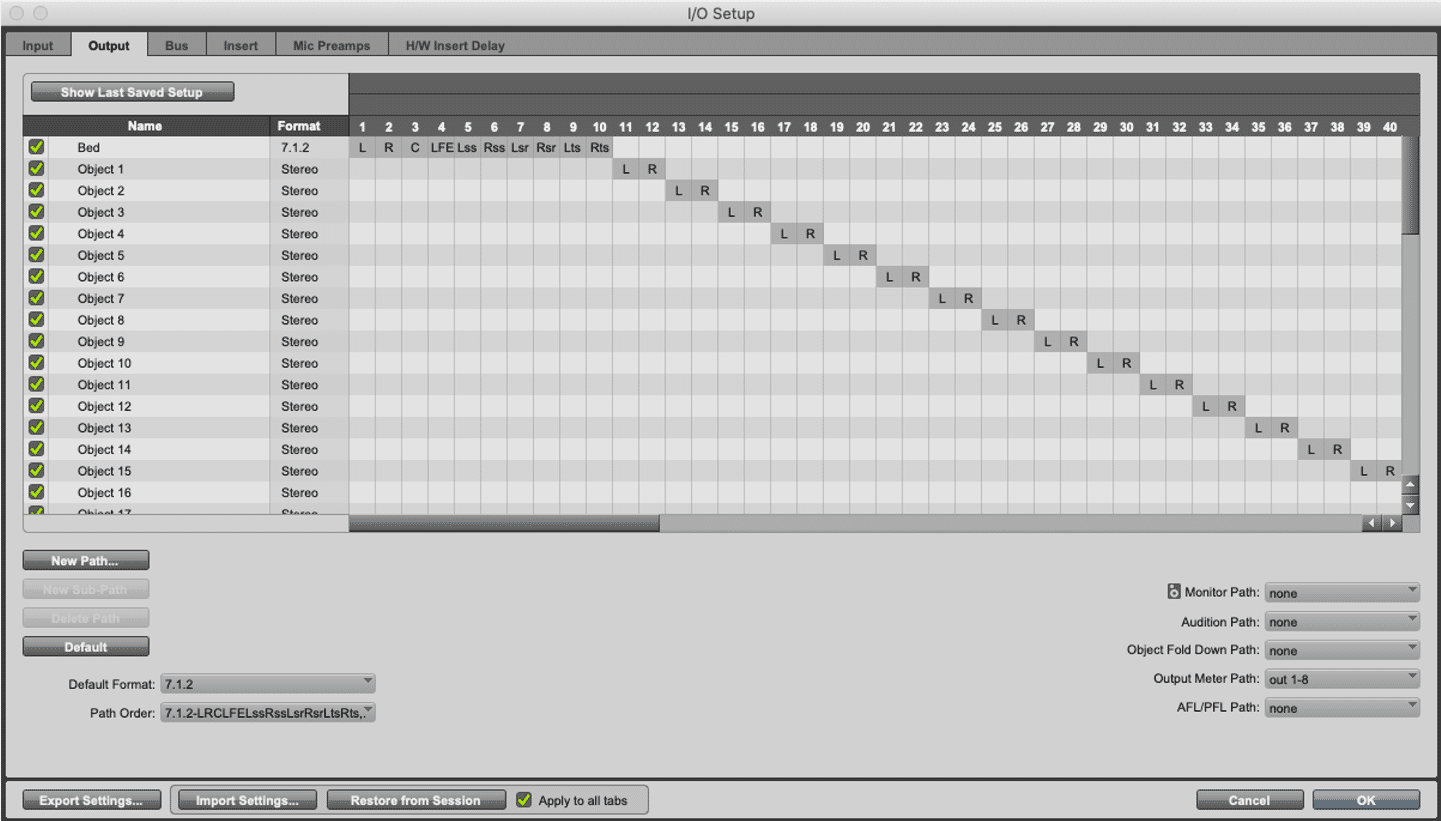
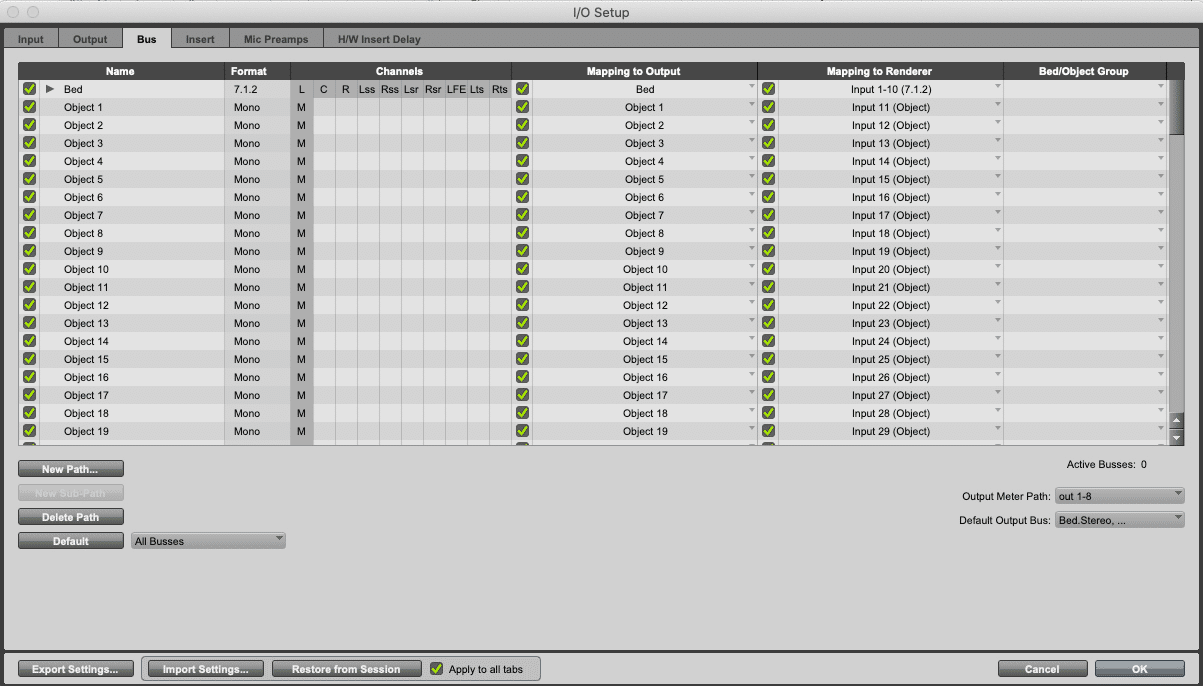
Note that pulling the I/O configuration from the Renderer will always create mono outputs, which can limit the usefulness of this function if the use of stereo Objects is desired, as detailed below.
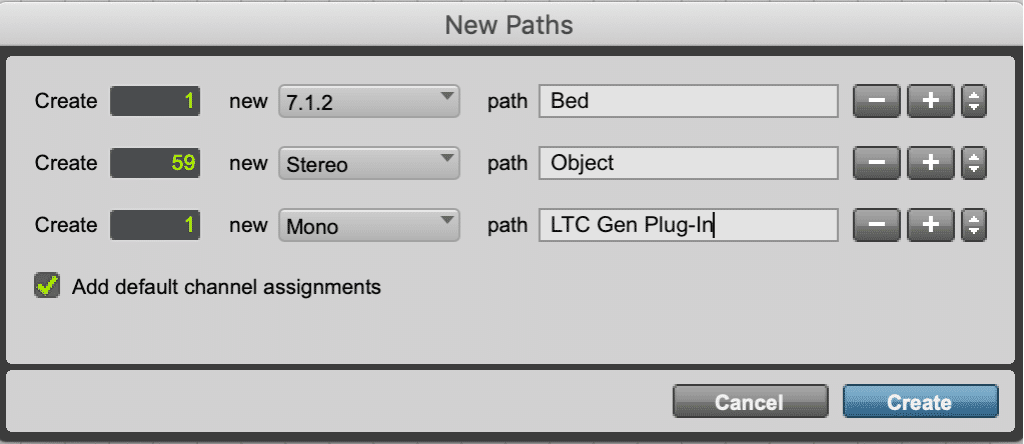
It is possible to create stereo outputs with mono subpaths that are mapped to the Renderer. This allows for both stereo and mono tracks to be used as Objects in the session. While this is more cumbersome to set up, it provides for greater flexibility. This subject is covered in a later module.
The Dolby Audio Bridge Stereo template (.ptxt) configures the I/O in this way, with the exception of a track for the LTC Generator plug-in. This can be a useful tool to save time when configuring new sessions.
Play Video
Importing Object Track Data from Another Session
Lesson 2 of 6
When importing session data into Pro Tools from another Dolby Atmos session, the Object output path assignments (if any) can be imported and the Bus/Object toggle setting for the tracks selected for import. This is vital when importing tracks that are already defined as objects in another session.
With the introduction of Pro Tools 2020.11 it also possible to import the group assignments of Bed and Object tracks from another session.
In order to enable this setting, Pro Tools must first be set to manage Bed/Object group from the I/O Setup Bus tab.
Set Pro Tools to Manage Bed/Object Groups
Follow this procedure to set Pro Tools to manage Bed/Object groups.
Step 1
Open the Bus tab.
Open the I/O Setup dialog box (Setup > I/O), and click the Bus tab.
1
2
3
4
5
Step 2
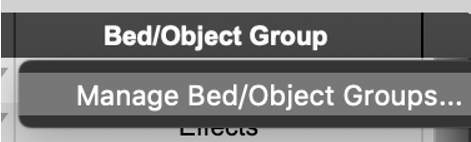
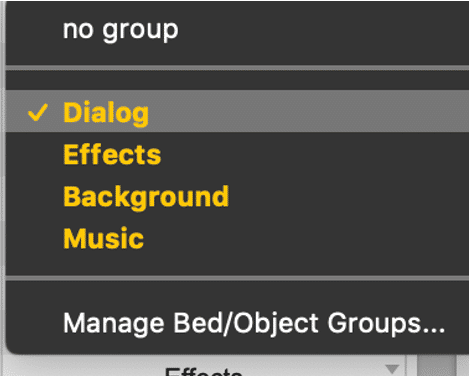
Reveal Manage Bed/Object Groups.
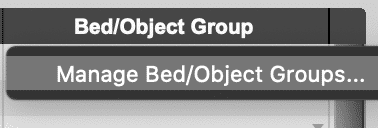
Click within the Bed/Object Group column to reveal Manage Bed/Objects Groups.
1
2
3
4
5
Step 3
Open the Bed Object Groups window.
Click Bed/Object Groups to open the Manage Bed/Object Groups window.
1
2
3
4
5
Step 4
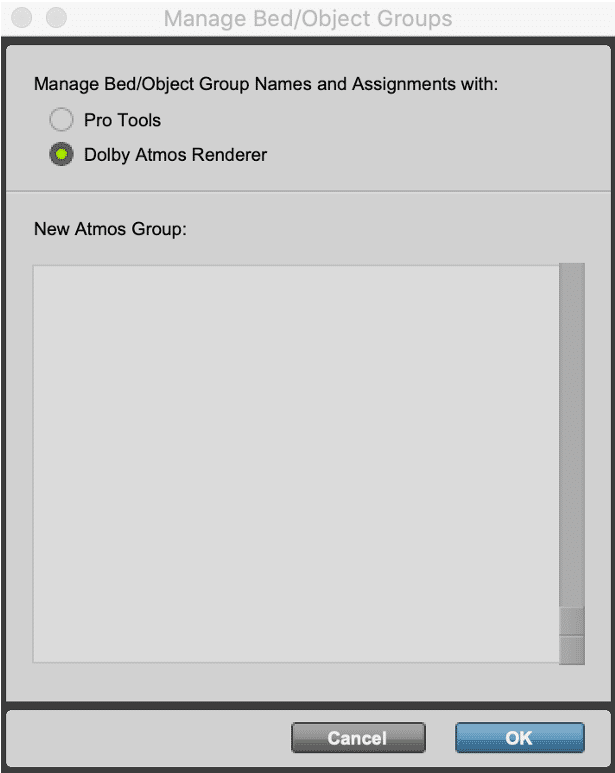
Take control from the Renderer.
Click OK to take control of Bed/Object Groups from the Renderer. At this time Bed/Object Groups will not be manually entered, but the option to import Bed/Object Groups when importing session data will be available.
1
2
3
4
5
Step 5
Click OK to close the I/O Setup.
1
2
3
4
5
Import Object Tracks from Another Session
Follow this procedure to import Object tracks from another session.
Step 1
Show Session Data.
Choose File > Import > Session Data (Option+Shift+I on Mac, Alt+Shift+I on Windows).
1
2
3
4
Importing ADM BWF as Session Data
Lesson 3 of 6
Pro Tools can import and play back an ADM BWF .wav master file with all audio and metadata converted to pan automation.
Preparing Your Session’s I/O Setup
When importing an ADM BWF file there are two approaches to the Pro Tools session’s I/O Setup:
- bulletThe Output and Bus tabs of the I/O Setup dialog box can be cleared and will be recreated when the ADM BWF is imported.
OR
- bulletThe I/O Setup can be prepared so that the incoming ADM BWF uses the existing paths.
Importing an ADM BWF with an existing I/O that hasn’t been cleared or prepared can result in unpredictable mapping and extra busses. If importing an ADM BWF into an existing session, extra attention must be paid to the I/O Setup’s Bus tab.
Preparing the I/O can be performed manually by adding output paths, by importing a .pio file, or by opening the ADM BWF in the Renderer and then pulling the I/O configuration from the Dolby Atmos Renderer using the Dolby Atmos Renderer as the Default in the I/O Setup Bus tab.
Using the Import Session Data Dialog Box
To import an ADM BWF .wav file into Pro Tools using the import session data function, follow the procedure below:
Step 1
Create a new Pro Tools session.
Create a new 24-bit, 48 kHz Pro Tools session.
1
2
3
4
5
6
7
8
Step 2
Open the I/O Setup.
Choose Setup > I/O to open the I/O Setup dialog box.
1
2
3
4
5
6
7
8
Step 3
Delete Output and Bus paths.
1
2
3
4
5
6
7
8
Step 4
Open the Import Session Data dialog box.
Choose File > Import > Session Data
1
2
3
4
5
6
7
8
Step 5
Locate the file to import.
Navigate to and select the ADM BWF .wav file you want to import, then click Open.
1
2
3
4
5
6
7
8
Step 6
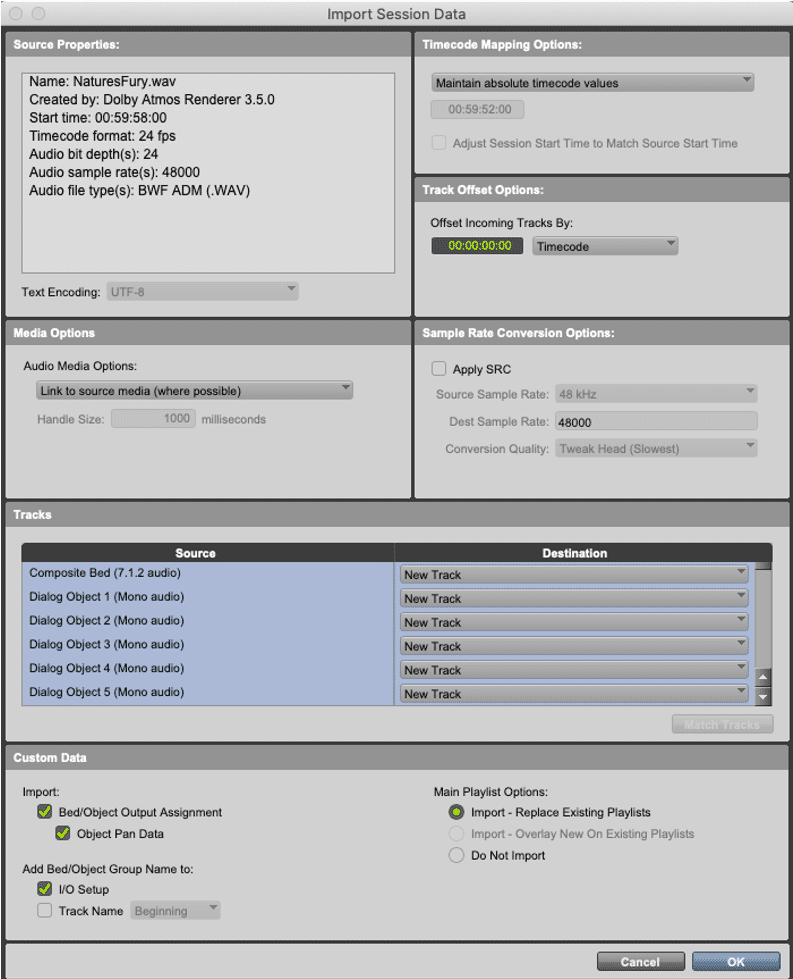
Set tracks and destinations.
In the Import Session Data dialog box, hold the Option key (Mac) or Alt key (Windows) and click on one of the Source tracks in the Tracks section to select them all and set their Destination to New Track.
1
2
3
4
5
6
7
8
Step 7
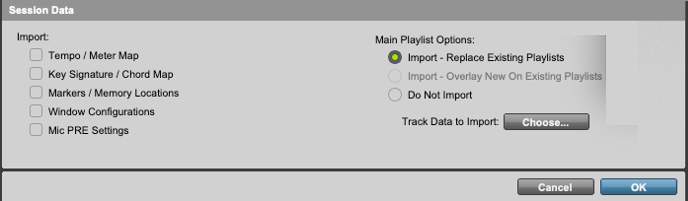
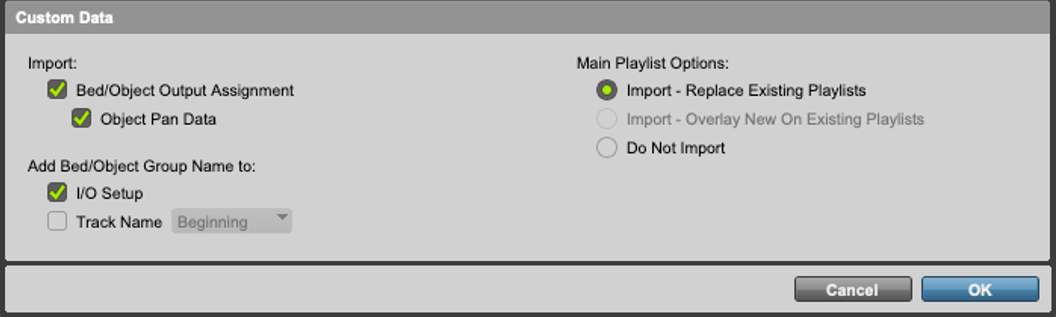
Select the Custom Data to Import.
Options are:
- Bed/Object Output Assignment – Imports Bed and Object output path assignments for imported tracks.
- Object Pan Data – Imports Dolby Atmos metadata and converts it to track pan automation.
- Add Object Group Name to I/O Setup – Imports the Bed and Object group assignments from the ADM BWF if present. For this option to be revealed Pro Tools must be set to manage Bed/Object Group names and assignments in the I/O Setup Bus tab as described in the previous article. On ADM BWF import these group assignments will be visible in the Bed/Objects Group column of the I/O Setup Bus tab. These are utilized if bouncing a mix to ADM BWF. The must be done prior to deleting Bus paths. Bouncing a mix to ADM BWF will be discussed in module 8.
- Add Object Group Name to Track Name – Adds the Object group name to the Beginning or the End of the track name, as specified. If descriptions were used in the Renderer Input Configuration window when mastered, they will be included in the ADM BWF export and be visible in the Tracks pane (as shown below) and included in the Pro Tools track names. If so, including the group name in the track name is not necessary and will just make it hard to read the track names. If not, and the track names listed are just numbers in the tracks pane then including the group names can be helpful. Input descriptions will be discussed in a later module.
1
2
3
4
5
6
7
8
Step 8
Complete the configuration.
Configure any other Import Session Data settings as desired, then click OK.
1
2
3
4
5
6
7
8
An alternative to Add Bed/Object Group Name to I/O Setup is to set the Dolby Atmos Renderer to Manage Bed/Object Group Names and Assignments in the I/O Setup Bus tab and open the ADM BWF in the Renderer. Group names and assignments will be pulled from the Renderer. Pro Tools can then be set to Manage Bed/Object Group Names and Assignments to prevent any further changes.
Play Video
Importing Audio Only
You can also import audio from an ADM BWF .wav file using the Import Audio command or by dragging and dropping the file into a session. However, only the audio will be imported when using these methods.
MP4 Export
Lesson 4 of 6
The Dolby Atmos Renderer allows the user to export an MP4 file for quality control (QC) playback on consumer devices and other use cases.
MP4 files are exported from an open master file (48 kHz only).
The primary use case for the MP4 export is QC of the encoded Dolby Atmos mix on consumer playback equipment, e.g., audio/video receiver (AVR) or soundbar.
A few examples:
- bulletTransferring the MP4 file to a USB flash drive and playing back via a Blu-ray player with the audio set to bitstream passthrough.
- bulletPlayback via the Safari browser airplayed to an AppleTV4K.
- bulletThe MP4 file can also be played back in the Dolby Reference Player application.
- bulletThe MP4 can also be used as the audio master for packaging streaming media.
The MP4 can also be used as the master for packaging streaming media.
The exported MP4 files contain an audio track and a few options for a video track.
The video track in the MP4 file can be:
- bulletBlack video at 720p resolution and 24fps encoded with the h264 video codec. This frame rate is independent of the frame rate of the open master file. The video track is included because many media players will not play an audio-only MP4 file.
- bulletNo video, for use where an audio-only MP4 file is required.
- bulletCustom video
The audio track is encoded from the open Master File:
- bullet The Music encoding mode encodes a Dolby Digital Plus JOC file at a bit rate of 768kbps using the Music Light Dynamic Range Control profile.
- bulletThe Film encoding mode encodes a Dolby Digital Plus JOC file at a user selectable bit rate of 448kbps or 768kbps using the Film Light Dynamic Range Control profile.
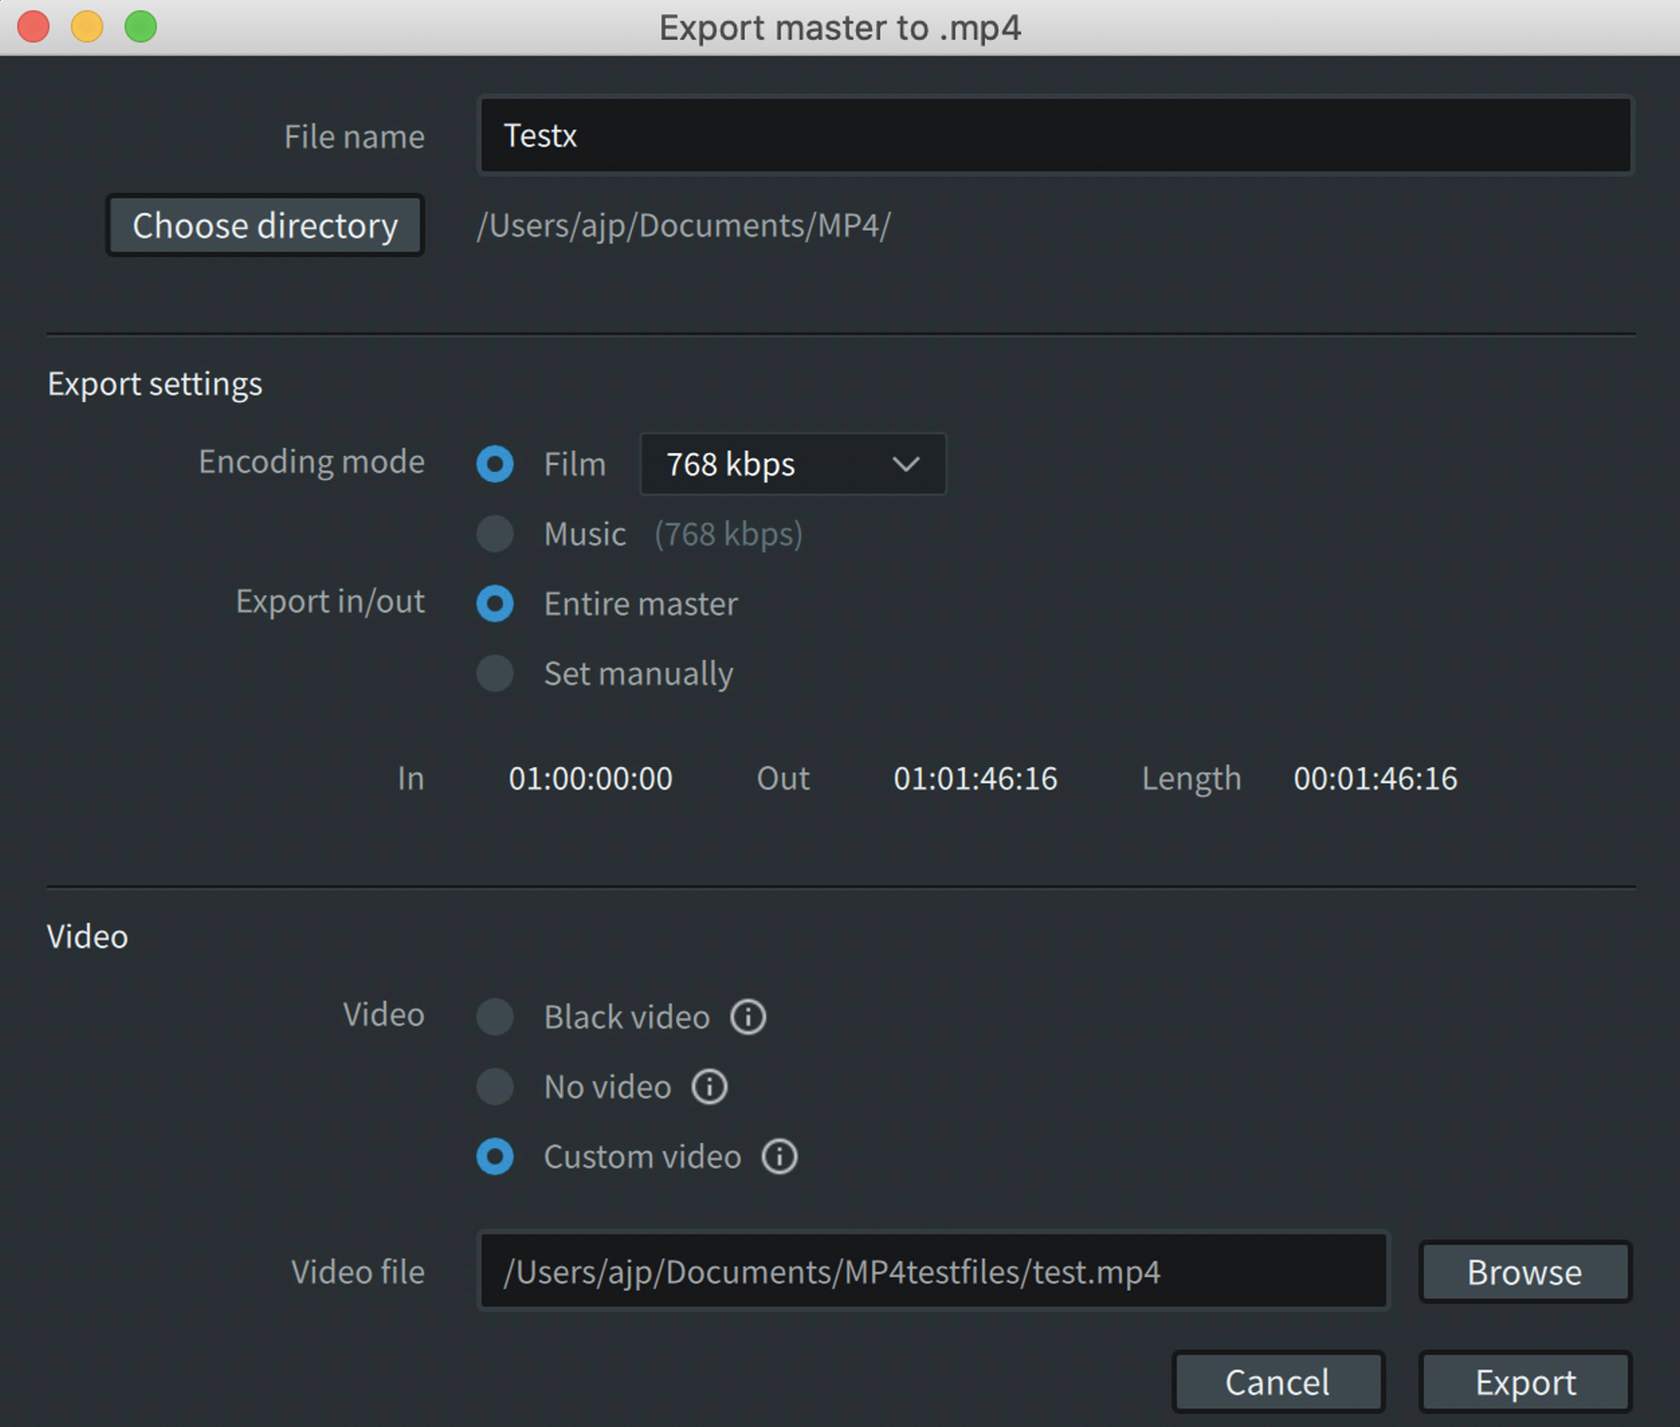
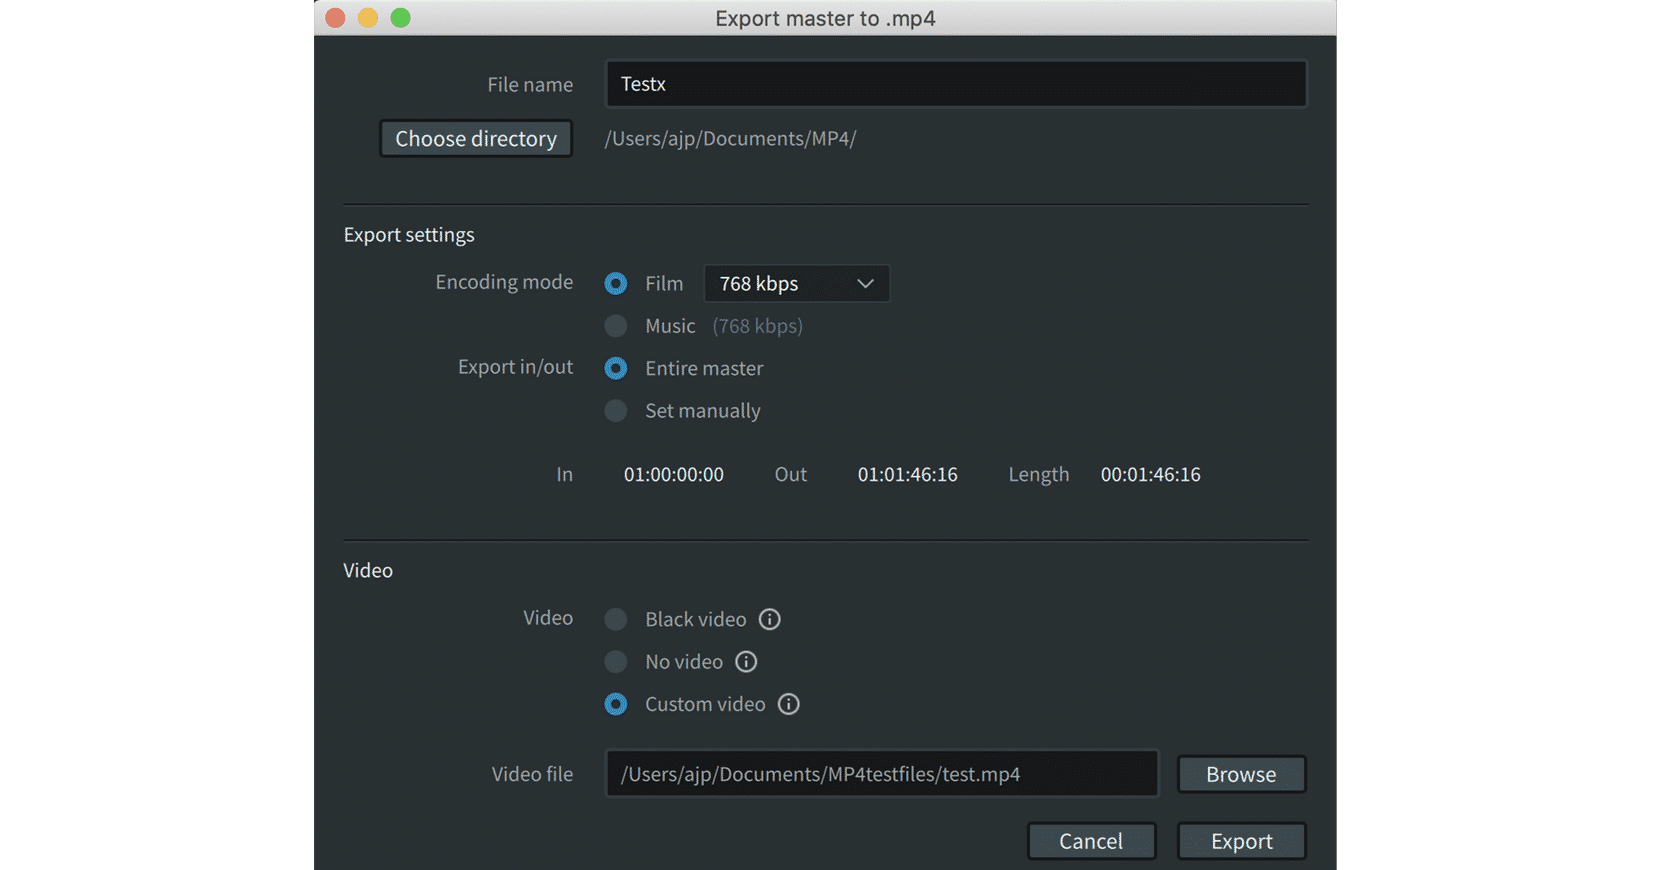
Exporting an MP4 File
Any audio in the MP4 will be discarded. If the custom video does not match the duration of the open Atmos Master, the duration of the resulting MP4 will conform to the longer duration of either the Atmos Master or the custom video file.
Dialog/notification boxes will appear if the custom video file cannot be used, if the frame rate does not match, or if the video file does not match the duration of the selected audio export.
- 11From the menu bar, navigate to File > Export MP4 or press Command+Shift+M (Mac) or Control+Shift+M (Windows).
- 22Follow the steps shown below to export the file. Click each step to view the details.
To export an MP4 file, first load a master file (48 kHz only), then open the Export dialog box:
Custom Video in MP4 Exports
Multiplexing custom video into the MP4 was introduced with the Renderer v3.7 and provides a way to QC an MP4 with video and Dolby Atmos audio.
Note that while the audio export in/out points can be set manually to trim any pre and/or post roll, there is no such control for custom video. To ensure playback is in sync, the start point of the video must match the In point of the Atmos Master or manually set in point.
If additional silence is required for the Atmos Master this can be added using the Dolby Atmos Conversion Tool.
Custom video requirements:
- bulletThe video container/file format supported is .mp4 or elementary video .h264
- bulletThe only video codec supported is h264
- bulletThe video frame rate must match the frame rate of the open Master file
Renderer Trim and Downmix Controls
Lesson 3 of 6
The Dolby Atmos Renderer provides metadata controls to determine how the 5.1 and 2.0 downmixes are derived from a Dolby Atmos mix. This impacts how they will sound during monitoring, playback with 5.1.2 (or 5.14) speaker layouts, re-renders, and when creating the 5.1 core used during Dolby Digital Plus JOC encoding for streaming services.
Two sets of controls are used for this purpose: Downmixes and Trims.
Downmix and trim metadata in the master file is used in the encoding process and determines how the 5.1 core of a Dolby Digital Plus JOC bitstream will sound on legacy equipment, or when Dolby Atmos is decoded with a speaker layout of less than 7.1.
Downmix modes can be independently set for monitoring and re-renders if needed for both 5.1 and stereo. This can be useful in modifying how stems will sound, as those will be remixed/summed later in localization workflows.
Downmix modes used for the master file and for re-renders can be optimized independently as needed. There are different downmix modes available based on mixers’ preferences and use cases. The 5.1 to
2.0 downmix happens after the 5.1 downmix, meaning that the 5.1 downmix mode will also impact the resulting 5.1 to 2.0 downmix.
Automatic trim mode provides optimized rendering to avoid any troublesome sonic buildup from overhead and rear content when monitoring with 2.0, 5.1, 5.1.2, and 7.1 speaker layouts. The automatic mode settings are sufficient for the vast majority of mixes. However, a manual mode is provided for more creative control, if needed. None of these modes affect how the rendered Dolby Atmos mix will sound when more than 5.1 floor speakers are used (i.e. 7.1.2, 7.1.4, 9.1.6 speaker layouts).
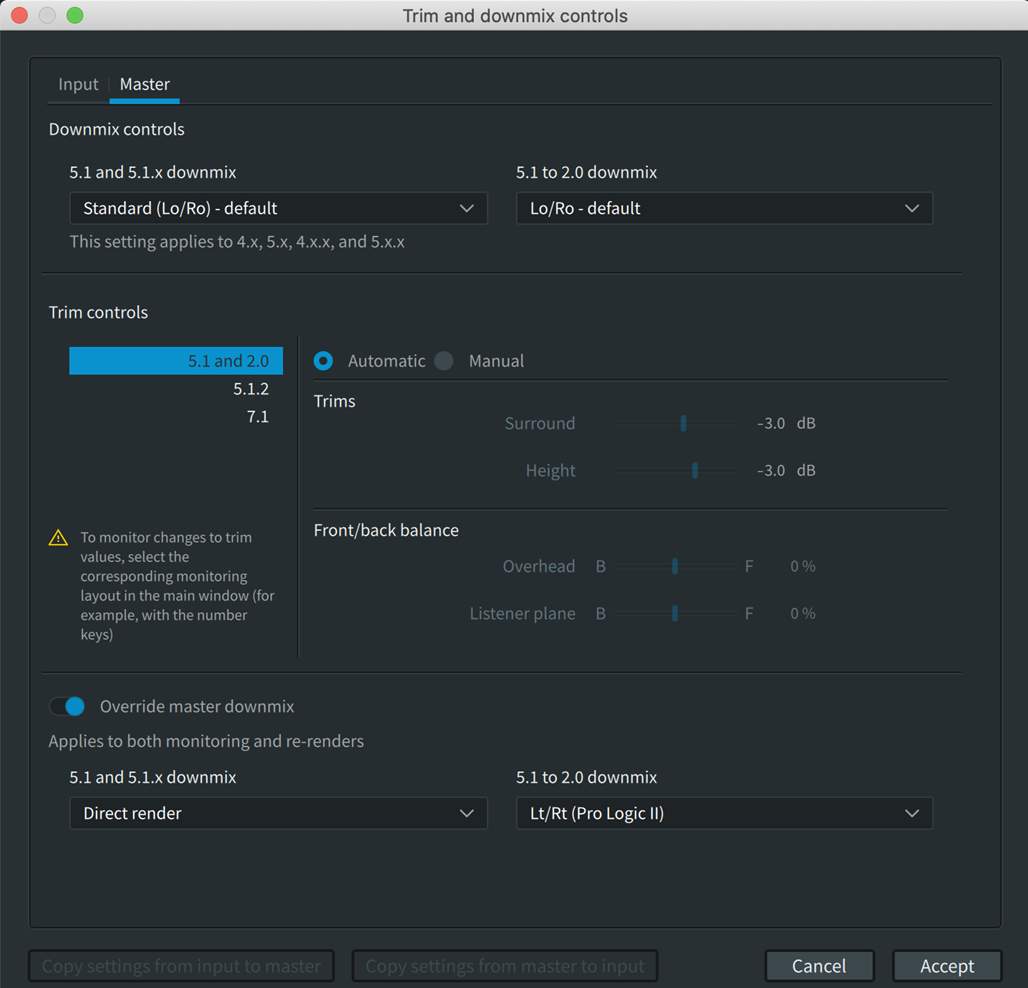
The Trim and Downmix Controls Window
The Trim and Downmix Controls Window is used to set:
- bulletDolby Atmos-to-5.1 and 5.1-to-2.0 Downmix metadata for master files – when recording a master file or to edit metadata in an unlocked .atmos master file
- bulletDolby Atmos-to-5.1 and 5.1-to-2.0 Downmix settings for monitoring and re-renders
- bulletTrim Controls for 5.1 and 2.0
- bulletTrim Controls for 5.1.2
- bulletTrim Controls for 7.1
To open the Trim and Downmix Controls Window navigate to the menu bar Window > Trim > Downmix Controls, or press Command+T (Mac), or Ctrl+T (Windows).
Take a few minutes to familiarize yourself with the interface. Click each informational icon (i) to view the details before proceeding.
Trims and Downmix Status Indicator
If the Input and Master trim and downmix controls do not match, an orange indicator will be visible in the bottom left of the Renderer main window. This indicator will turn off when the “Input” and “Master” match, indicating that punch-ins to the open Master are permitted.

Override Master Downmix
In addition to separating Input trim and downmix modes from an open Master, v3.7 of the Renderer introduces the ability to override the downmix modes of an open Master for monitoring or for generating re-renders without editing the program level metadata.

With the Override master downmix toggle switch is engaged, both 5.1, 5.1.x and the 5.1 to 2.0 downmix modes can be altered from the settings in the open Master file.
When different downmix modes are applied to re-renders, a notification will appear in the re-render window and the re-render export window alerting the user that the override downmix is active.


Downmix and Trim Metadata, Monitoring, and Re-renders
Downmix and trim metadata is written into the master file and can be edited/updated on a previously created .atmos master file that has been unlocked for editing. This metadata applies to the entire file and cannot be varied per “scene.”
Downmix Modes
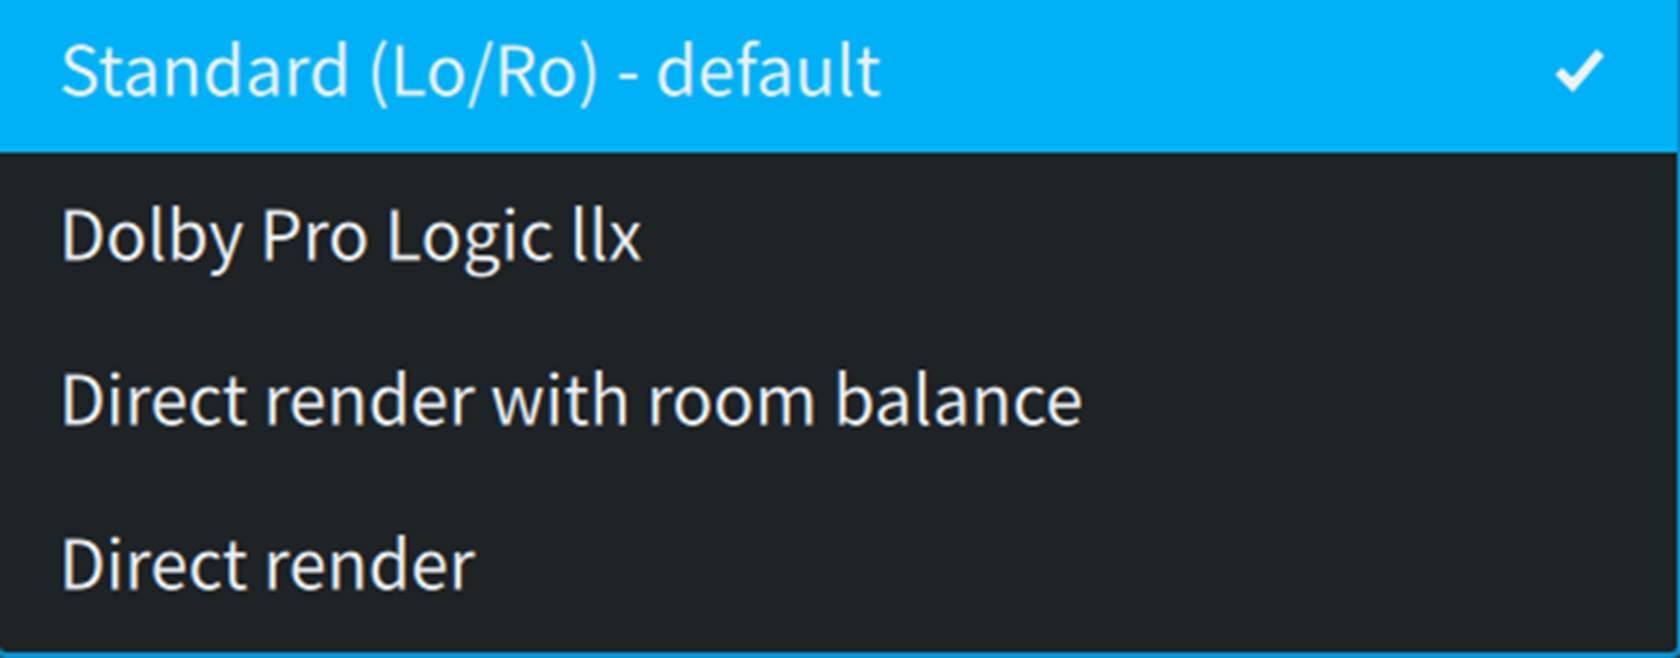
To create a 5.1 downmix, two basic methods are used. The Dolby Atmos Renderer either renders to 7.1 (applying trims) and then downmixes to 5.1, or the Renderer downmixes directly to 5.1. There are two choices for either method.
For creating a 5.1 downmix from an initial 7.1 re-render, the mixer can choose either Standard (Lo/Ro) – default or Dolby Pro Logic IIx. Both determine how the rendered rear surrounds downmix to 5.1.
Standard Lo/Ro
Standard Lo/Ro sums the rear and side surrounds in equal measure, using the following coefficients:
- bulletLs = 0 dB × Lss + 0 dB × Lrs
- bulletRs = 0 dB × Rss + 0 dB × Rrs
Pro Logic IIx
Pro Logic IIx is a matrix-encoding technology originally developed for encoding rear surrounds of 7.1 mixes into 5.1 to provide 7.1 playback in home theaters from 5.1 sources. When used to downmix rendered 7.1-to-5.1, the intended use case may indeed be for the 5.1 Pro Logic IIx to be decoded to 7.1; however, some mixers simply prefer the sound of a 5.1 mix encoded using Pro Logic IIx.
ProLogic IIx uses the following downmix coefficients:
- bulletLs = Lss + (–1.2 dB × Lrs) + (–6.2 dB × Rrs)
- bulletRs = Rss + (–6.2 dB × Lrs) + (–1.2 dB × Rrs)
Direct 5.1 Downmix Modes
When creating a direct 5.1 downmix from the Renderer, the mixer can choose Direct Render or Direct Render with Room Balance.
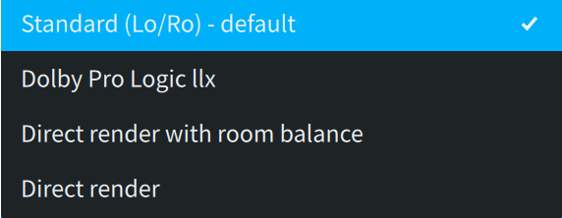
- bulletDirect Render renders to 5.1 (without first downmixing via 7.1) to recreate the 7.1 sound field at the central listening position using phantom imaging between the surround speakers and front speakers in order to maintain rear surround and side surround panning intent which is lost when using a summing downmix.
- bulletDirect Render with Room Balance renders to 5.1 as above but avoids some of the possibly unfavorable characteristics of Direct Render. Because Direct Render uses phantom imaging between the surround speakers and front speakers, it sometimes sounds ‘front heavy’ and can also result in comb filtering artifacts between the fronts and surrounds. Direct Render with Room Balance applies an updated Dolby rendering algorithm that reduces the comb filtering effects associated with phantom imaging of objects positioned halfway between the front and rear of the room. Room balance refers to how the Renderer deals with content that is panned between the midpoint and rear of the room. Using room balance, the content is presented at a constant level in the surround speakers between the rear and midpoint of the room, avoiding any need for phantom imaging until it is in the front half of the room.
5.1 to 2.0 Downmix Modes
All of the 2.0 downmix options are created by first creating a 5.1 downmix from the 7.1 render of the Dolby Atmos mix, and then downmixing from 5.1-to-2.0 in the same manner as 2.0 consumer products. The choice of the 5.1 downmix method above affects the subsequent 5.1 to 2.0 downmix.
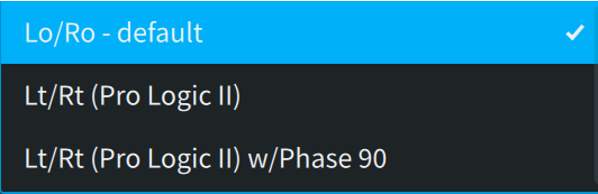
- Lo = L + (–3 dB × C) + (–3 dB × Ls)
- Ro = R + (–3 dB × C) + (–3 dB × Rs)
- Lt = L + (–3 dB × C) – (–1.2 dB × Ls) – (–6.2 dB × Rs)
- Rt = R + (–3 dB × C) + (–6.2 dB × Ls) + (–1.2 dB × Rs)
- Lt = L + (–3 dB × C) – (–1.2 dB × Ls) – (–6.2 dB × Rs)
- Rt = R + (–3 dB × C) + (–6.2 dB × Ls) + (–1.2 dB × Rs)
A 90-degree phase shift to Ls/Rs is applied prior to feeding the downmix, which reduces undesirable phase cancellation, improves imaging, and enables proper matrix decoding. It is recommended to use the 90-degree phase shift for any Lt/Rt downmixes.
Trim Controls
When set to manual, the mixer can audition the trim controls in real time:
- bulletSurround and Height sliders apply trims (in dB) to the default fold-down behavior for the surround and overhead content.
- bulletOverhead and Listener Plane sliders set how height content (Overhead) and surround content (Listener Plane) fold down, pushing more towards the front or rear of the soundscape.
Note that trim controls apply to the entire file. Manual control should not be used to optimize one scene at the expense of the rest of the content.
Interaction of Trim and Downmix Modes
The trim controls for 5.1 and 2.0 are applied concurrently with the selected downmix modes. It is important to be aware of the characteristics of manual trims when selecting downmix mode. For example, adjustments to the Front/Back balance of the Listener Plane can impact the effectiveness of Direct Render with Room Balance.
Monitoring Layouts Needed to Audition Trim Controls
The default monitor layout of the Dolby Atmos Renderer is 7.1.4. If the mixer wants to make manual adjustments to trims for 5.1.2, a custom monitoring layout will need to be created in the Room Setup window to add the Ltm/Rtm in Speaker Setup and to add a monitoring layout for 5.1.2 in the Monitoring tab.
Play Video
Mastering Suite Features
Lesson 4 of 6
Though the Dolby Production Suite and Dolby Mastering Suite are largely similar, there are some features that are unique to the Mastering suite:
Array Mode
The Dolby Atmos Renderer running as the Dolby Atmos Mastering Suite reveals the option to use speaker arrays.
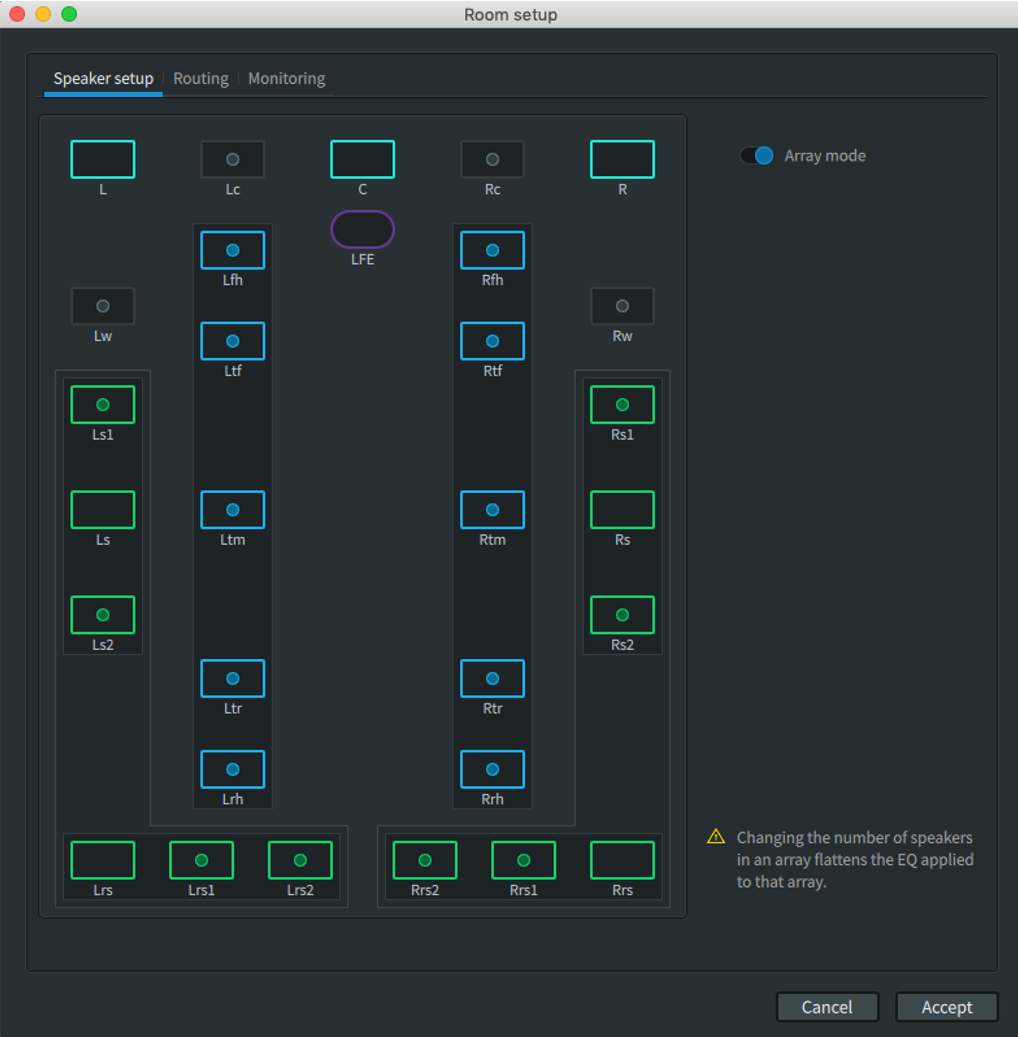
Array mode allows for the use of up to three speakers each for Ls, Lrs, Rs, Rrs, and up to five speakers for the Lts and Rts overheads comprised of front height, top front, top middle, top rear, and rear height.
Array mode is used in larger mix rooms and allows the Bed channels to address the entire array while Object Audio can still address each individual array speaker.
Spatial Coding Emulation is disabled when Array mode is enabled.
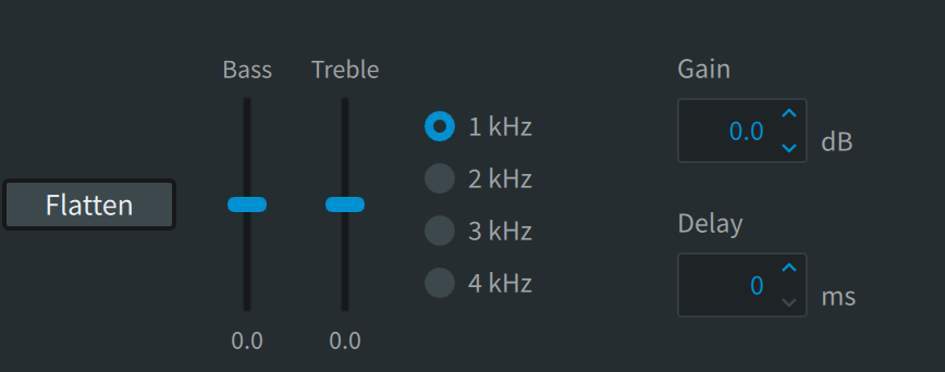
Speaker EQ
Once the gain has been adjusted for the system and the signals time-aligned, the graphic equalizer control can be used to adjust the EQ of each speaker and reduce any remaining coloration effects.
To adjust the equalization for any speaker, highlight the speaker and adjust the graphic equalizer. Any changes are applied immediately.
EQ settings can be copied and pasted between channels as needed, using the appropriate buttons, and can be reset with the Flatten button.
In addition to the graphic EQ controls, there are separate Bass and Treble shelf controls. For treble frequencies, select the desired frequency (1 kHz, 2 kHz, 3 kHz, or 4 kHz) to set the point at which high-frequency shelving will begin.
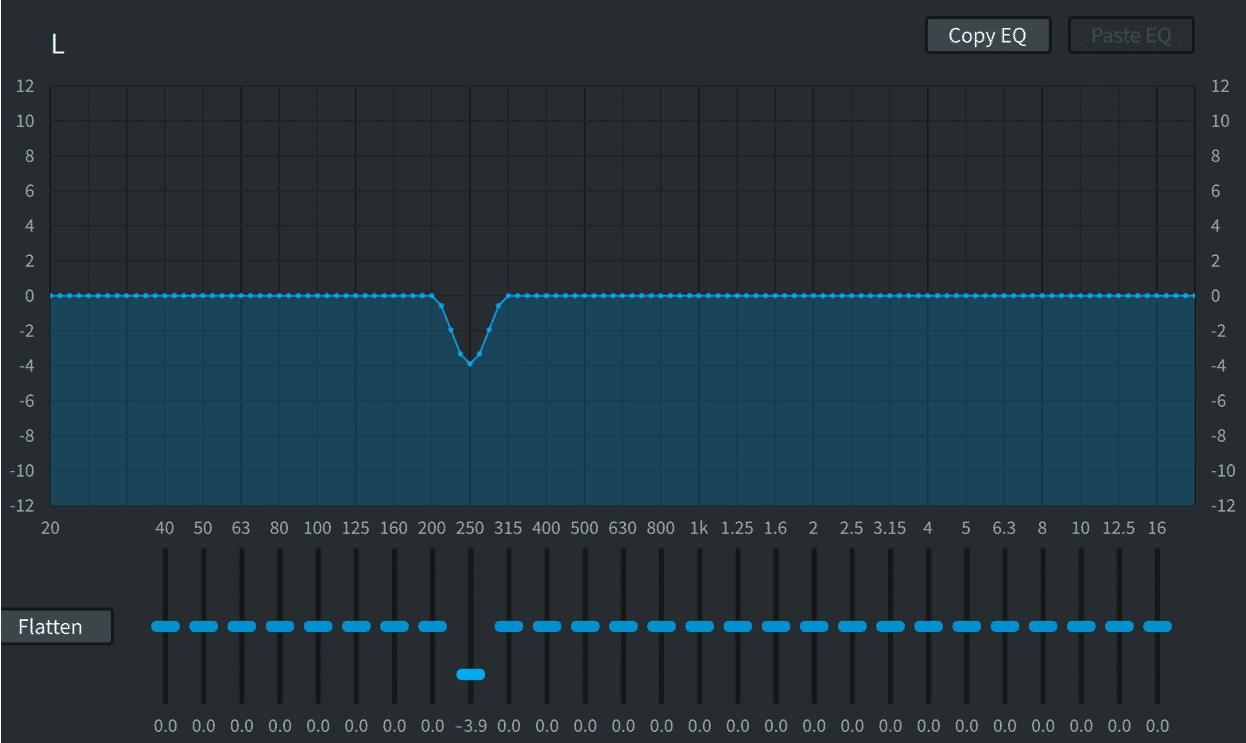
Global post-EQ Gain/Delay controls are also provided.
Bouncing Your Mix to ADM BWF
Lesson 1 of 7
With the release of Pro Tools 2020.11, Avid introduced the ability to bounce a mix to ADM BWF. This facilitates faster than real time mastering and eliminates the need to configure synchronization.
When choosing your deliverable format, it is important to remember that there are several functions that require the Dolby Atmos Renderer, including:
- Monitoring the Dolby Atmos mix with various speaker layouts and downmix selections
- Recording with punch-ins
- Generating re-renders, including binaural re-renders
- Optionally Generating program-level metadata for the bounce to ADM BWF
Preparing to Bounce Your Mix to ADM BWF
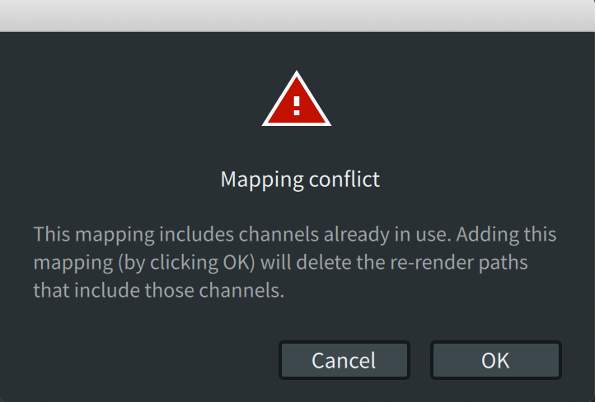
The I/O Setup Bus tab now includes Mapping to Renderer and Bed/Object Group columns.
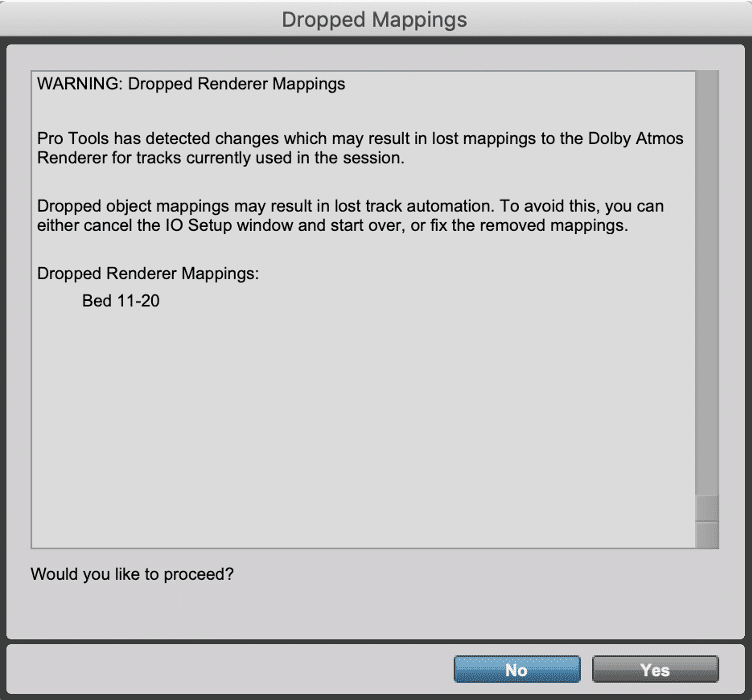
The Mapping to Renderer column allows mapping of Bed outputs to Renderer inputs, as well as mapping Object metadata to Renderer inputs. This is required to include Bed(s) in the bounce to ADM BWF. The Renderer input configuration window has to have Bed and Object inputs that match the Bus tab in order to be able to successfully map Beds and Object ahead of a bounce to ADM BWF.
If any mapping is missing when closing the I/O Setup, a warning dialog appears as shown here.
The Bed/Object column assignments can pull group names and input assignments to groups from the Renderer. Alternatively, the group names and group assignments can be independently and manually configured in Pro Tools or pulled from individual tracks when importing session data or from an ADM BWF on import as session data.
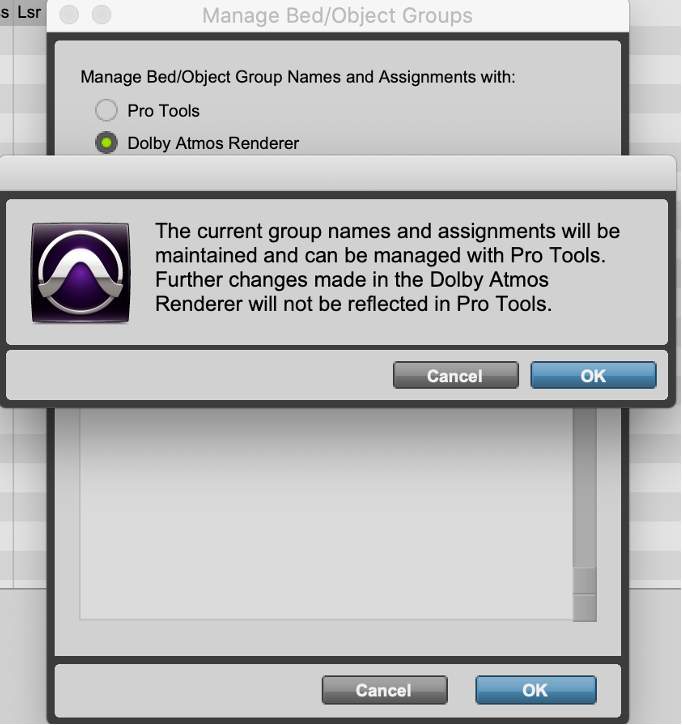
Clicking on an assignment in the Bed/Object Group column brings up the prompt to open the Manage Bed/Object Groups dialog box, as shown.

When set to Dolby Atmos Renderer, the Group names currently defined in the Renderer Input Configuration window will be listed, and the input assignments to groups will be pulled from the Renderer.
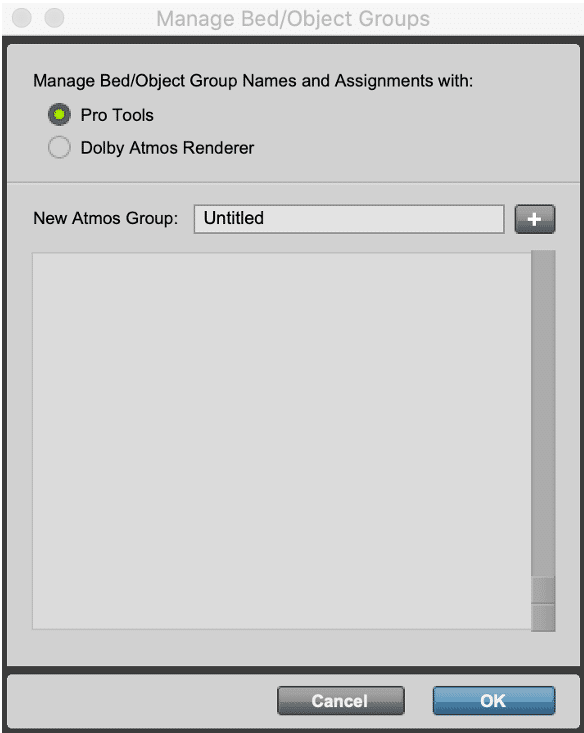
When set to Pro Tools, a warning dialog appears.

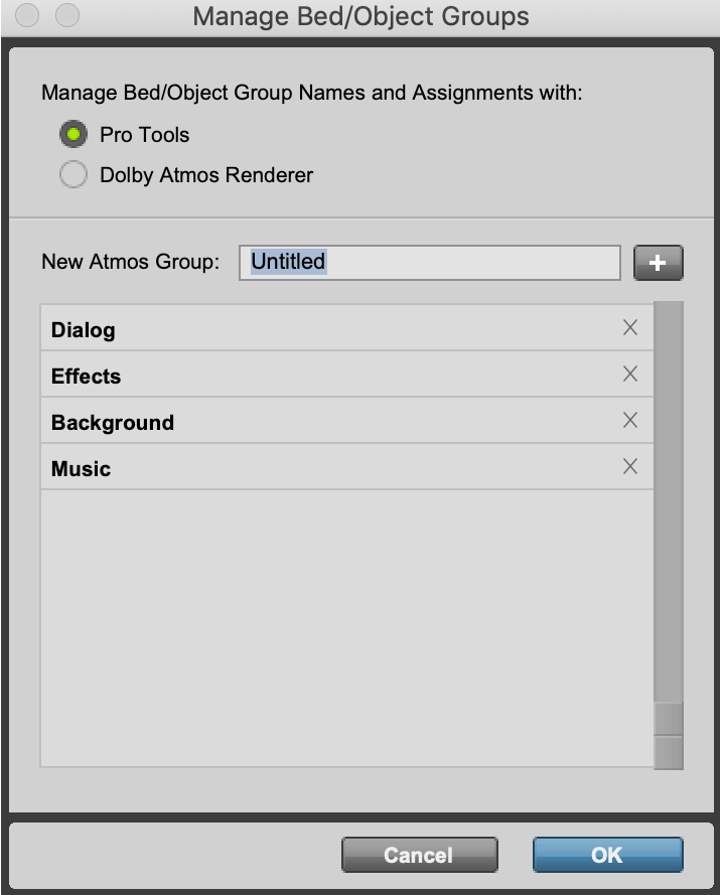
Once accepted, the Manage Bed/Objects Groups dialog box display is controlled by Pro Tools. New groups can now be created and assigned to mapped Beds and Objects as shown.
When Bed/Object Groups are managed by Pro Tools, the group names and input assignments to groups can be made while importing an ADM BWF.
New in Pro Tools 2020.11 is an option to add Bed/Objects Group names to the I/O Setup when importing an ADM BWF.
Note that input descriptions set in the Input Configuration window of the connected Renderer will be included in the ADM BWF independent of whether the Bed/Object Group Master is the Renderer or Pro Tools.
Bouncing a Mix to ADM BWF
Once the I/O Setup is configured and a mix is complete, the bounce to ADM BWF can proceed. To bounce a mix to ADM BWF:
- bulletChoose File > Bounce Mix (Option+Command+B)
- bulletSelect WAV (Dolby Atmos ADM BWF) from the File Type dropdown menu
To bounce a mix to ADM BWF:
- Choose File > Bounce Mix (Option+Command+B).
- Select WAV (Dolby Atmos ADM BWF) from the File Type dropdown menu.
- The Beds and Objects mapped to the Renderer in the I/O Setup Bus tab are listed if they meet the following criteria:
- The bus must be mapped to a Bed or Object.
- The bus must be actively used in the session.
- The bus must be active.
- Click on I/O Setup to make any corrections needed.
- Set the FFOA, if needed.
- Set the File Destination.
- Check Offline for faster than real-time bounces.

8. Select the source of program-level metadata from the following:
- Factory Default
- Connected Renderer (only available if connected to a Renderer)
- Previous ADM File (most recently imported ADM BWF)
- Program level metadata includes:
- Trim and downmix metadata
- Binaural render mode metadata

The speed of an offline bounce to ADM BWF is dependent on the session and CPU.
- 99Click Bounce
- 1010Open the bounced ADM BWF in the Renderer to generate re-renders as needed.
- 1111Convert the bounced ADM BWF to .atmos with the Dolby Atmos Conversion Tool and open in the Renderer to unlock if any program-level metadata edits or punch-ins are required.
Re-renders
Lesson 2 of 7
Re-renders generate channel-based outputs from the Renderer’s source selection, either from the real-time input to the Renderer from Pro Tools or from an open master file. Re-renders are used for a number of purposes:
- bulletTo derive channel-based deliverables for non-Atmos distribution.
- bulletRe-renders allow projects to be mixed in Atmos without requiring separate mixes for legacy deliverables in 5.1, stereo, etc.
- bulletRe-renders can be created from full mixes, beds, objects, or from user-customized groups defined in the Renderer input configuration.
The Re-render Window
The Re-render window is a matrix where re-renders are defined by width and inputs, and optionally mapped to physical outputs. Any defined re-renders which are not mapped to physical outputs are available only as offline re-renders.
To create, define, and map re-renders, open the Re-render window from the Windows menu, or with Command+R on the Mac or Control+R on Windows.
Take a few minutes to become familiar with the window and features. Click each informational icon (i) to review the details before proceeding.
Re-render Layouts
The choices of layout are 2.0, 5.0, 5.1, 5.1.4, 7.0, 7.0.2, 7.1, 7.1.2, 7.1.4, 9.1.6, BIN (Binaural), AmbiX (B-Format), and Loudness.
- bulletThe 2.0 through 5.1.4 layouts are rendered using user-adjustable Downmix and Trims settings. These are discussed in the following article.
- bullet7.1.4 has been added to facilitate adding immersive content to video games for cutscenes and trailers.
- bulletAll re-renders except 9.1.6, BIN, and AmbiX are rendered with Spatial Coding applied.
- bulletBIN uses the same Binaural Renderer as optionally used for headphone monitoring.
- bulletAmbiX re-renders are B-Format four channel (W, Y, Z, X).
TIP: The Loudness export is a 5.1 re-render with soft limiting applied to ensure that loudness analysis made with the Renderer and with third-party tools are compatible. If a non-limited 5.1 deliverable is desired, the standard 5.1 re-render should be used.
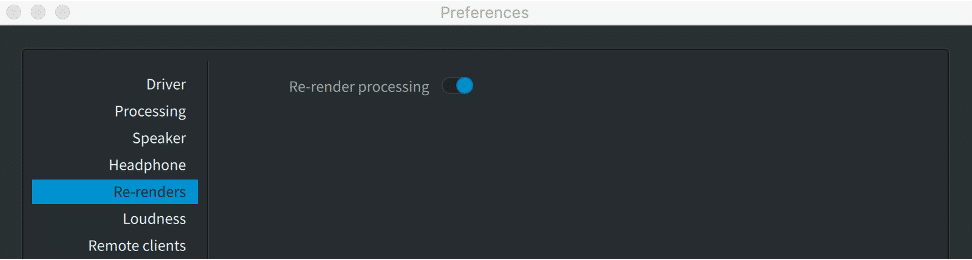
Re-render Processing
For re-renders to be available for real-time output, re-render processing must first be enabled in the re-renders tab found in Preferences (Mac) or Settings (Windows).
Depending on the quantity and complexity of re-renders, the CPU load can be adversely affected. The CPU load will be reflected in the CPU Meter in the Renderer Main Window. Best practice is to disable live re-render processing during mastering, or to only have required live re-renders mapped to outputs.
Live versus Offline
When the Renderer source is set to input from Pro Tools, only live re-renders mapped to outputs are available. When the Renderer source is an open master file, both live and offline re-renders are available. It is possible to have a mix of live and offline re-renders. All live re-renders will also be available for offline export when a master file is open.

The term “Live” indicates that the re-renders are assigned to physical outputs and that real-time re-render processing is enabled in Preferences or Settings. If re-render processing is not enabled and the re-renders are assigned to physical outputs, a warning status message appears at the top of the Re-renders window.
Live re-renders can be recorded back into Pro Tools with the Renderer source in either Input or Master. Note that due to the throughput delay of the Renderer, live re-renders will be subject to delay when recording back into Pro Tools. Best practice is to include 2-pops when mastering and using live re-renders to help accurately spot live re-renders recording back into Pro Tools.
If recording a 5.1 re-render back into Pro Tools to use with a third-party loudness measurement plug-in or application, use the dedicated Loudness 5.1 re-render layout which includes the soft clip encoding limiter used in the Renderer and encoding tools. This is needed to ensure that loudness measurement performed with third-party tools from a re-render matches the measurements obtained in the Renderer.
When using the Dolby Audio Bridge as the Renderer core audio input device live re-renders are not available as the Dolby Audio Bridge is a one way audio path. If the Dolby Audio Bridge is set as the core audio input device to the Renderer re-render processing should be disabled. Attempting to output re-renders via the Dolby Audio Bridge while it is set as the Renderer input device will likely result in a feedback loop. It is possible to record live re-renders to Pro Tools from an open master file if the Dolby Audio Bridge is set as the Renderer audio output device and the input to Pro Tools.
Offline re-renders are not mapped to physical outputs.
Mapping Re-renders to Outputs
Live re-renders are mapped to outputs in the Map to Live re-render section.
To map a re-render:
- bulletClick on any available output to define this as the first (L) channel of the re-render output.
- bulletOnce mapped, the outputs will display blue and an arrow will appear to the left to expand the selection to show output channels.
- bulletRe-clicking on a mapped output will cancel it and allow the re-render to be mapped to different outputs.
- bulletIf a mapping overlaps with another re-render, a warning appears for confirmation.
- bulletFor real-time re-renders, a maximum of 10 re-renders can be created and can be mapped to no more than 64 channels.
If a mapping overlaps with another re-render, a warning appears for confirmation.
Play Video
Setting the Physical Outputs Available for Live Re-renders
The first available outputs for real-time re-renders are set in the Room Setup window routing tab.
- bulletThe Routing tab is not visible when using the Send/Return plug-ins as the Renderer audio driver.
- bulletThe first available output for live re-renders is not relevant when using the Dolby Audio Bridge as the Renderer core audio input device.
By default, the first output for live re-renders is 23, which is the output following the maximum speaker configuration (22 speakers). If a 7.1.4 speaker configuration is used, the first output that can be assigned for re-renders is output 13. By contrast, if speaker arrays are enabled with a larger speaker configuration (using the Dolby Atmos Mastering Suite), a conflict warning will appear and the first re-render output will need to be shifted accordingly.

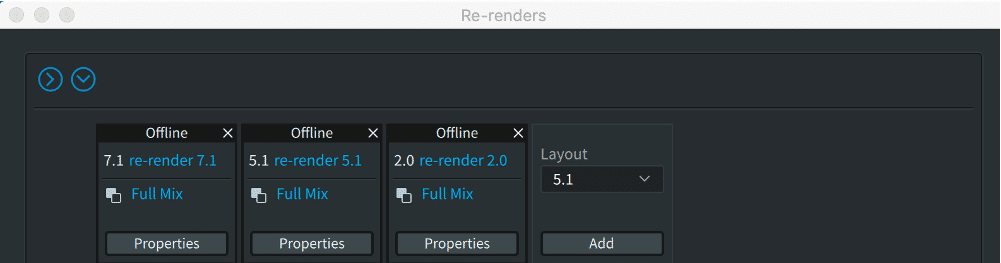
Adding or Modifying a Re-render
To add or modify a re-render, choose the Layout of the re-render required then click Add to create a new re-render.
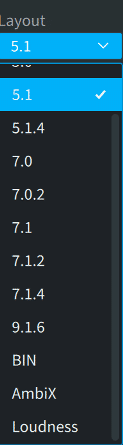
Layout drop-down menu options
The choices of layout are 2.0, 5.0, 5.1, 5.1.4, 7.0, 7.0.2, 7.1, 7.1.2, 7.1.4, 9.1.6, Bin (Binaural), AmbiX (B-Format), and Loudness. Scroll within the drop-down menu to reveal all the options.
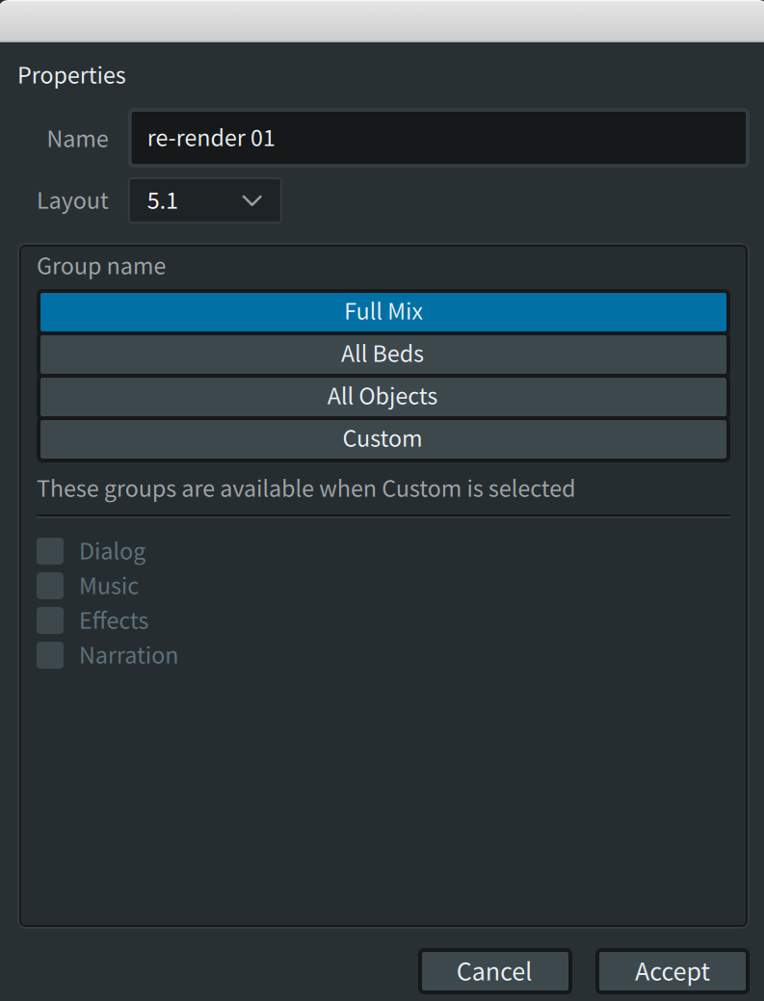
Once added, the re-render will appear with a generic name and will default to be a re-render of the Full Mix.
Click on Properties to:
- Modify the re-render name.
- Change the layout.
- Assign custom group(s) to the re-render.
Re-render Properties
Properties can be used to modify an existing re-render; however if the re-render is mapped to physical outputs, changes to the layout after creation may create output mapping conflicts.
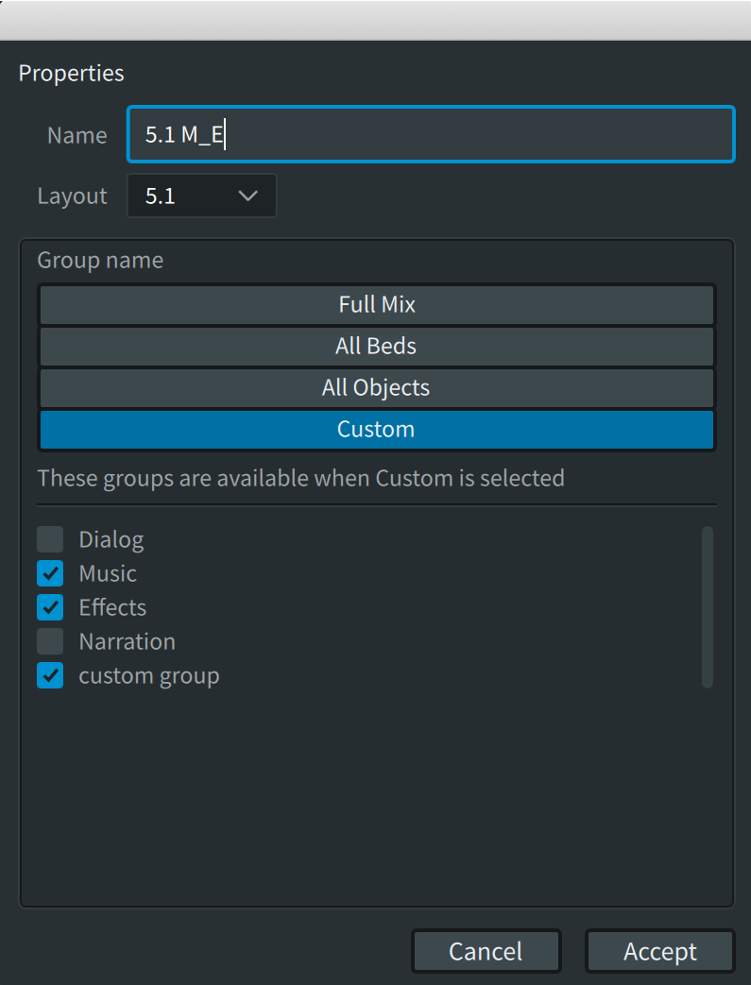
Selecting Custom allows for the use of the groups defined and allocated in the Input Configuration window. Only inputs assigned to the selected groups will be part of the re-render. This is best practice for creating channel-based stem deliverables. If an ADM BWF .wav or IMF IAB .mxf master file is open, only the groups available when the master file was created will be available. If changes to group membership are needed, convert back to a .atmos package using the Dolby Atmos Conversion Tool and unlock the file for edited when opened in the Renderer.
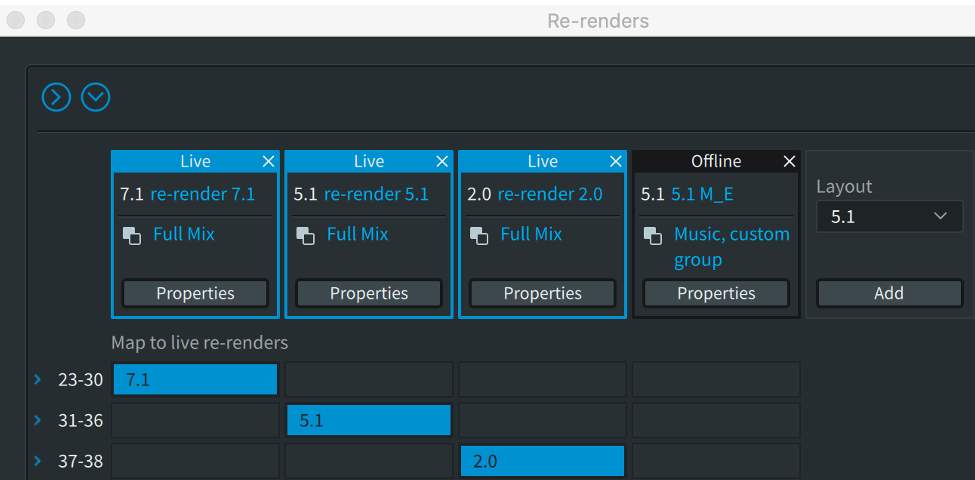
Once the selection of custom groups has been accepted, they will be displayed in the re-render matrix.
Play Video
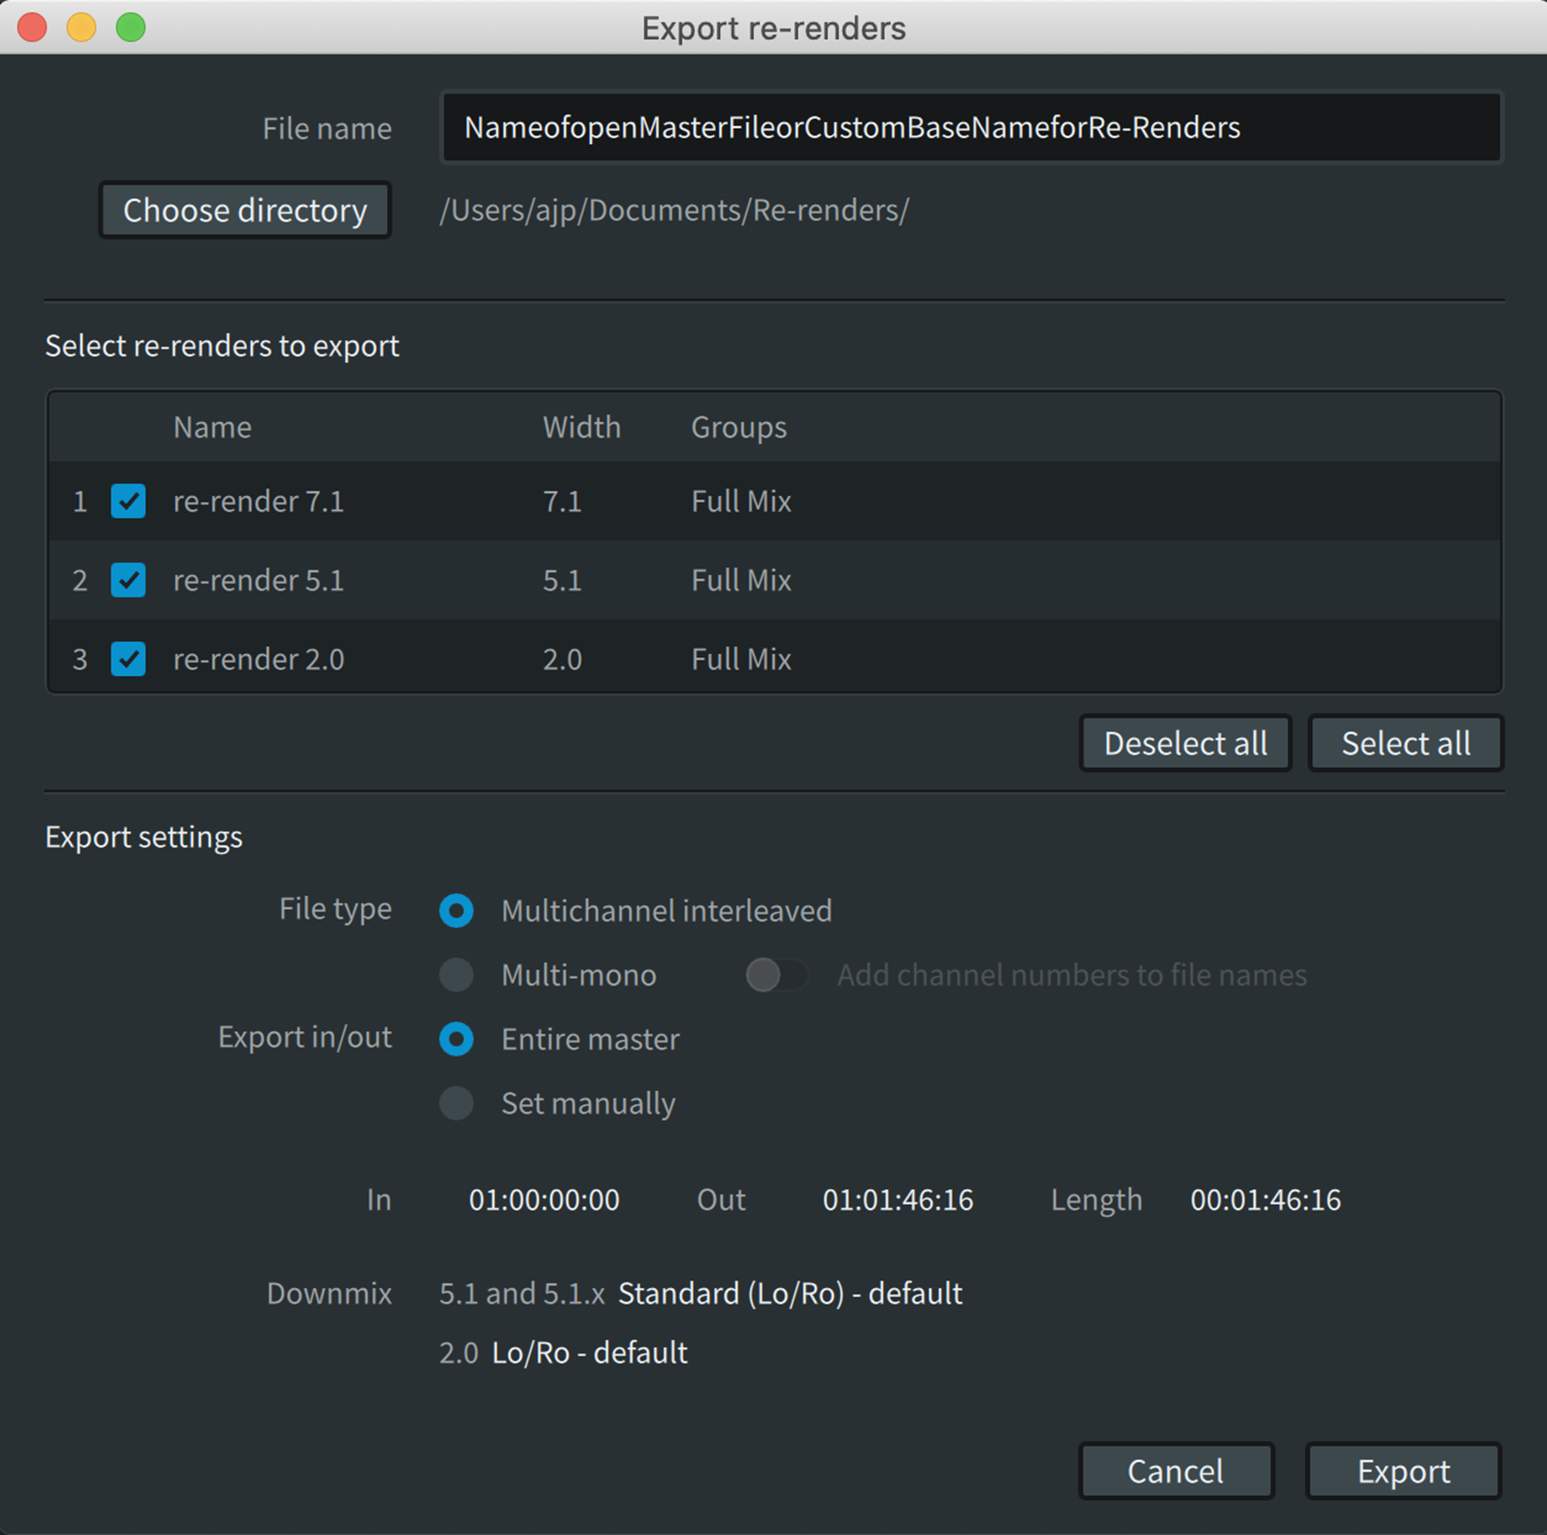
Exporting Re-renders
All re-renders, whether configured as live or offline, are available for offline export with an open master file as source.
To export re-renders, first accept any changes to the Re-render Window, then open the Export re-renders dialog from File > Export Audio > re-renders or press Command+O (Mac) or Ctrl+O (Windows). Click to view the popup details shown below to complete the procedure in the Export re-renders dialog box.
Play Video
Delivering Re-renders
If a delivery specification calls for channel-based deliverables to conform to True Peak limits, dynamics processing will need to be applied to the re-renders in Pro Tools, either on the recorded live re-renders or imported offline re-renders.
Recording Live Re-renders
Lesson 3 of 7
Live Re-renders can be recorded back into Pro Tools. While offline re-renders can always be imported into Pro Tools, direct recording can be more efficient and provide real-time feedback. Recording the “loudness” 5.1 re-render to be measured with existing loudness measurement plug-ins is also a useful function.
Note that live re-renders are not possible when using the Dolby Audio Bridge as the Core Audio device.
There are two different ways to generate live re-renders:
- bulletRe-renders can be recorded while Pro Tools is playing and the Renderer source is set to Input. This can be done before or during recording a master.
- bulletRe-renders can be recorded while the Renderer is generating re-renders from playback of an open master file.
Note that generating live re-renders can be CPU-intensive depending on the number and complexity of defined re-renders. Monitor the audio CPU meter in the Renderer. If it is running high, consider disabling some re-renders or generate the live re-renders on playback of an open master file.
Simultaneously recording re-renders while Pro Tools is playing out up to 128 channels can likewise tax drive read/write capabilities on your Pro Tools workstation. Best practice is to record live re-renders to a different drive than used for playback of the session.
To record live Re-renders, follow the steps below.
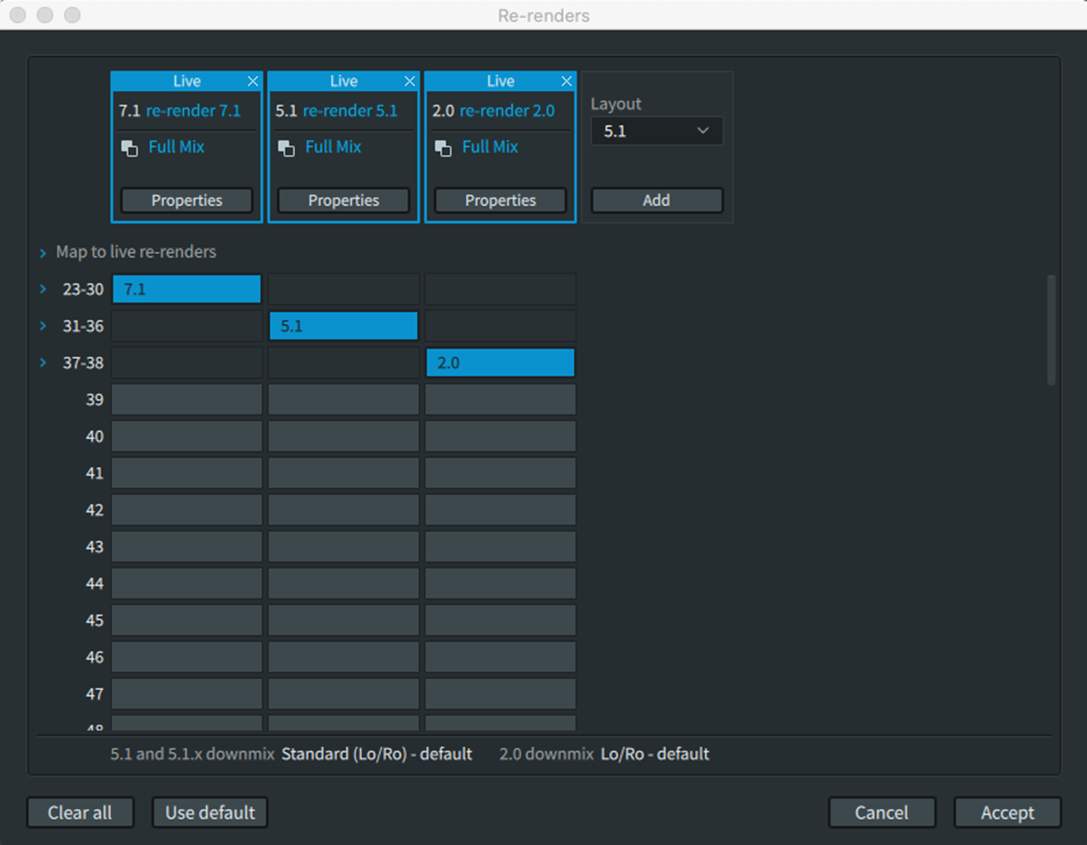
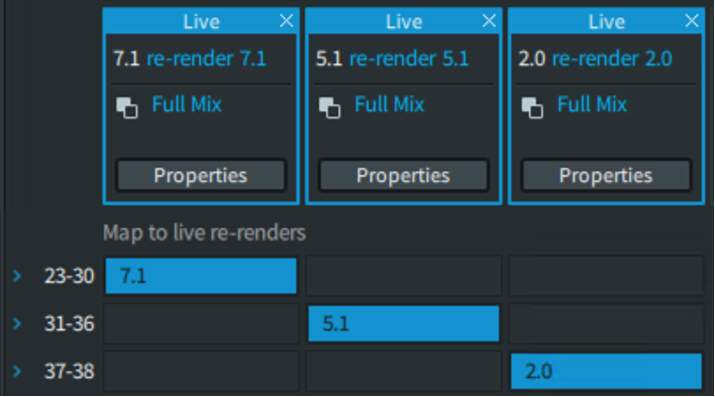
In the Renderer:
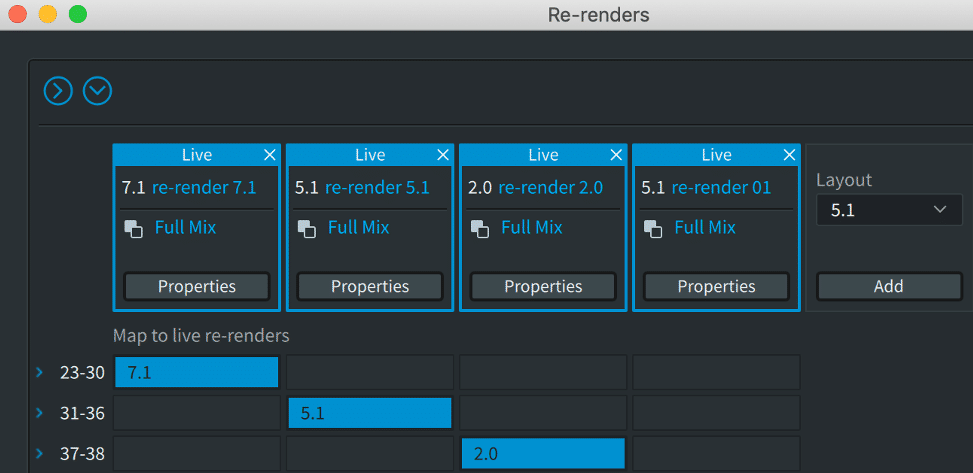
- Define and map the live re-renders needed in the Renderer Re-render window. These can be full mixes, beds, objects, or custom re-renders. In the example below, the default 7.1, 5.1, and 2.0 full mix re-renders are used and mapped to outputs 23–38.
- Note that the outputs being used for the re-renders in the mapping column begin with the first available output as set in the Room Setup > Routing tab.
- Enable re-render processing in the Renderer Preferences (Mac) or Settings (Windows).
- Enable the Sync button (clock icon) to set the Renderer to chase incoming LTC.
In Pro Tools:
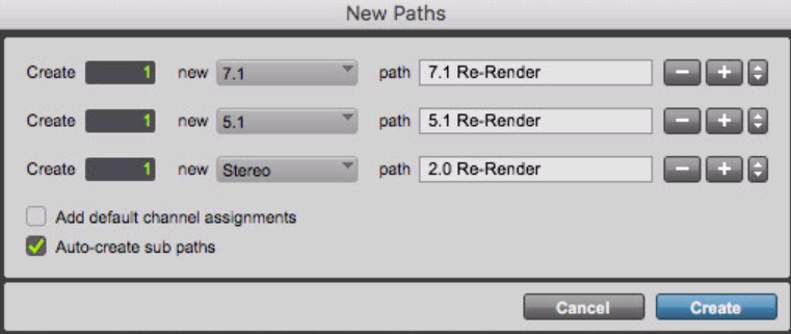
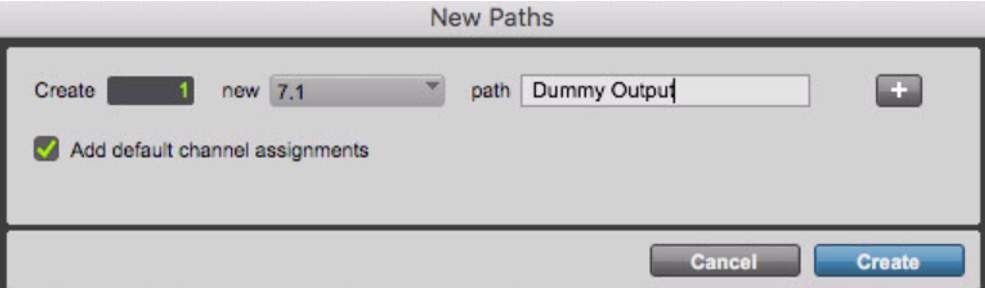
- Add new paths for re-render inputs in the I/O Setup Input page.
- The input width and input numbers must match the re-render mapping in the Renderer.
- All re-renders are output from the Renderer in SMPTE channel order and may need to be manually re-ordered.

- 44Add Audio tracks using the defined inputs to record the re-renders. Set to input monitor and arm for record.
- 55If recording with on a system with more than 128 channels of I/O, the re-renders can be routed to an interface for monitoring.
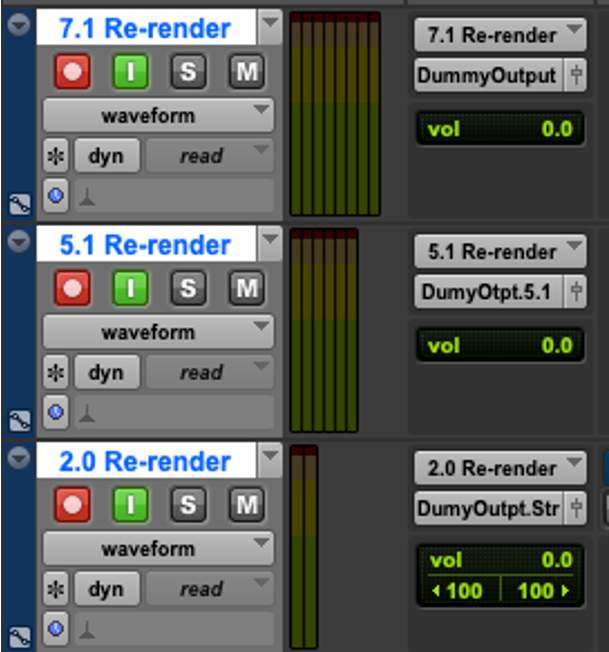
- 66If recording with an HDX2 system, a dummy output is needed to be able to put the tracks into record and avoid potential feedback.
If recording re-renders on a Pro Tools system with 3 x HDX cards and a dedicated audio interface for monitoring, the re-render tracks can be bussed to physical outputs rather than dummy outputs.
It is recommended to record live re-renders using a synchronization 2-pop, as there is expected latency on the round trip through the Renderer. Live re-renders will be offset in the recorded live re-render compared to the source audio. This must be manually compensated for by spotting the 2-pop to the correct location on the timeline. Avoid using auto-fades for 2-pops in order to give a clearly defined edge which can be accurately spotted.
Using Send/Return Plug-ins to Record Live Re-renders
- Add a new Aux Input track and Audio track for each re-render to be recorded.
- Insert the Dolby Renderer Return plug-in on the Aux Input tracks.
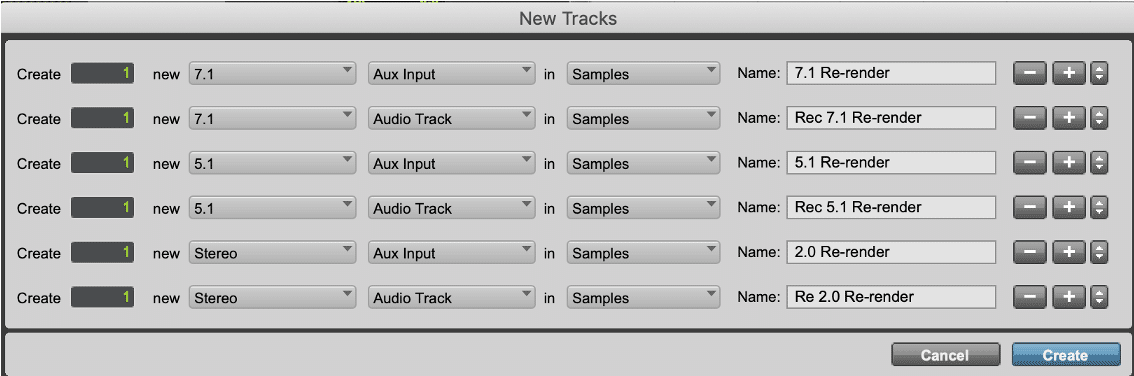
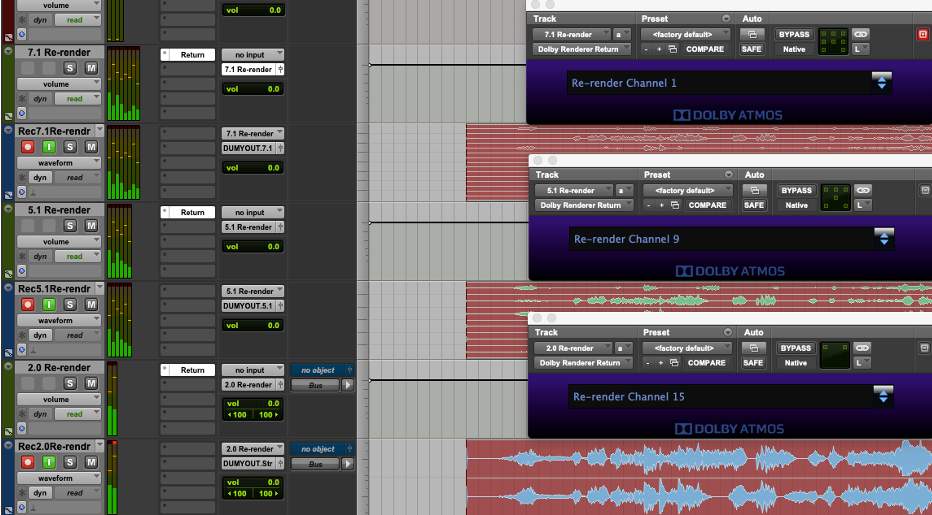
- 33Unlink the Master Link Button for 7.1 and 5.1 (or other multichannel) tracks and select each channel individually to assign each Return plug-in input to the proper Renderer output for correct SMPTE channel order. For example, using the default re-renders, the first mapped re-render is 7.1, the second is 5.1, and the third is 2.0. Remember that mapped output 23 in the Renderer is Re-render Channel 1.
- 4
- Left = Re-render Channel 1
- Center = Re-render Channel 3
- Right = Re-render Channel 2
- Left Surround Side = Re-render Channel 5
- Right Surround Side = Re-render Channel 6
- Left Surround Rear = Re-render Channel 7
- Right Surround Rear = Re-render Channel 8
- LFE = Re-render Channel 4
- 5
- Left = Re-render Channel 1
- Center = Re-render Channel 3
- Right = Re-render Channel 2
- Left Surround Side = Re-render Channel 5
- Right Surround Side = Re-render Channel 6
- Left Surround Rear = Re-render Channel 7
- Right Surround Rear = Re-render Channel 8
- LFE = Re-render Channel 4
- 6
- Left = Re-render Channel 9
- Center = Re-render Channel 11
- Right = Re-render Channel 10
- Left Surround Side = Re-render Channel 13
- Right Surround Side = Re-render Channel 14
- LFE = Re-render Channel 12
- 7
- Left = Re-render Channel 15
- Right = Re-render Channel 16
Alternatively, 16 mono Aux Input tracks can be used, with each having a Renderer Return plug-in inserted and dedicated to a single re-render channel.
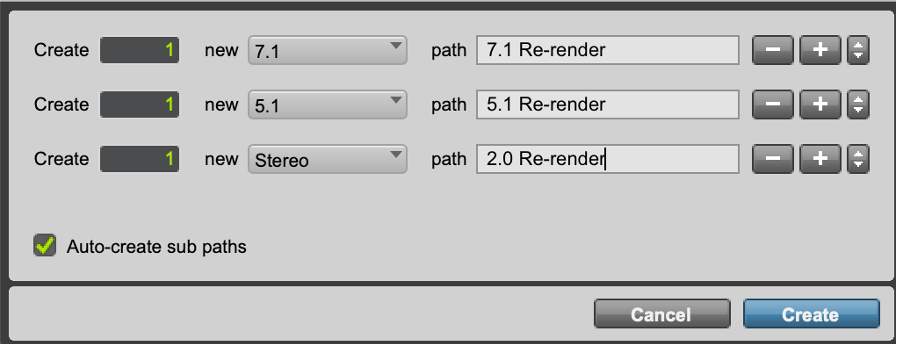
- 88Create a bus for each re-render. This is used as the input for the Audio track to record the re-render.
- 99Assign each Aux Input track to the relevant bus or sub-path.
- 1010Assign the Audio track input to use the relevant re-render bus created above.
- 1111Assign the Audio track output to your speaker outputs and mute as needed or use a dummy bus.
- 1111Set the Audio tracks to input and arm for record.
Binaural Render Mode
Lesson 4 of 7
In addition to the Object Audio Renderer used for Speaker outputs and channel-based downmixes and re-renders, the Dolby Atmos Renderer includes a separate Binaural Renderer.
The Binaural Renderer is used for monitoring Binaural audio on headphones, creating Binaural re-renders, and for writing Binaural metadata to .atmos master files.
The Binaural Renderer reproduces the experience of a multichannel loudspeaker listening experience as closely as possible over headphones.
The Binaural Renderer renders all of the bed and object inputs to create a compelling immersive mix over headphones using head-related transfer function (HRTF) filters. The Binaural Renderer includes its own limiter, which is used for the headphone output and re-renders.
Binaural Render Mode Metadata
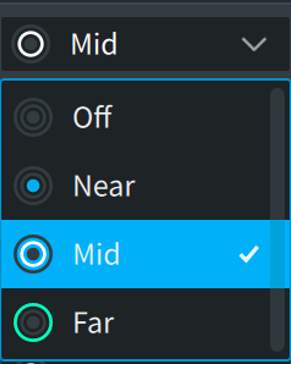
Binaural settings are unique to the Atmos headphone experience. These settings are intended to give varying levels of spatialization to each the objects or bed channels to which they are applied and approximate the virtual distance between an object or bed and the listener’s head.
There are four possible settings: near, mid, far and off, the last of which lets the mixer turn binaural processing on an object off completely. The “mid” setting is the default and simulates the approximate distance between the sound source and the listener if they were listening on loudspeakers 1.5 meters away. If mixing on headphones the mixer can add some depth to the mix by choosing to set objects to “near,” and bring them closer, or to “far,” and push them further away.
From a creative standpoint this allows specific sounds to be more intimate and allow more space in others and is applicable to both music production and audio post production.
It is good practice to distribute objects equally between near, mid and far, and ultimately the settings the mixer chooses may be dependent on an Object’s timbre. This includes placing rhythmic sounds like drums in near or mid mode to give them more impact, and putting things that might already have some reverb on them like guitars and synths in far mode. These are by no means rules, and can vary a lot from mix to mix.
If a mixer wants to make an object sound very close to the listeners head but wants to avoid bringing an object “off the wall” or into the room, which may make the object sound more diffuse on loudspeakers, using the “near” setting can be a great way to achieve that effect on headphones without having to make any sacrifices for loudspeaker playback. Because of this difference in rendering between loudspeakers and headphone, its generally preferable to pan objects near the edge of the Atmos cube.
- bulletBinaural Render Mode metadata is written to the entire master file and is editable from an existing .atmos master file that is unlocked for editing. Binaural Metadata is used during encoding to AC4 IMS (Immersive Stereo).
- bulletThe default for each Bed and Object input is Mid, with the exception of the LFE which defaults to Off. Audio inputs set to Off are still included in the binaural render without distance modelling processing applied.
An input configuration that defines multiple Beds can be used; however there can be only one binaural mode for each bed channel, as they are combined into a single bed upon export/encode. If you have multiple beds defined and change the setting on one of them, the setting will change on all of the other bed inputs. For example, if three beds are defined, changing the left channel on one of them to Near will change the left channel on the other two.
Some Dolby Atmos music delivery services require Binaural Render Mode metadata not to be left at default values. Please refer to the relevant technical delivery specifications.
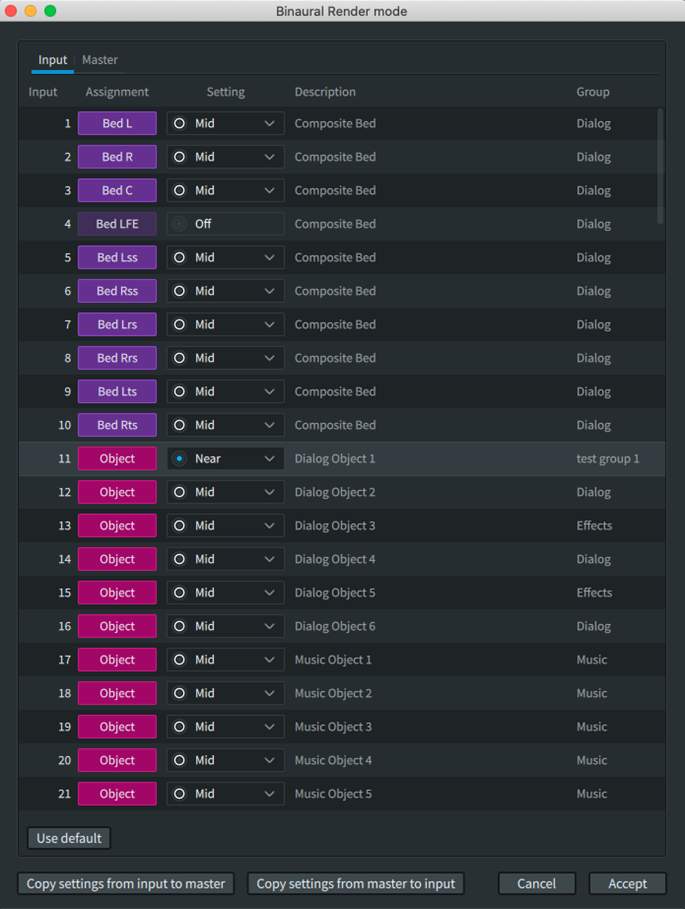
Binaural Render Mode Window
Binaural metadata settings are made in the Binaural Render Mode window.
To open the Binaural Render Mode window:
From the menu bar, select Window > Binaural Render Mode or press Command+B (Mac) or Ctrl+B (Windows).
Binaural Render Mode Window Input/Master Switch
Version 3.7 of the Dolby Atmos Renderer introduces the Input/Master switch, which decouples the Binaural Render Mode distance settings of the “Input” from that of an open Master file.

With the Input/Master switch toggled to Input, it is now possible to adjust the Binaural Render Mode distance settings as needed, independent of the settings in an open Master file. It is also possible to copy the Binaural Render Mode distance settings from a Master file to the “Input” to enable punch-ins, or for use when creating a new Master. Conversely, Binaural Render Mode settings can be copied from the “Input” to an unlocked .atmos Master file.

Binaural Render Mode Status Notification
If the Binaural Render Mode distance settings do not match between the input and an open Master file, an orange indicator will be visible in the bottom left of the Renderer main window.

This indicator will turn off when the “Input” and “Master” match, indicating that punch-ins to the open Master are permitted.
The Binaural Render Mode window uses the input configurations defined in the Input Configuration window, or the input configuration from an open master file.
A visual indicator and switch will be present if a Master File is loaded.

To make changes in the distance model settings, click on any input in the setting column to highlight and reveal the setting drop-down menu.
If a .atmos master file is open it must be unlocked for editing.
In addition to the descriptive tags (Off, Near, Mid, Far), different icons are used to indicate object distance setting.
To change multiple inputs at the same time:
- Shift-click on inputs to select contiguous inputs.
- Command/Ctrl-click on inputs to make non-contiguous selections.
After selecting multiple inputs, their settings can be changed at the same time.
Controls can be adjusted while live monitoring or while playing back a master. Headphone processing (or Headphone Only mode) must be enabled, and the Headphone Render mode must be set to Binaural in Preferences or Settings.
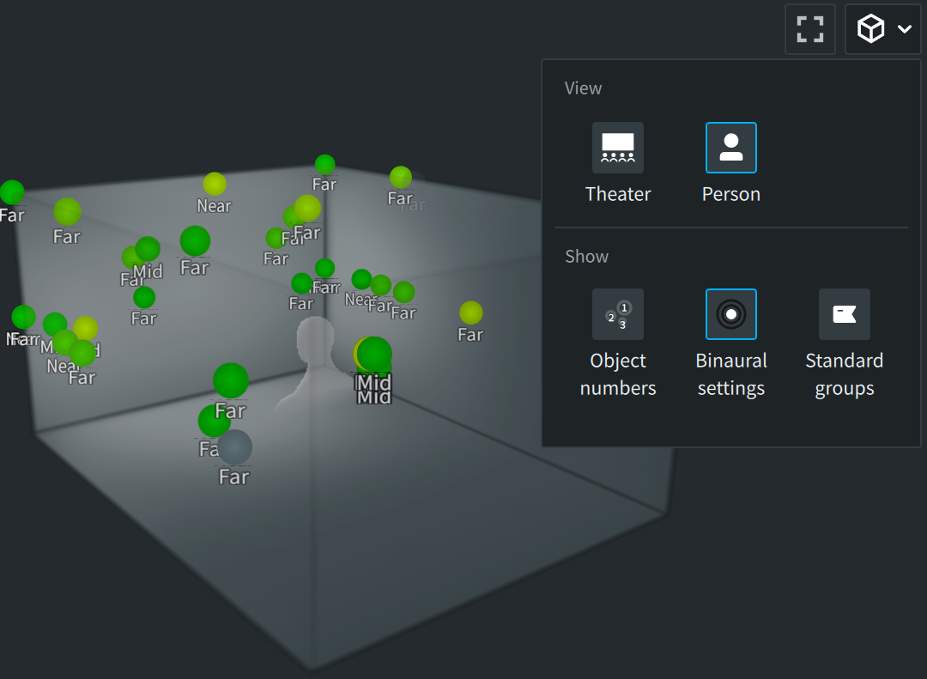
Binaural render mode settings can be displayed in the main Renderer Window Object view from the View/Show drop-down menu.
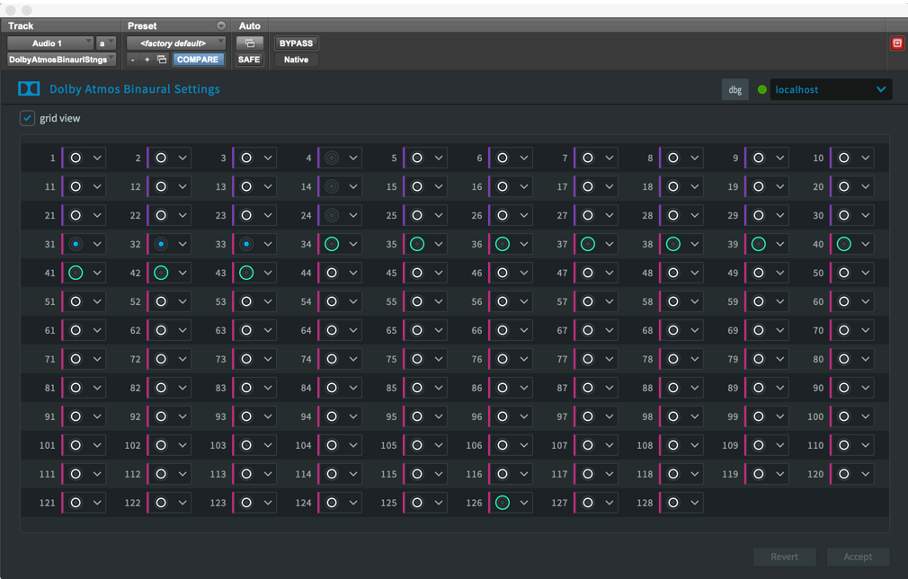
Dolby Atmos Binaural Settings Plug-in
The Dolby Atmos Binaural Settings plug-in provides a way to set and modify the binaural render settings from Pro Tools rather than the Binaural Render Mode window in the Renderer application or Renderer Remote. It also provides a way to save both the Input Configuration and the Binaural Render Mode distance settings as plug-in presets.
To use the Dolby Atmos Binaural Setting plug-in, instantiate the plug-in on any Audio track, or in AudioSuite.
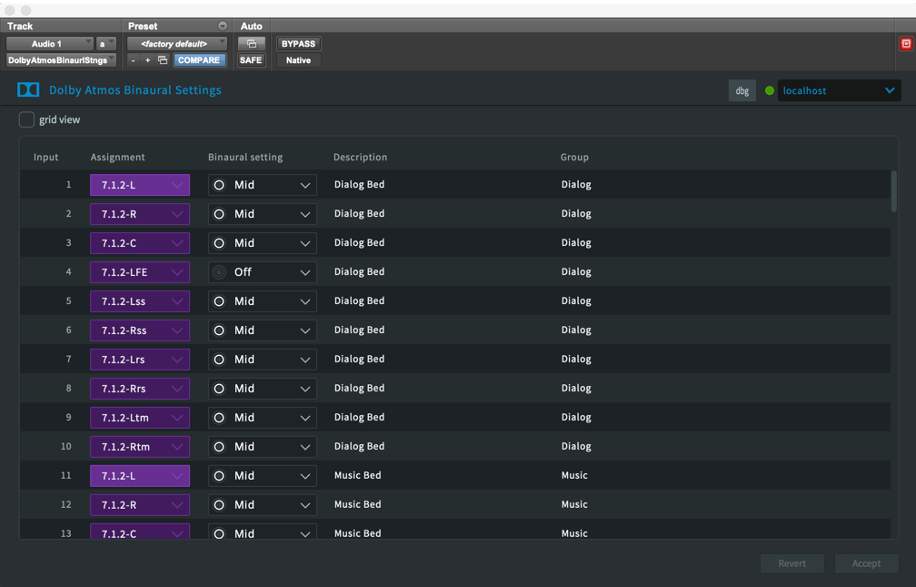
The plug-in needs to establish communication with the Dolby Atmos Renderer independently of Pro Tools. This is done by entering the IP address or hostname of the external Renderer or entering localhost if the Renderer is running internally.
The connection status indicator will turn green to indicate that connection between the plug-in and the Renderer has been established. This indication is also visible in the Renderer preferences or settings Remote Clients tab.
Once communication with the Renderer is established, the plug-in will populate with the input configuration from the Renderer and any existing settings from the Binaural Render Mode window.
Any undefined inputs will appear with a yellow boundary to alert the user that these inputs need to be set or the input configuration copied from an open Master file.
The user interface shows a combined view of the Input Configuration and Binaural Render Mode windows. An optional grid view provides a way to see all 128 inputs and the distance model settings at a glance and make changes as needed.

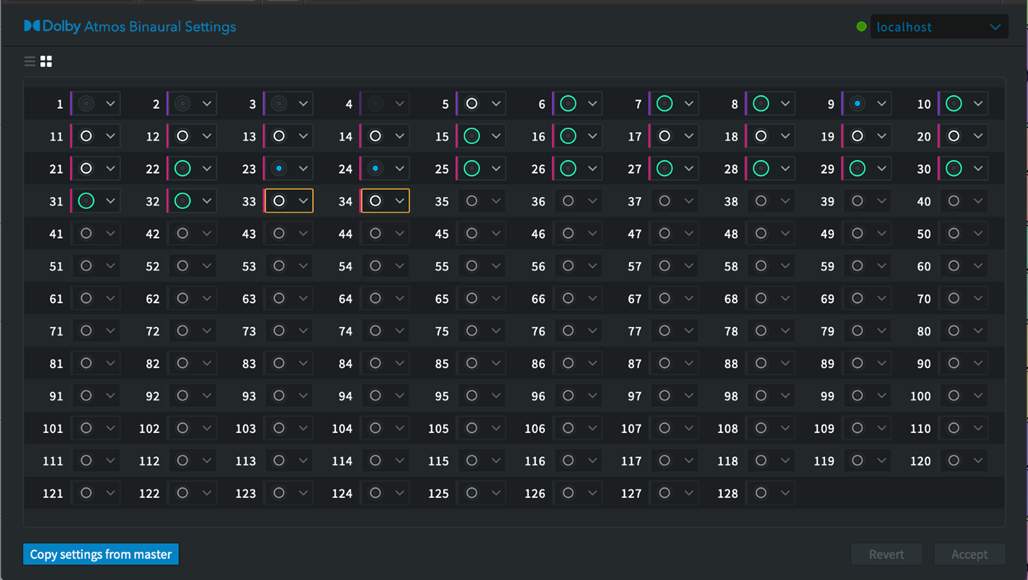
The plug-in also indicates when unused inputs are incorrectly assigned to objects. If an unassigned input in an open Master file (or a newly created Master file) is incorrectly assigned to an object, there will be a yellow border around that object in the plug-in window.
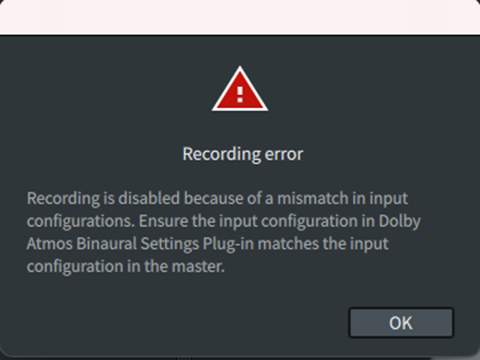
This mismatch will result in an error that will prevent both recording to a new Master file and punch-ins of an unlocked Master file.
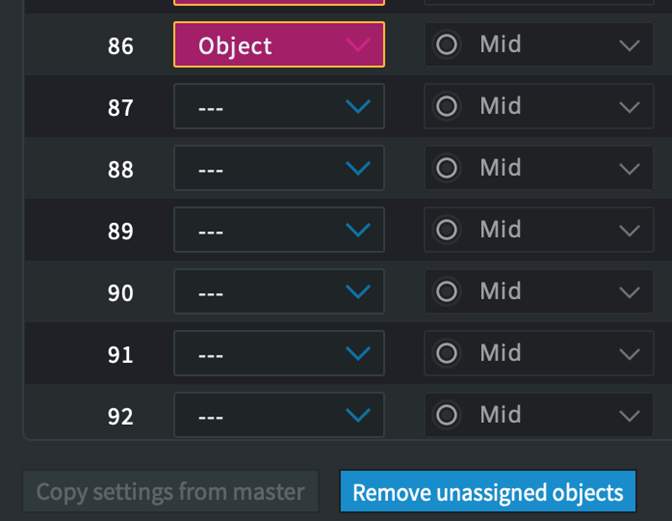
The mismatch can be resolved by clicking the illuminated Copy settings from master button (for an open Master file) or by clicking on the illuminated Remove unassigned objects button.
When the plug-in is used to control settings, a dialog appears in either the Input Configuration Window or the Binaural Render Mode window to alert the user that the function is controlled remotely.
This is also indicated in the main Renderer window status bar.

Note that these settings are not automatable and apply per channel for the duration of the master. Care should be taken in editing these after mixing has begun, as changes to these settings are not undoable.
Play Video
Dolby Atmos Binaural Settings Plug-in
Exporting and Importing Input/Binaural/Re-render Configuration Files
Lesson 5 of 7
Input Configuration and Binaural metadata settings are stored within the master file. However, if the same settings are to be used again for multiple projects, it may be helpful to store these settings, along with Re-render settings, separately. These settings files can be supplied along with ADM BWF files to facilitate additional post and localization work at other facilities.
Input/Binaural/Re-render Configuration Files
Input/Binaural/Re-render settings can be exported to an .atmosIR file.
The following is included in an .atmosIR file:
- Input Channel Configuration assignments (as beds, objects, or no assignment)
- Bed and object descriptions
- Assignments to groups
- Custom group names
- Per bed or object input channel, setting for binaural distance model
- Re-render channel strips
- Re-render settings, per strip
- Properties (strip name, layout, and group assignments)
- Mapping
The .rmuio configuration files saved by the Renderer v1.72 and earlier are compatible with the current versions of the Renderer. These files can be imported, but .atmosIR files created in current versions are not backwards compatible with v1.72 and earlier.
Exporting Input/Binaural/Re-render Settings
If a master file is open, export will use the settings from the master file.
To export the Input/Binaural/Re-render settings from a master file:
- 11Navigate from the menu bar to File > Export Master Input/Binaural/Re-render Config or press Option+Shift+E (Mac) or Alt+Shift+E (Windows).
- 22Browse to the desired output directory.
- 33Name the file.
- 44Click Save.
If no master file is open, the source is input, and the export will use the current settings.
Exporting an Input/Binaural/Re-render config file using the Renderer Remote application will save the .atmosIR file on the same computer the Renderer Remote is running on, not on the external workstation.
Importing Input/Binaural/Re-render Settings
To import the Input/Binaural/Re-render Settings:
- 11Navigate from the menu bar to File > Import Input/Binaural/Re-render Config or press Option+Shift+I (Mac) or Alt+Shift+I (Windows).
- 22Select the file.
If a master file is already open, only the Re-render configuration can be loaded.
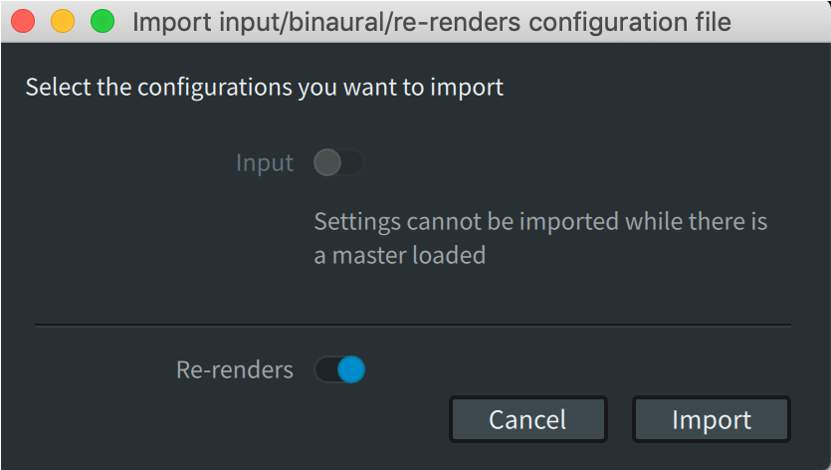
If a master file is not open, the Import dialog allows the option to import the Input Configuration (Input Configuration only or Input and Binaural Configuration) as well as the Re-render Configuration.
Pre- and Post-Production Practices
Lesson 1 of 5
Here are some suggestions and tips for working on Dolby Atmos Home Entertainment content. This is not meant to be prescriptive—every project is different, and every facility and mixer has or will develop techniques and methods best suited to them.
Pre-production
A mixer may not always be involved in a production from the start. However, depending on the production, it may be possible to convey some requests that will assist in working with Dolby Atmos in post.
Assets
Gather audio assets for the final mix that will allow the sound editor and mixer the highest level of flexibility for panning and mixing. Dolby Atmos relies on mono or stereo elements that can be dynamically panned and moved, and in this sense, is no different in concept to layered editing and mixing in Stereo, 5.1, and 7.1. If only 5.1 stems are received, the output will likely be a static, mostly 5.1 mix, as it is more challenging to separate individual, movable Objects once a premix has been flattened to 5.1.
If possible, request music stems in sets of stereo and mono files, as opposed to a finished 5.1 mix, or 5.1 stems that are hard to “unpack.” If a composer is accustomed to delivering finished 5.1 mixes, ask for a 5.1 guide track and stereo stems broken out by instrument group.
Multichannel Microphones
Multichannel microphones are not always practical in scripted production where clean, discrete recordings are preferred, but they can be invaluable for post-production of recorded live events. Soundfield/ambisonics microphones, like those from Sennheiser (Ambeo) SoundField, CoreSound, Røde, Schoeps (ORTF-3D) et al., are becoming increasingly popular for immersive capture. The multichannel output of these systems can be decoded to Dolby Atmos to reproduce the height plane. Placement of these microphones is more convenient than hanging mics over the audience, but the result can be more diffuse than using multiple directional microphones. You are also ‘baking in’ the directionality of sound sources within a scene, meaning you are unable to pick and choose elements within the recording.
Post-production Practices
There are several best practices that can make Dolby Atmos post-production workflows more streamlined and predictable. Planning is key to finding an approach that works best for a given mix/show, and can be maintained across multiple mixes if working on an episodic.
It is prudent to closely study delivery specifications and plan on the best way to achieve creation of all the deliverables required.
The goals of these practices are to:
- bulletOrganize Pro Tools sessions and the Dolby Atmos Renderer in a way that is easy to understand and facilitates downstream localization work.
- bulletMinimize the number of mastering passes that are required; this can save time and effort.
- bulletMinimize the number of deliverables and converge towards a common workflow if working on an episodic.
- bulletMinimize the effort required to derive localization assets.
Using multiple Beds is a recommended practice and is key to successfully generating stems and mastering-ready assets. It is important that both the team managing production and the audio post-production team are aligned at the start of the audio production process. When working in Pro Tools, each stem (such as Dialog, Music, Effects, etc.) can be assigned a Bed (stereo up to 7.1.2) and a set of Objects.
In some workflows, these stems are all combined into a composite Bed for output to the Dolby Atmos Renderer. This allows up to 118 Objects to be used in the mix. However, this approach makes it impossible to derive channel-based stems without making multiple real-time mastering passes.
Assigning each stem Bed in Pro Tools to a unique set of outputs feeding the Dolby Atmos Renderer means that one master can be created that will allow for all the channel-based stems to be derived in a single pass. This master, including the multiple Beds, can be delivered as-is for encoding and distribution.
A second master may also be created with a fully filled music and effect (M&E) stem to create a single localization master. A fully filled M&E includes the non-dialog sound elements from the dialog stem, as well as additional Foley to cover elements of production sound lost when removing the Dialog stem. The original language can be included as a custom group of beds and/or objects in the localization master for guide purposes, and removed by re-rendering all other elements to provide clean localization assets.
This simplified approach saves time and reduces the number of master file sets.
A couple examples of a multiple Bed workflow:
- Dialog
- Narration
- ME Comp (FX, BG, MX)
- Intl ME Fill Helper
- Dialog
- Narration
- FX
- BG
- MX
- Intl ME Fill Helper
In the second example, 6 Beds are used. Separating out the music can be useful as it facilitates replacement, should there be regional licensing issues.
Additional Beds can be used in the master Pro Tools session, but they will be bussed to the main Beds and therefore, mixed into the master. These could include reverb returns, Foley, etc. to provide as much control as needed.
Dolby Atmos Mixing Tips
Lesson 2 of 5
What follows are some suggestions and tips for working on Dolby Atmos Home Entertainment content. This is not meant to be prescriptive. Every project is different, and every facility and mixer has or will develop techniques and methods best suited to them.
Creative use of Dolby Atmos
- bulletSonic details off-screen add to the world surrounding a character and help the audience hear what the character is hearing.
- bulletTrack where a character’s eyes are focused off-screen with sound — a monster in the room above or something in a tree above.
- bulletUse a change of room reverberation that includes height reflections to emphasize a character’s perception of an interior space they are entering.
- bulletA tall reverb can add to the perceived scale of a tall interior.
- bulletRecorded crowd audio can be panned around and above the listener to increase the sense of inclusion when reproducing a concert or comedy special.
- bulletSound effects meant to give a sense of awe may be included in the overheads to enhance the perceived scale and scope of the scene.
- bulletTo fully envelop the listener, layers of sound can be split into multiple Objects and individually panned. Ocean sounds, for instance, can be lifted up over the listener and crash all around to give the feeling of being overwhelmed by the power of water.
Music in a Dolby Atmos Post Mix
- bulletPull music back in the room to separate it from on-screen elements and add emotional impact to the scene. Give breathing room to SFX and ambiences placed in Left and Right by pulling the music into the Left-wide and Right-wide areas.
- bulletMusic panning in the surrounds and overheads can create feelings of intimacy and inclusion. Music soaring into the overheads enhances an epic scene.
- bulletUse Dolby Atmos-mixed music to maintain sonic continuity. When building a mix that contains a lot of dialog and music segments with SFX-heavy sections, using immersive mixing techniques on the music tracks can help maintain the feeling of immersion throughout your show.
Mixing Music in Dolby Atmos
- bulletPercussion elements work particularly well in the front wide and front overheads.
- bulletTry to receive the drums stem broken down into smaller groups rather than one stereo or 5.1 drum stem.
- bulletSteady rhythmic elements, such as shakers, are meant to be locked in time and are best kept in the front half of the mix soundstage to assure cohesion with similar elements in L/R. This will help maintain tight rhythmic phase with the front rhythmic elements.
- bulletLook at using upmixers on stems or finished sub-mixes to create overhead space. These can turn stereo, 5.1, or 7.1 mixes and stems into 7.1.2 Beds. Some are built with algorithms that can retain centered vocals and downmixes in a stereo deliverable. Use the channel balance to control how much overhead sound is extracted
- bulletThe Size parameter can spread tracks to fill out larger areas of the sound stage and make the room sound bigger.
- bulletThere are a number of excellent 7.1.2 (and higher) reverbs on the market. Use the FMP feature (Follow Main Pan) in Pro Tools when sending an Object to a surround reverb to maintain natural panning in the reverb return.
Beds vs. Objects:
- Dialog
- Reverb returns
- Musical elements meant to envelop the listener
- Ambiences
- Backgrounds
- Diegetic sound effects
- Individual music elements
- bulletThere is no right or wrong approach, and the Bus/Object toggle can be utilized as needed.
Mixing Tips
- bulletApproach a mix from the top down – Dolby Atmos (7.1.2) to 5.1 to stereo. Approaching Dolby Atmos as “do 5.1 or 7.1 first and think of supplemental elements” does not lead to optimal results.
- bulletBuilding contrasting elements in the overheads and sides can increase the feeling of immersion.
- bulletSounds that are intentionally diffuse in the overheads, like wind, are best placed in the overhead Bed channels, which cover the whole ceiling. Using Objects, especially without size metadata, may be too point-source to be as effective.
- bulletIn the Dolby Atmos Panner, use the wedge shape automatic height panning mode when mostly staying left/right; use sphere for pans that go over and across the room.
- bulletPay close attention to how many speakers are being used as you pan to the interior. Panning too far into the middle of the room can decrease the stereo image and quickly become mono.
- bulletSize can be a handy way to grow a sound to fill more speakers (with no phase issues), but as it is basically a 3D cube, it can quickly become room-filling mono. Small quantities of size can do a lot.
- bulletHumans have more acuity to localize things as being above us if they are higher in the frequency spectrum. If you want a stem to be accentuated in the overheads, it’s best to use tracks that have some frequency content above 2K.
- bulletDolby Atmos allows for the full frequency range in all speakers, in both the cinema and at home. This is unlike prior practices for cinema, where surround arrays were bandlimited, removing any low-end content. In Dolby Atmos, don’t be afraid to move sounds with significant low-end away from the screen, as on-screen and off-screen Objects will have the same weight. However, it is important to be aware of where bass-heavy Objects are panned. Not only do humans perceive the verticality of higher frequencies better than bass frequencies, but most soundbars route much of the bass to the sub, so directionality will be perhaps be less noticeable than intended. Excessive low-end in a Dolby Atmos mix may take up too much headroom and weight in the stereo re-render if this is a target deliverable. (This doesn’t pertain to the LFE channel, as LFE is not included in LtRt or LoRo re-renders. As such, it is not recommended to route content solely to the LFE channel.)
- bulletPay attention to the Dolby Atmos soundstage between cuts. Abrupt changes between mixes in stereo and Dolby Atmos can be disorienting.
- bulletWhen panning in a mix stage that has deployed speaker arrays, remember that Objects move through individual speakers in an array, whereas Bed channels will address the arrayed speakers as a set.
- bulletMonitor a mix with Spatial Coding Emulation turned on. You can simulate the final presentation in Dolby Digital Plus at data rates used by leading streaming services by selecting 16 elements in Preferences or Settings.
- bulletIn Pro Tools, VCAs can be used to control and hit loudness target levels as measured by the Renderer or plug-ins (via the loudness re-render).
- bulletIn Pro Tools, you can use groups to gang only plug-in parameters in a given slot. Use this to your advantage to control compressors, limiters, filters, and EQ on multiple Objects.
- bulletUse care when using track groups and master busses with Objects, especially if you are toggling between Objects and Beds, as your Bed master busses may have additional processing, such as limiters.
- bulletUse the Groups in the Renderer to their full advantage; plan routing to make re-renders and multiple deliverables much easier.
- bulletUse the Description field of the Renderer input page. This description shows up in Pro Tools in the “mapping to Object” field in the bus routing. This helps organize complex routing between the two applications.
Mastering, Exports, and Conversion
- bulletUse the LKFS metering in the Renderer to comply with loudness requirements. The meter conforms to international loudness measurement standards.
- bulletAlternatively, use the loudness-specific re-render with other loudness measurement plug-ins and applications.
- bulletUse the different monitoring paths in the Dolby Atmos Renderer to check different channel-based renders.
- bulletWhen recording your master, it may be helpful to add 2-pops to the top of the program if live re-renders are to be recorded. This will make it easier to sync stems for channel-based work downstream. Use FFOA to mark a First Frame of Action that will be read by the encoder.
- bulletIf the Master File contains a 2-pop, use the “set manually” option of ADM or IMF IAB.mxf exports to remove the pop when exporting masters.
- bulletAlternatively, if you want to remove the pops from Master Files destructively, use the Dolby Atmos Conversion Tool trim feature. You can also pre- and post-append the silence to the master if needed.
Multiple Bed Workflows and Templates
Lesson 3 of 5
In conjunction with the use of multiple Bed workflows, the use of templates and input/output configurations is essential to working efficiently. Saving, reusing, and delivering Pro Tools templates (.ptxt), I/O Setup files (.pio) and Renderer input and re-render configuration files (.atmosIR) can take the guesswork out of projects that are handled by multiple mixers in multiple facilities.
Templates and I/O in Pro Tools
In this example, the Pro Tools template is set up with stem Beds and Object tracks grouped (and using colors for easy identification), with the track names matching the bus and Object names set up in the I/O configuration.
The template also has VCAs for every group and master VCA as well. This is an effective way to hit loudness targets within a Pro Tools session.
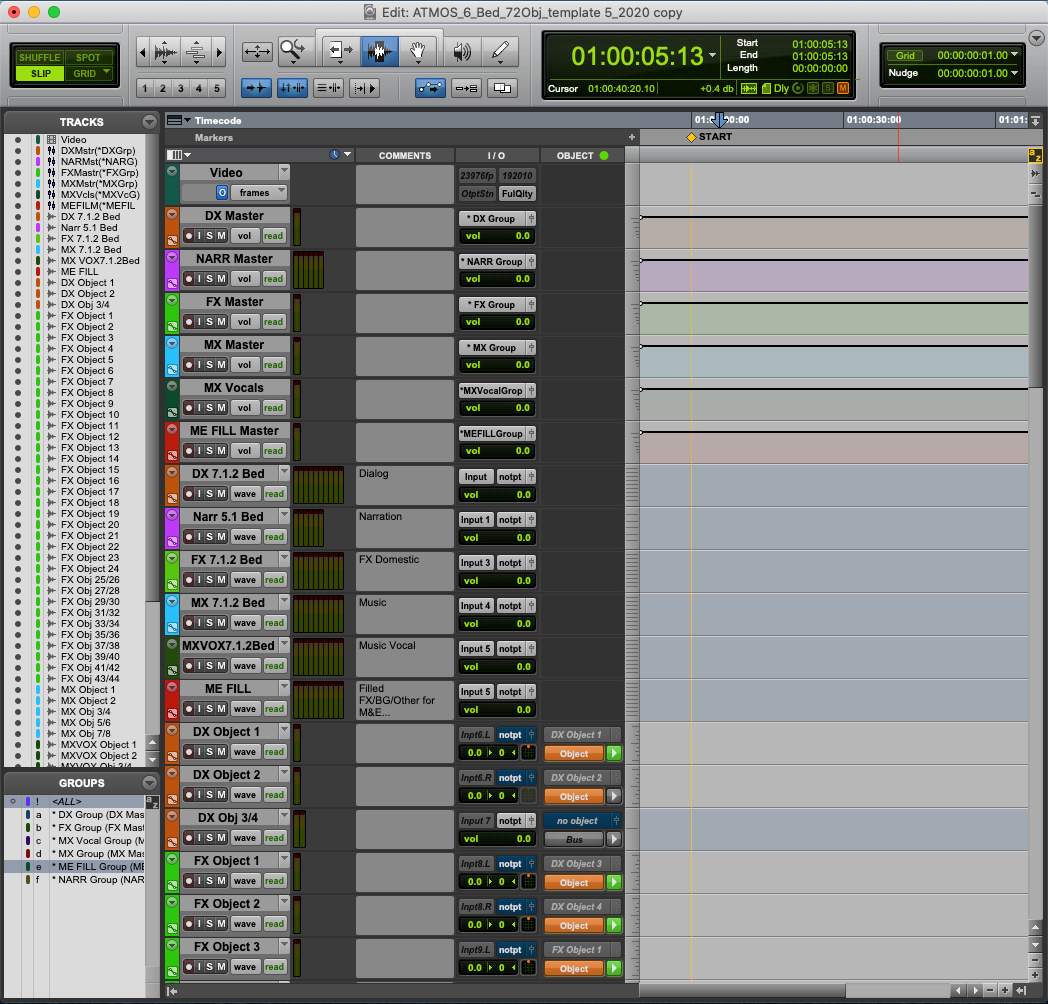
In this example, the Pro Tools I/O page uses the same names in the output page to match the track names and bus names. The Object outputs are all stereo so that both stereo and mono Object tracks can be used.
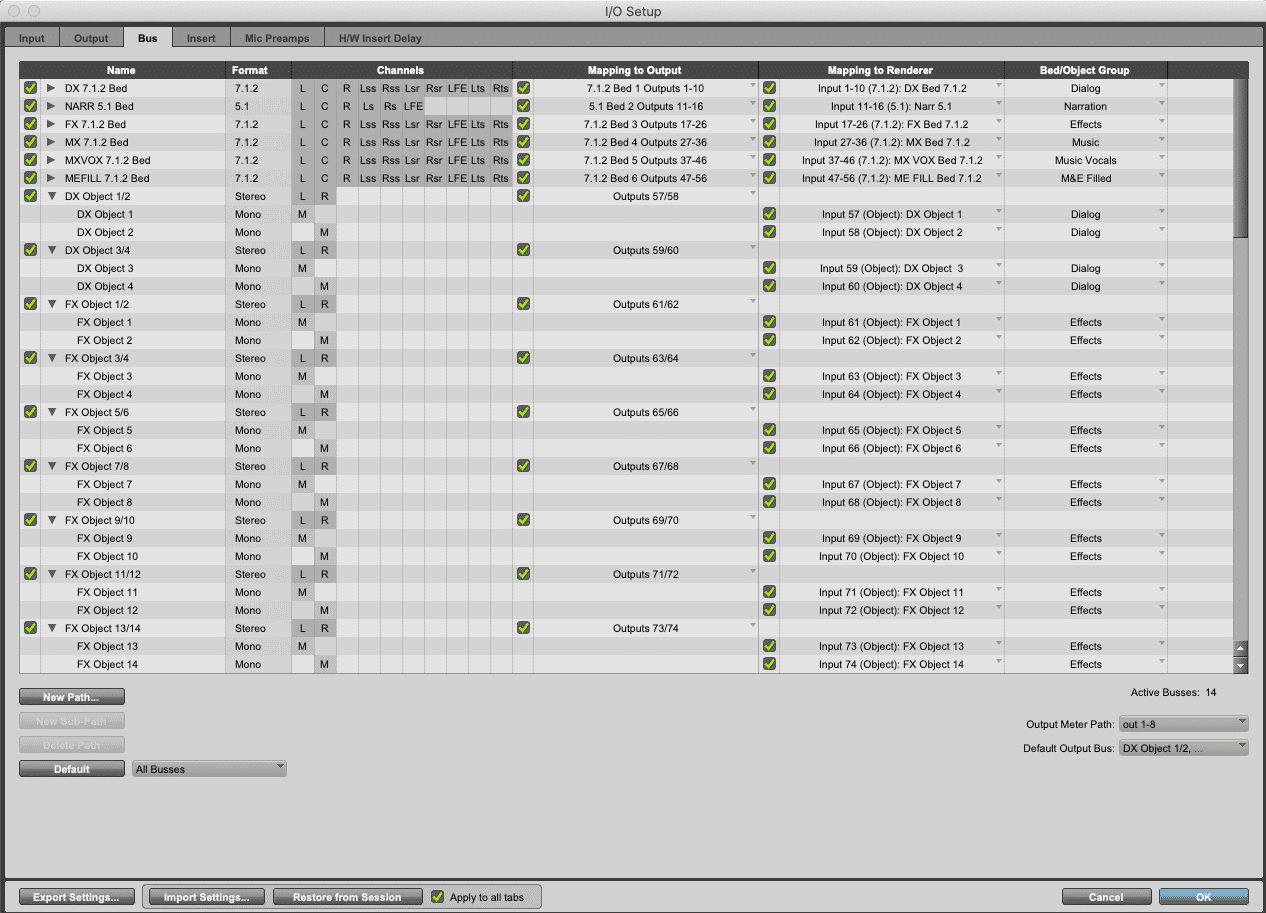
Input Configuration in the Dolby Atmos Renderer
In this example, the Dolby Atmos Renderer uses an exported atmos.IR file to create a configuration that matches the provided sample Pro Tools template. Groups have been created in the Dolby Atmos Renderer Input page for each stem Bed and all stem Objects. Dolby Atmos Renderer inputs are modified to match the width and input numbers for each Bed and are assigned to groups. Object inputs are assigned to groups to match the Pro Tools template. Additionally, the Input descriptions have been filled to match the Pro Tools track names and outputs/bus names in the Pro Tools I/O. Once Pro Tools has established communication with the Dolby Atmos Renderer, the description names populate the “Mapping to Renderer” column in the Pro Tools I/O Setup Bus tab.
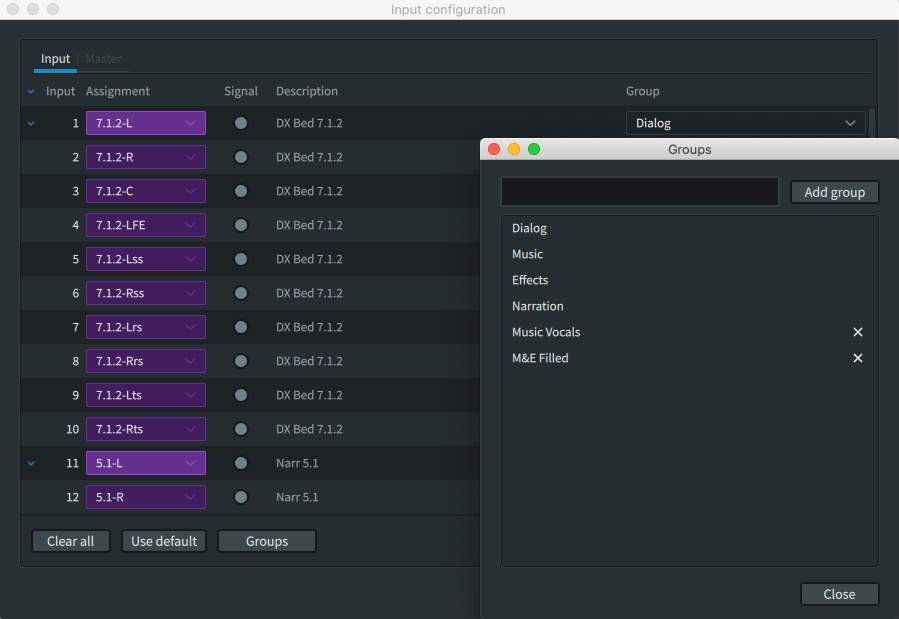
Using this type of Pro Tools template, Pro Tools I/O configuration, and Dolby Atmos Renderer Input configuration provides clarity as to how both the master recorder session and Dolby Atmos Renderer are organized and helps prevent mistakes. It also establishes which Bed and Object assignments are to be used by which premix workstation.
Dolby Atmos Master Files
The Dolby Atmos Renderer records to a master file set (.atmos). The first master in our example is made with only the M&E fill muted in Pro Tools. This creates an “encoding master” for the primary language. Often an export to ADM BWF is done at this stage to provide a single deliverable for encoding. The second master in our example is recorded with everything unmuted in Pro Tools including the primary language Bed/Objects and the M&E fill Bed/Objects. As this will have the M&E fill unmuted it will sound odd during monitoring. This creates a “localization master.”
Working with Localization Masters
Once exported as an ADM BWF, the localization master can be imported to Pro Tools as session data and the original language Bed/Objects used as a guide while being replaced by alternate language(s). The localization master will have all the stem Beds and stem Objects active. These will get turned on or off as needed for downstream localization work. Often the panning automation on Objects can be used or modified to work with the replacement language. Once completed, the original language is muted or deleted, and a new encoding master file is created.
When the localization ADM BWF is imported into Pro Tools as session data, the track names and Mapping to Renderer can be preserved. However, all Objects will be imported to mono tracks.
There are a few ways to configure the I/O for use with a multiple Bed ADM BWF including using a supplied .pio file, a supplied .atmosIR configuration file for the Renderer, or importing the ADM BWF to an cleared and empty I/O Setup with the output and bus paths removed.
However, the fastest and easiest way to work with a localization ADM BWF with multiple beds is to:
- 11Use either a supplied .atmosIR file or the open the ADM BWF in the Renderer.
- 22Export a .atmosIR configuration file locally.
- 33Close the ADM BWF master.
- 44Create a new master file.
- 55import the .atmosIR file just exported for use with the Renderer input.
- 66Create a Pro Tools session.
- 77Open the I/O Setup.
- 88Delete all output and bus paths.
- 99Use the Dolby Atmos Renderer as the Default in I/O Setup bus tab.
When the same localization ADM BWF is imported all the track names, bus names, outputs, Mapping to Renderer input descriptions, Bed/Object groups will match within Pro Tools and the Renderer.
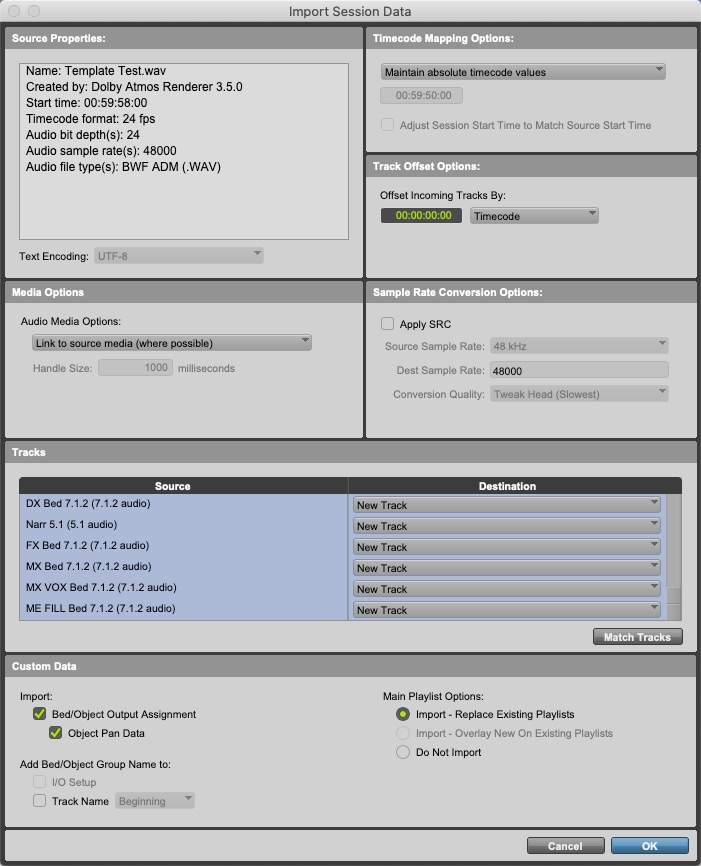
The Groups and VCAs will need to be re-established. The same .atmosIR can be used to maintain the proper input assignments and groups in the Dolby Atmos Renderer during recording of the alternate language master.
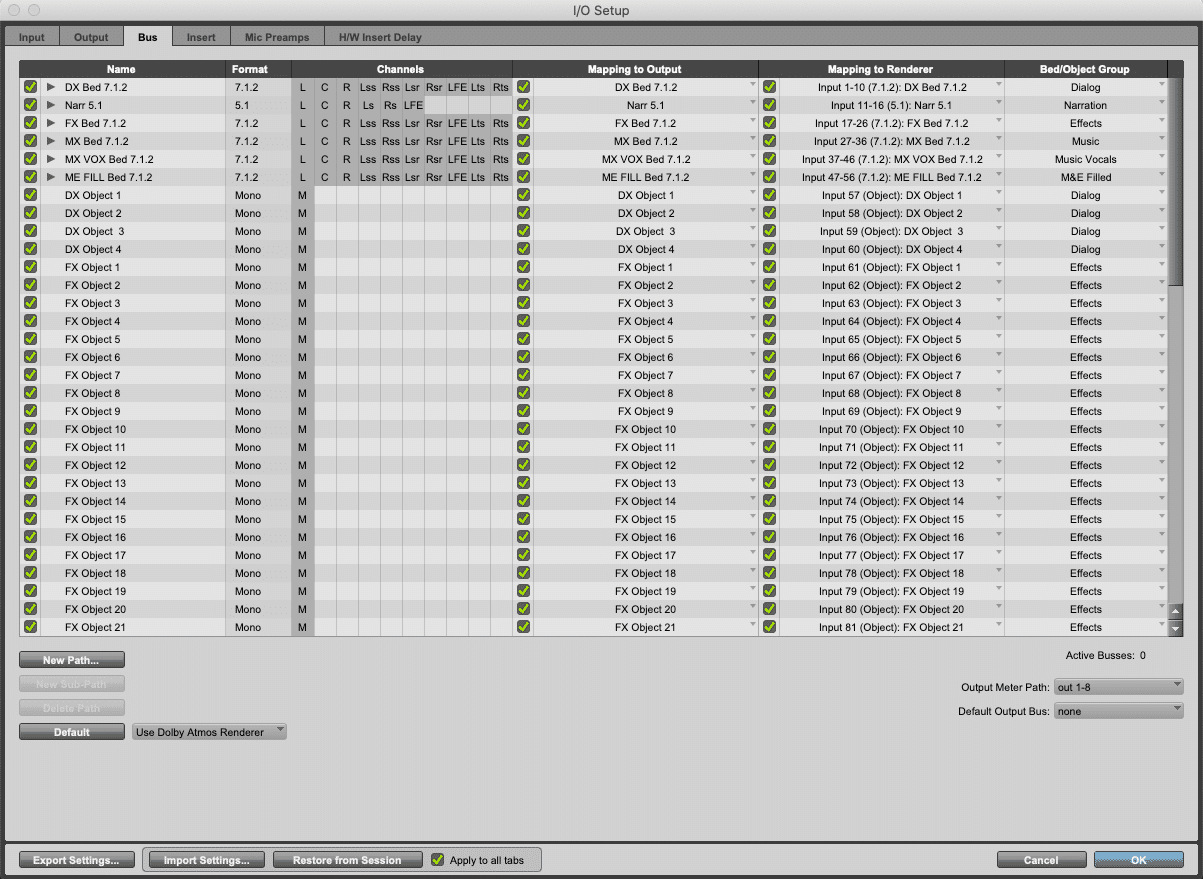
Channel-Based Deliverables
In this example, the Dolby Atmos Renderer Input configuration establishes groups for each stem bed and stem Object. To derive channel-based full mixes and localization assets, re-renders are generated using the groups defined in the Dolby Atmos Renderer prior to the multibed mastering process. These group names and assignments are saved within the master file set and ADM BWF. Re-renders can be generated for full mixes as well as stems and guide tracks for final deliverables (for channel-based encoding or for localization vendors). Re-renders can be generated at the required channel width: stereo, 5.1, 7.1, etc. These can be generated in real time or exported offline as either interleaved or mono .wav files. Exporting re-renders away from the soundstage provides a low-cost way to generate all required channel-based deliverables.
If a delivery specification calls for channel-based deliverables to conform to True Peak limits, dynamics processing will need to be applied in Pro Tools (either on the recorded live re-renders or imported offline re-renders) prior to being re-exported.

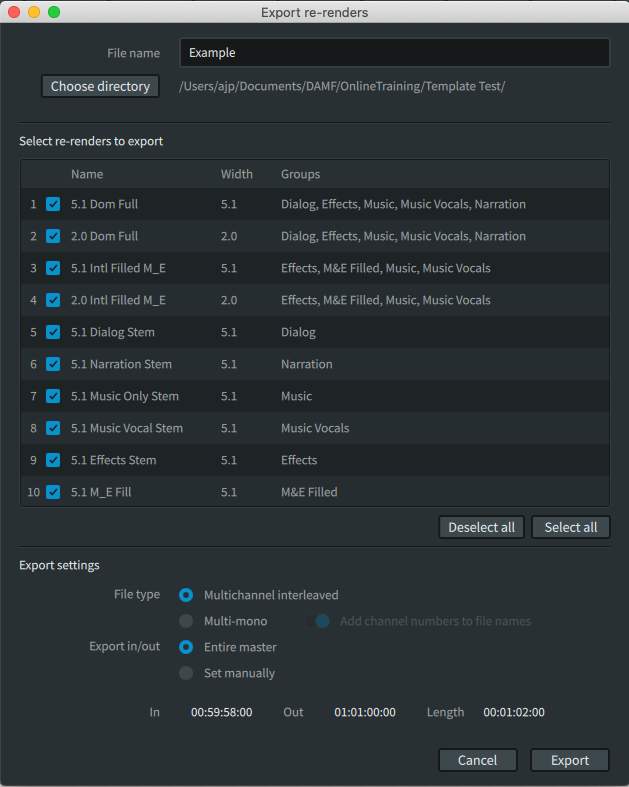
Quality Control Fundamentals
Lesson 1 of 4
The final check, called Quality Control—or QC for short—can begin as soon as a master file is finalized following a recording.
QC of the master .atmos file set can be performed from the Renderer either as an audio-only playback or synchronized to a proxy or reference video played back from Pro Tools.
QC of an Exported Dolby Atmos Master File
If the deliverable is an ADM BWF or IMF IAB, export the ADM BWF or IMF IAB per the delivery specs (with or without pre-/post-roll as required) and open the exported file for the QC pass. While export to ADM BWF is non-destructive, it is still best practice to QC the final deliverable. Export to IMF IAB quantizes the metadata, so it is important to QC the exported file.
There are third-party IMF mastering applications on the market that can import Dolby Atmos master files. These can be used to QC the Dolby Atmos master against reference video, as well as to author and QC the complete IMF package. These include Colorfront – Transkoder, Rohde & Schwarz – Clipster, Blackmagic Design – Resolve, and MTI Film – Cortex
Master File QC Listening Environment
Audio QC should be performed in a 7.1.4 listening environment. If performed in a dedicated QC environment, professional monitoring/monitor control should be used in a room with sufficient isolation and Noise Criterion (NC) rating. This does not need to match the mix environment.
QC of Channel-Based Deliverables
All channel-based deliverables must be QC’ed. This includes full mixes, M&E (Music & Effects), and stems as required. This can be done in Pro Tools, either using live re-renders or by exporting offline re-renders from the Renderer and importing into the DAW.
Remember that dynamics processing may need to be applied in Pro Tools to achieve True Peak limits. In this case the results should be bounced to disk and QC’ed as the final deliverable of the channel-based assets.
Third-party playback and automated QC platforms can also be deployed, as per the delivery spec.
QC of MP4 Exports
The Renderer allows for the export of an MP4 file with the Dolby Atmos master file encoded as Dolby Digital Plus JOC with black 720p video. As of Renderer v3.7 the MP4 can contain black 720p video (the default), no video, or custom video. Film and Music encoding modes can be used as appropriate for the content. Film encoding mode allows user-selectable encoding at 448kbps or 768kbps to provide parity with common streaming bitrates.
QC of the MP4 (with black or custom video) is possible via several methods including:
- bulletSideloaded on a USB drive and played back via a Blu-Ray player set to audio passthrough and connected via HDMI to an AVR enabled with Dolby Atmos or soundbar with Dolby Atmos
- bulletPlayback via the Safari browser on macOS and iOS devices and “pushed” to an AppleTV4k using Airplay connected via HDMI to an AVR enabled with Dolby Atmos or soundbar with Dolby Atmos
- bulletPlayback on iOS devices using Airpods or headphones
Options for streaming playback include (but are not limited to):
- bulletPlayback via the Plex server application from a Mac or Windows computer to the Plex Player application on an AppleTV4K connected via HDMI to an AVR enabled with Dolby Atmos or soundbar with Dolby Atmos.
- bulletStreamed from AWS storage packaged as Apple HLS via a Safari browser and “pushed” to an AppleTV4k using Airplay connected via HDMI to an AVR enabled with Dolby Atmos or soundbar with Dolby Atmos.
- bulletStreamed from a Mac or Windows computer configured as an HTTP server with playback of HLS packaged .m3u8 via a Safari browser “pushed” to an AppleTV4k using Airplay, or MPEG-Dash packaged .mpd from the VLC application to a Google Chromecast Ultra4k; Either connected via HDMI to an AVR enabled with Dolby Atmos or soundbar with Dolby Atmos.
While the first three methods are relatively straightforward, the other workflow options require additional knowledge, effort, and configuration.
Playback on consumer devices allows QC of the mix on a variety of possible listening configurations, including soundbars, a variety of discrete speaker configurations, upward-firing speakers, and Dolby Atmos virtualization with tablets and phones.
QC of the MP4 can also be done on professional applications such as the Dolby Reference Player, GrayMeta Iris QC platform, with file-based analysis using MediaInfo, and other third-party QC applications.
It is also possible to demux the encoded Dolby Digital Plus stream (.ec3) and mux with program video encoded with the .h264 or .h265 codecs.
Instructions for doing so using free command line tools or using Amazon AWS Media Convert are available on the Dolby Atmos Post and Music Production Knowledge Base.
QC of Channel-Based Deliverables
QC criteria for Dolby Atmos mixes is a superset of criteria used for channel-based assets. Basic audio QC criteria apply such as:
- bulletFile duration
- bulletSample rate (channel-based assets)
- bulletBit depth (channel-based assets)
- bulletConformance with loudness specification (LKFS/LUFS)
- bulletTrue peak levels (channel-based assets only)
- bulletClipping/distortion
- bulletDropouts
- bulletHiss
- bulletCrackle
- bulletTicks/pops
As well as subjective aspects of the mix, including:
- bulletDialog intelligibility monitored in 7.1.4 (and lower) speaker layouts
- bulletMissing effects
- bulletSynchronization with picture for lip sync and effects
- bulletObject placement in relation to onscreen action
Reporting of QC issues should be done in conformance with the customer requirements re: verbiage, severity, format, etc.
Third-party professional QC providers are also sanctioned by some of the leading streaming services.
Loudness Measurement with Dolby Atmos
Lesson 2 of 4
Loudness measurement is not performed on a full Dolby Atmos mix but instead on a 5.1 re-render.
This is done for two reasons:
- bulletThere isn’t an effective way to measure the loudness of an entire Dolby Atmos presentation.
- bulletMore importantly, this practice ensures loudness continuity between Dolby Atmos content and content that is not mixed or presented in Dolby Atmos. A home viewer watching a movie in Dolby Atmos who switches back to 5.1 content should not experience a shift in loudness.
Loudness measurement can be performed using both the real-time and offline loudness measurement built into the Dolby Atmos Renderer. Alternately, a 5.1 re-render can be generated and measured in loudness apps and DAW plug-ins.
Delivery specifications vary, but –23 LUFS, –24LKFS, and –27LKFS are common loudness targets.
True Peak (dBTP) targets are difficult to achieve with Dolby Atmos content, even if limiting is used in the DAW session. Rendering to 5.1 involves unpredictable summing. Additionally, the nature of True Peak measurements are interpolative.
While True Peak limits are commonly specified in delivery requirements when working in 5.1, when working in Dolby Atmos, True Peak specifications should be a target value. As long as the dBTP measurements aim for –2dBTP and do not exceed –.1dBTP, the limiter that is used in the encoding process will be sufficient to prevent audible clipping.
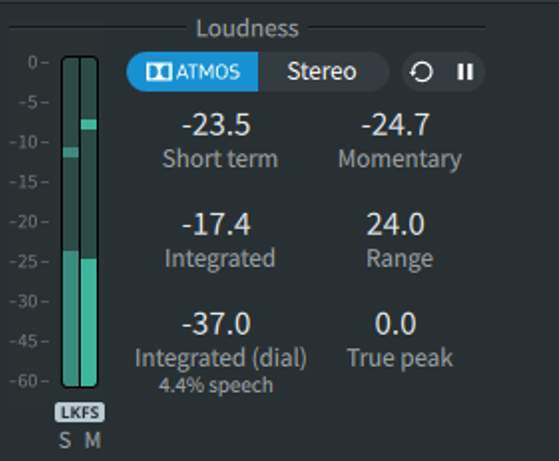
The loudness measurement tool in the Dolby Atmos Renderer has a soft clip limiter inline that mimics the encoding process. If using external loudness measurement applications or plug-ins, use the “loudness” 5.1 Re-render that has this limiter applied to get consistent measurements.
Loudness measurement is also performed during the encoding process and the dialnorm metadata value is set according to the measured value.
If True Peak limits must be met for channel-based Re-renders, the re-renders will need to be limited as an additional processing step in the DAW.
Exercise 2
Part 1: Configuration
Lesson 1 of 4
The objective for this section is to set up the Pro Tools I/O and Renderer Input Configuration for a multiple Bed workflow. Refer to the previous lessons if needed.
Download the PT210D_v2022_Exercise 2.zip file to the Pro Tools workstation by clicking the link below. After download, unzip the contents onto the media drive.
Click the link to download the zip file containing the content that you will use during this exercise.DOWNLOAD
If the download link provided above does not initiate the download, right-click the link and copy the link address and paste it into a new tab or window in your browser to initiate the download of the media.
For this set of exercises, three ADM BWF files are provided each with different languages, one with an alternate music track. An .mp4 file is provided for the video track. For this exercise, start with A_Sound_Proposal_German_AltMusic.wav.
If at any point the finished project files are needed for reference, the Renderer Input Configuration (.atmosIR), Pro Tools I/O setup (.pio), and Pro Tools session (.ptx) files are provided. However, it is recommended that the exercises be completed without using these files.
The most efficient options when working with ADM BWF files that use multiple Beds are:
- bulletTo prepare the I/O Setup prior to importing the ADM BWF as session data by pulling the input configuration from the Renderer which is set as Default in the I/O Setup Bus tab. This can be done by importing a supplied .atmosIR file to the Renderer. Alternatively, if no .atmosIR file is supplied, this can be done by opening the ADM BWF in the Renderer, exporting a .atmosIR file from the master, closing the ADM BWF and then importing the .atmosIR file to the Renderer with the source set to Input.
- bulletTo have the I/O set by the ADM BWF import process. For the purposes of this exercise, we are going to examine the structure of the ADM BWF from the Import Session Data Track window track pane and recreate the Renderer input configuration manually prior to undertaking the first option.
Setting Up the Dolby Renderer
Follow these steps in the Renderer:
1. Launch the Renderer.+
2. Launch the Renderer Remote application.+
3. Close any open master files.+
4. Verify the Renderer I/O and synchronization configuration.+
5. Set frame rate to 23.976 fps.+
6. Set up the Renderer Input Configuration.+
7. Set up the main Renderer window.+
Setting Up Pro Tools
Follow these steps in Pro Tools:
1. Launch Pro Tools if closed.+
2. Click Cancel from the Dashboard.+
3. Establish Connection with the Renderer.+
4. Establish synchronization.+
5. Set or verify the correct Playback Engine is in use.+
6. Configure Session>Setup.+
Creating a New Session
Create a new session by choosing File > Create New or by pressing Cmd+N, saving and closing any already open session.
From the dashboard:
- 11Name the session A_Sound_Proposal_Exercise.
- 22Uncheck Create from Template if checked.
- 33In the I/O Settings drop-down menu select Last Used.
- 44Set the File Type to BWF (.WAV).
- 55Set the Sample Rate to 48 kHz.
- 66Set the Bit Depth to 24-Bit.
- 77Click Create.
- 88Configure Session > Setup or press Cmd+2.Set the timecode rate to 23.976. Set the session start to 00:59:50:00.
- 99Choose File > Import > Session Data.
- 1010Browse to the location of the supplied A_Sound_Proposal_German_AltMusic.wav ADM BWF file, select the file, and click Open.
Inspect the Tracks pane of the Import Session Data dialog box – do not import at this point.

From the track names, note that the session will require:
- 4 x 7.1.2 outputs for the four stem beds in the order of DX, FX, BG, MX
- 46 x mono outputs for Object audio
From the track names, note the distribution and order of Objects among the stems:
- 2 x DX Objects
- 17 x FX Objects
- 23 x BG Objects
- 4 x MX Objects
- 2 x AltMX Objects
- Click Cancel to cancel the ADM Import.
- Leave the Pro Tools session open.
Renderer Input Configuration
In the Dolby Atmos Renderer (or Renderer Remote), manually recreate the Input Configuration:
- 11Choose Window > Input Configuration.
- 2
- Add 3 x 7.1.2 Beds in addition to the default Bed.
- Choose the Assignment drop-down of inputs 11, 21, and 31 and select 7.1.2.
- 3
- Enter the name “Background” and click Add group.
- Next, add Groups for Dialog, Effects, and Music.
- Close the Groups dialog.
- 4
- Assign 1–10 to the Dialog Group.
- Click within the input description of any channel from 1 to 10 and enter DX Bed.
- Assign 11–20 to the Effects Group.
- Click within the input description of any channel from 11 to 20 and enter FX Bed.
- Assign 21–30 to the Background Group.
- Click within the input description of any channel from 21 to 30 and enter BG Bed.
- Assign 31–40 to the Music Group.
- Click within the input description of any channel from 31 to 40 and enter MX Bed.
- 5
- Assign 41–42 to the Dialog Group.
- Click within the input description to add “DX Object 1” to input 41.
- Hold Option+Cmd (Mac) or Ctrl+Alt (Windows) and press Enter to sequentially name the input description.
- Assign 43–57 to the Effects Group.
- Click within the input description to add “FX Object 3” to input 43.
- Hold Option+Cmd (Mac) or Ctrl+Alt (Windows) and press Enter to sequentially name the input description.
- Assign 58–80 to the Background Group.
- Click within the input description to add “BG Object 18” to input 58.
- Hold Option+Cmd (Mac) or Ctrl+Alt (Windows) and press Enter to sequentially name the input description.
- Assign 81–84 to the Music Group.
- Click within the input description to add “MX Object 41” to input 81.
- Hold Option+Cmd (Mac) or Ctrl+Alt (Windows) and press Enter to sequentially name the input description.
- Assign 85–86 to the Music Group.
- Click within the input description to add “AltMX Object 45” to input 85.
- Hold Option+Cmd (Mac) or Ctrl+Alt (Windows) and press Enter to sequentially name the input description.
- Inputs after 86 can be set to null.
- Highlight (Shift-click) Inputs 86 – 128 and use the Assignment drop-down menu to select Null (–).
The result will look like this:

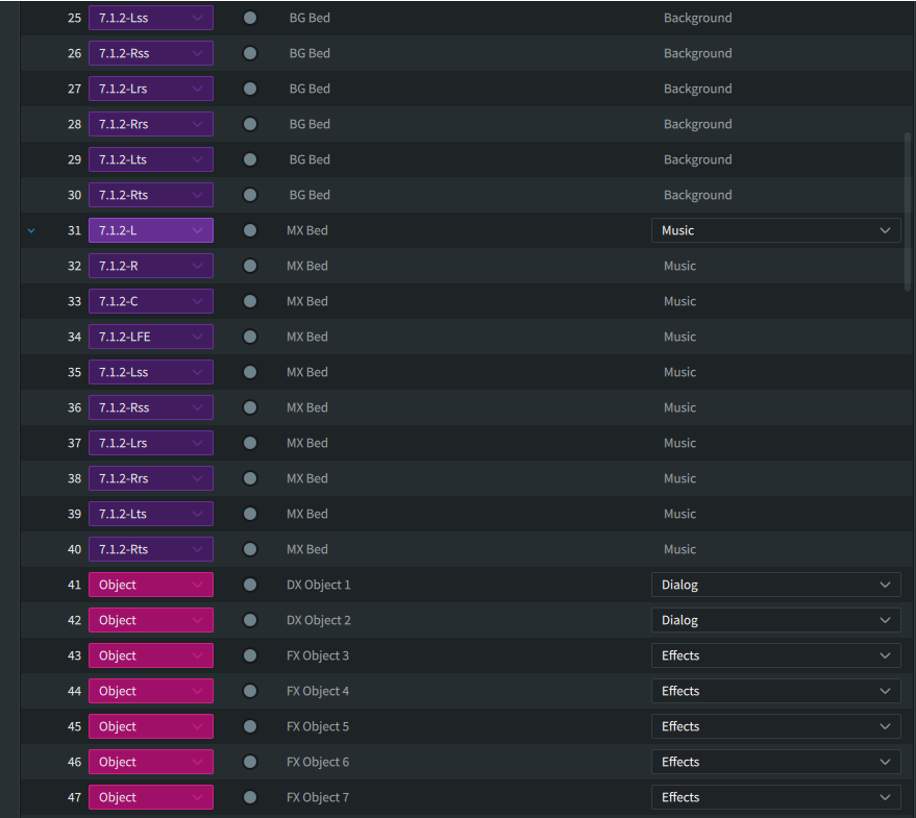
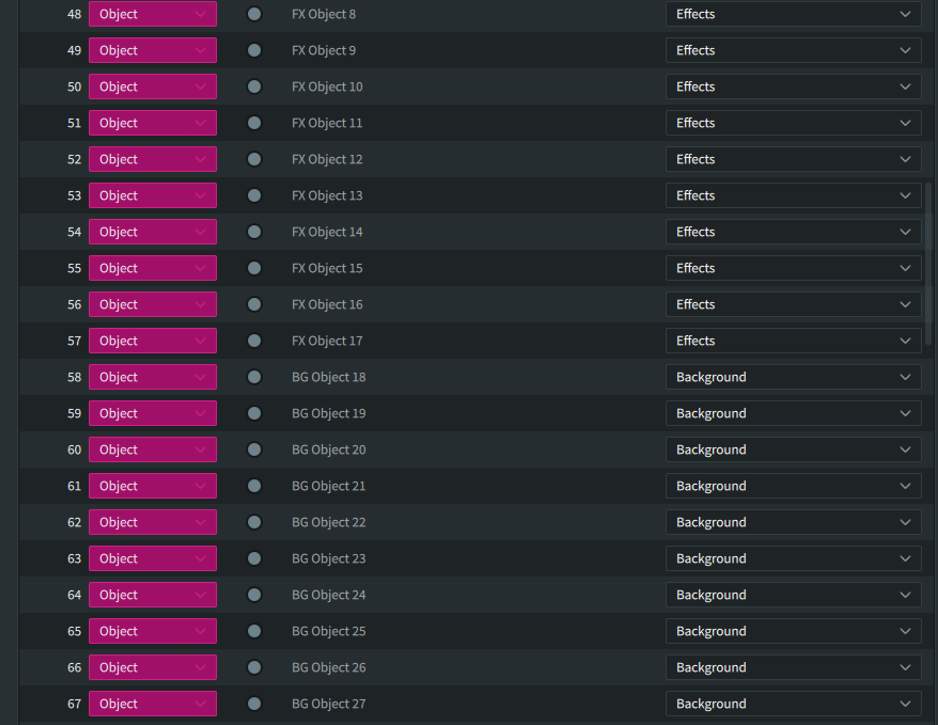
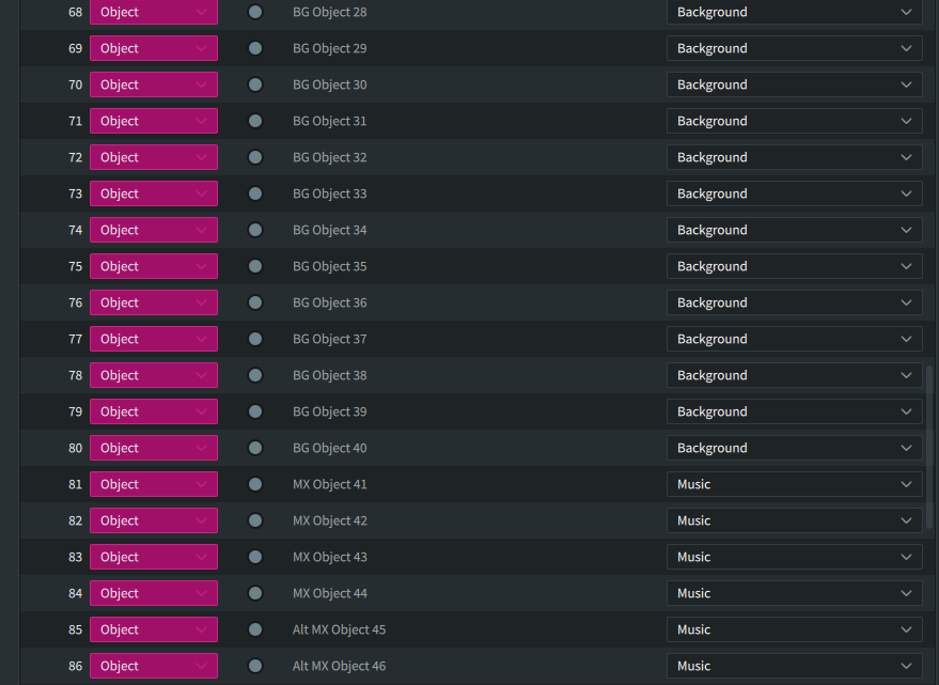
In this case, the Object numbers are sequential across stems. In other cases, the Object numbering will restart with each stem. This depends on personal preference.
Export the Input/Binaural/Re-render Config to the same location as the ADM BWF files:
- Choose File > Export Input/Binaural/Re-render Config or press Option+Shift+E.
- Name the config A Sound Proposal.
The resulting file will have the extension .atmosIR.
Use the Dolby Renderer to Create Pro Tools’ I/O Setup
- 11Choose Setup > I/O Setup > Bus tab.
- 22Click within the Bed/Object Group column in the Bus tab to bring up the Manage Bed/Object Group Names window. Set Manage Bed/Object Group Names and Assignments to Dolby Atmos Renderer.
- 33If all bus paths are already deleted in the Bus tab, create a new path and map it to the Renderer to create an entry in the Bed/Object Group. column to click on and bring up the Manage Bed/Object Group Names window. Set Manage Bed/Object Group Names and Assignments to Dolby Atmos Renderer.
- 44Click OK.
- 55Delete all existing Output paths from the Output tab.
Use the drop-down menu to the right of the Default button to select Use Atmos Renderer.
Click Default.


The Output and Bus tabs of the I/O Renderer will be populated according to the Renderer Input Configuration.
Click OK.
- 66Import the supplied A_Sound_Proposal_German_AltMusic.wav ADM BWF file as session data: Import>Session Data or press Option+Shift+I.
- 77Navigate to the directory containing A_Sound_Proposal_German_AltMusic.wav.
- 88Set all tracks to New Track (Option+click).
- 99Click OK.
- 1010Delete all existing Output paths from the Output tab.
In the Custom Data pane, check the following:
- Import:
- Object Output Assignment
- Object Pan Data
- Add Bed/Object Group Name is grayed out as the Dolby Atmos Renderer was set to Manage Bed/Object Group Names
- Click OK.

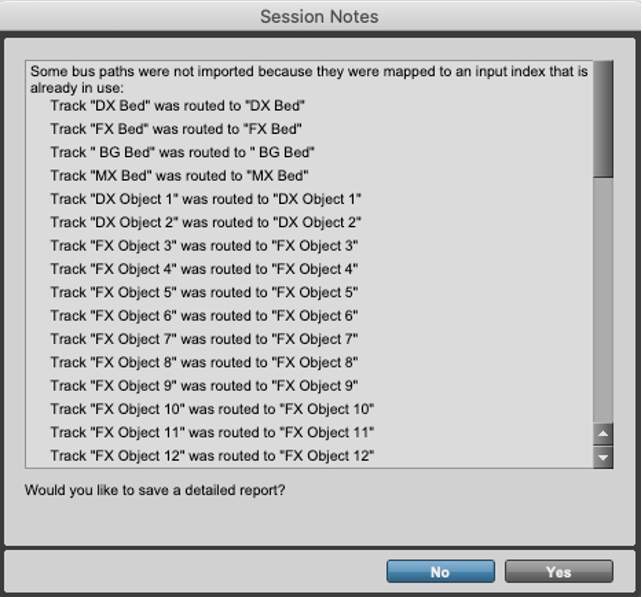
A Session Notes dialog will appear that calls out that existing matching paths and mapping from the I/O were used instead of being created from the ADM Import.
Click No.
All mono Object audio tracks in the Edit window should be set to Object (orange).
If not, Shift-Click to select the mono Object audio tracks and Option Click on any of the Bus/Object toggle switches to set all mono Object audio tracks to Object.
The track names, assigned Object bus names, and audio files names in the Edit window will be named identically.


The bus and output names in the I/O Setup Bus tab will also correspond to the Renderer input configuration descriptions.
Additional Steps
If the LTC Gen plug-in will be used for synchronization with the Renderer, another output, bus, and mono Audio track will need to be created:
- Choose Setup > I/O Setup > Output tab.
- Add new path: 1 x mono output and name it LTC Gen.


- Click and drag the output to 129 and ensure that the same channel is used for LTC input in the Renderer (set in Preferences /Settings).
- Click OK.
Add 1 x mono Audio track in the Edit or Mix window, name the track LTC Gen and insert the LTC Generator plug-in.
- Choose Track > New or type Shift+Cmd+N.
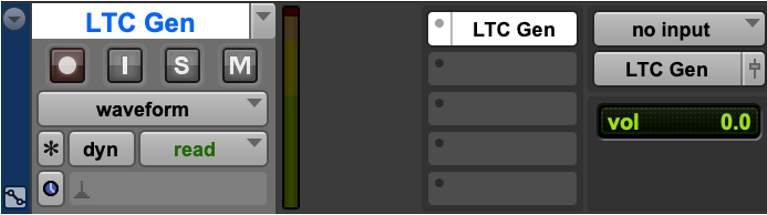
Saving Your Work
Be sure to save this session and/or save as a template. Future exercises can use this template as a starting point.
Part 2: Track Layout
Lesson 2 of 4
The objective for this part is to combine tracks from three ADM BWF files to create a multi-language source master Pro Tools session, and to establish groups and VCA assignments to facilitate mastering operations.
Setting Up the Dolby Renderer
Follow these steps in the Renderer:
1. Launch the Renderer.+
2. Launch the Renderer Remote application.+
3. Close any open master files.+
4. Verify the Renderer I/O and synchronization configuration.+
5. Set frame rate to 23.976 fps.+
6. Set up the Renderer Input Configuration.+
7. Set up the main Renderer window.+
Setting Up Pro Tools
Follow these steps in Pro Tools.
First, Open the saved session A_Sound_Proposal_Exercise.
Before importing additional tracks and creating duplicate track names, it is helpful to label existing tracks and audio files to differentiate them.
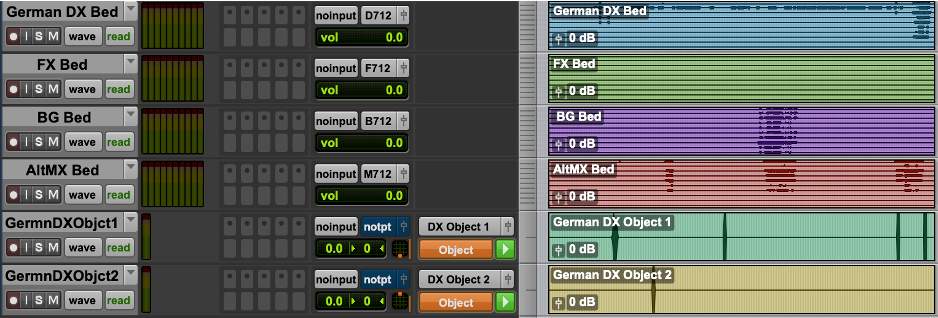
The ADM BWF file imported in the Exercise 4 was A_Sound_Proposal_German_AltMusic.wav.
Rename track and audio files:
Beds
- DX Bed to German DX Bed
- MX Bed to AltMX Bed
Objects
- DX Object 1 to German DX Object 1
- DX Object 2 to German DX Object 2
Importing Tracks
Now, import the English language tracks:
- 1
- Choose File > Import >Session Data.
- 22Browse to the location of the supplied A_Sound_Proposal_English.wav ADM BWF file and click Open.
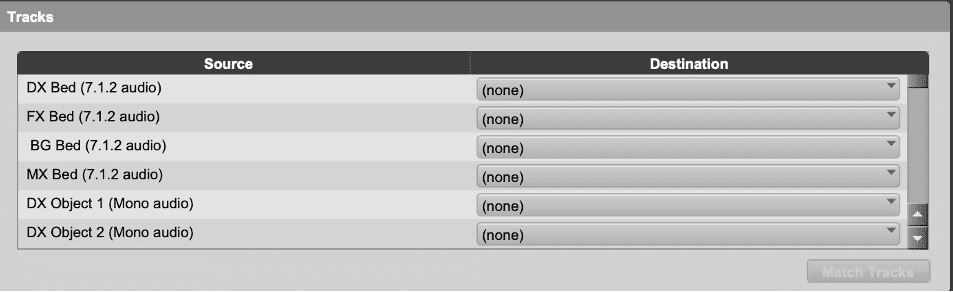
The Tracks pane of the Import Session Data window will show you the tracks available for import.
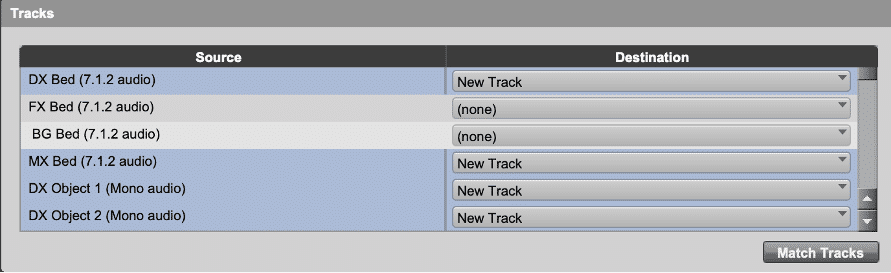
In the destination field, select New Track for:
- DX Bed (7.1.2 audio) – This will be English.
- MX Bed (7.1.2 audio) – This will be the original Music Bed.
- DX Object 1 (Mono audio) – This will be English.
- DX Object 2 (Mono audio) – This will be English.

In the original German_AltMusic file, the tracks below were silent. In the destination field, select to replace:
- MX Object 41 (Mono audio) with MX Object 41
- MX Object 42 (Mono audio) with MX Object 42
- MX Object 43 (Mono audio) with MX Object 43
- MX Object 44 (Mono audio) with MX Object 44
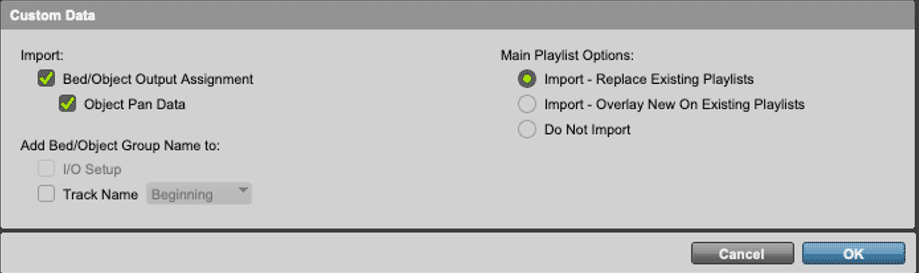
In the Custom Data panel, select:
- Import
- Object Pan Data
- Object Output Assignment
Click OK.
As in the first part of this exercise, a Session Notes dialog will show the bus paths were already in use.
- 33Click No.
- 4
- DX Bed to English DX Bed
- DX Object 1 to English DX Object 1
- DX Object 2 to English DX Object 2
- English DX Bed will be assigned to the DX 7.1.2 Bed.
- English DX Object 1 will be assigned to Object bus DX Object 1 with the Object Control Mode Off.
- English DX Object 2 will be assigned to Object bus DX Object 2 with the Object Control Mode Off.
- 55Drag the new Bed and Object tracks to align with the other Bed track in the session (English DX Bed next to German DX Bed, etc.).
Now, import the French language tracks:
- 6
- Choose File > Import >Session Data.
- 77Browse to the location of the supplied A_Sound_Proposal_French.wav ADM BWF file and click Open.
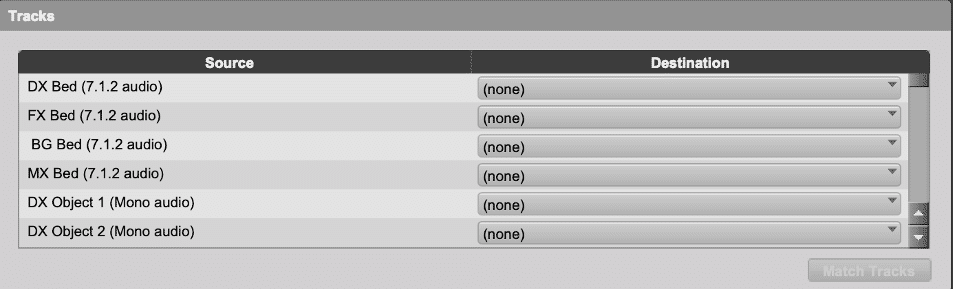
The Tracks pane of the Import Session Data window will show you the tracks available for import.
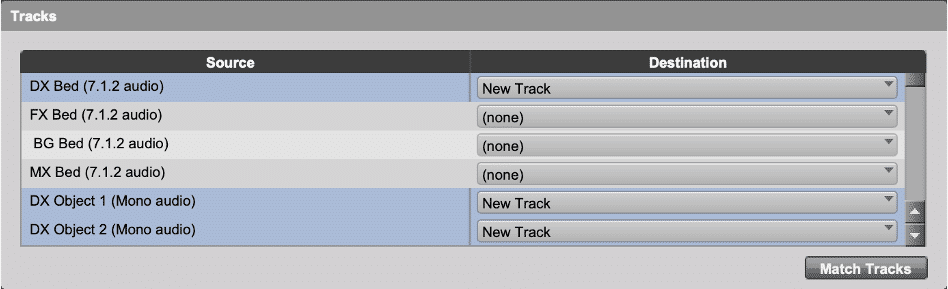
In the destination field, select New Track for:
- DX Bed (7.1.2 audio) – This will be French.
- DX Object 1 (Mono audio) – This will be French.
- DX Object 2 (Mono audio) – This will be French.
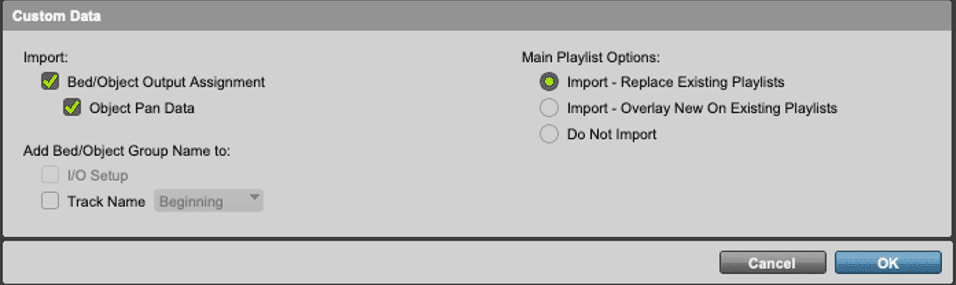
In the Custom Data panel, select:
- Import
- Object Pan Data
- Object Output Assignment
Click OK.
- 88Click No.
- 9
- DX Bed to French DX Bed
- DX Object 1 to French DX Object 1
- DX Object 2 to French DX Object 2
- French DX Bed will be assigned to the DX 7.1.2 Bed.
- French DX Object 1 will be assigned to Object bus DX Object 1 with the Object Control Mode Off.
- French DX Object 2 will be assigned to Object bus DX Object 2 with the Object Control Mode Off.
- 1010Drag the new Bed and Object tracks to align with the other Bed track in the session (French DX Bed next to German DX Bed, etc.).
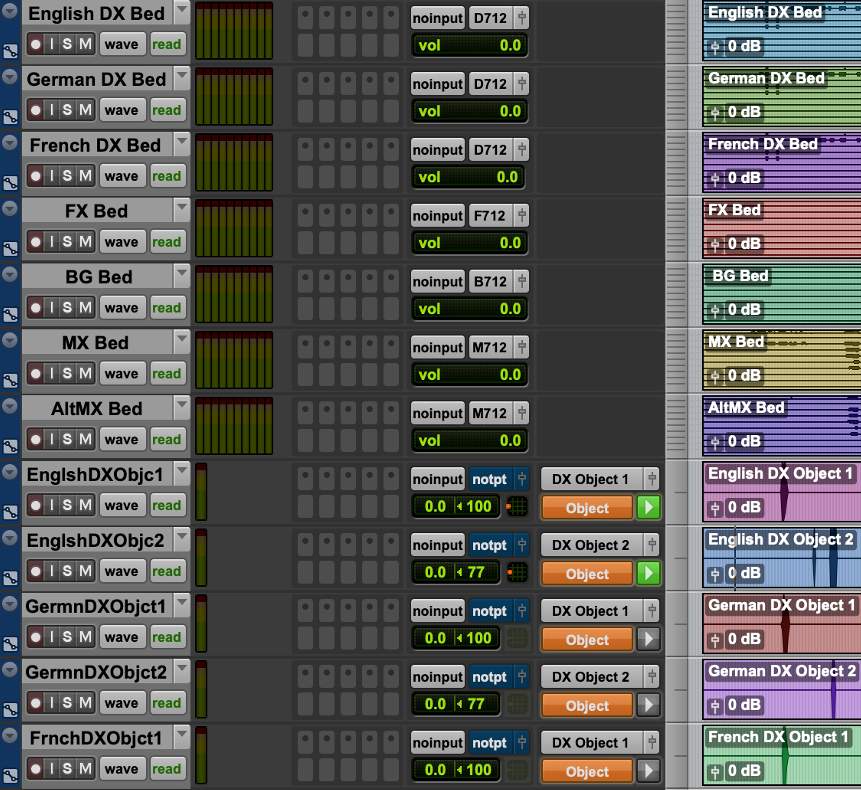
As the dialog Objects share panning, set the Object Control Mode to Master for English DX Object 1 and 2 by first setting the Object Control Mode to Off for German Dialog Object 1 and 2.
This should appear as shown in the Edit window.
Select the last track in your session, and add 8 VCA Master tracks:
- From the menu bar, navigate to Track > New or press Shift+Cmd+N.
Name the VCAs:
- Master
- Eng DX Master
- Ger DX Master
- Frch DX Master
- FX Master
- BG Master
- MX Master
- AltMX Master
From the Group pane in the Edit window, create the following groups with the bulleted membership via the drop-down or type Command+G.
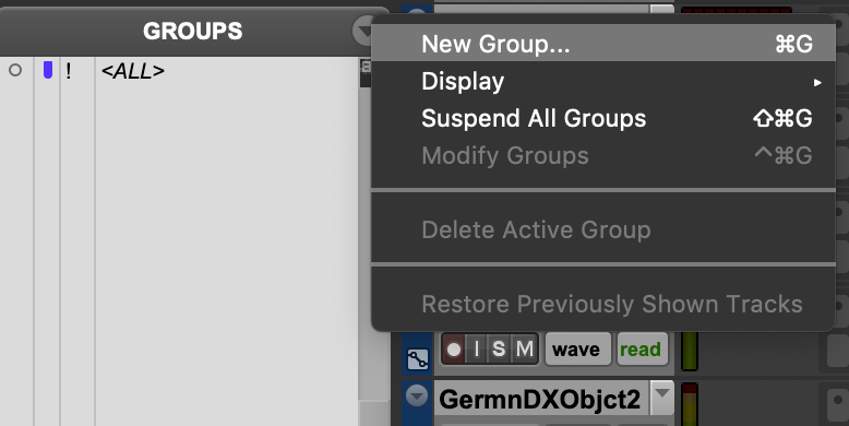
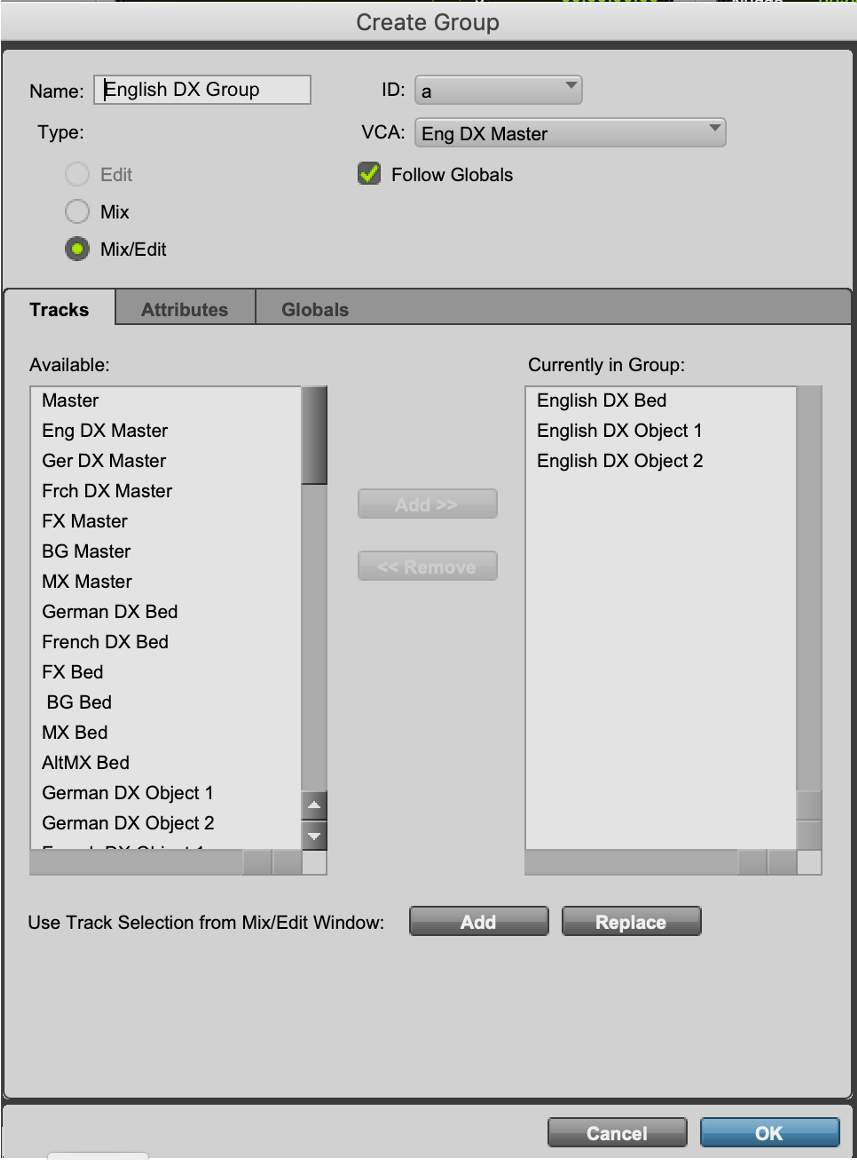
Use Add>> and <<Remove to populate the Groups (or double-click on a track name).
Create the following groups:
- Name the English DX Group, English DX Group.
- Assign the VCA as Eng DX Master and ensure the following are part of that group:
- English DX Bed
- English DX Object 1
- English DX Object 2
- Name the German DX Group, German DX Group.
- Assign the VCA as German DX Master and ensure the following are part of that group:
- German DX Bed
- German DX Object 1
- German DX Object 2
- Name the Frch DX Group, French DX Group.
- Assign the VCA as Frch DX Master and ensure the following are part of that group:
- French DX Bed
- French DX Object 1
- English DX Object 2
- Name the FX Group, FX Group.
- Assign the VCA as FXMaster and ensure the following are part of that group:
- FX Bed
- FX Object 3 thru FX Object 17
- Name the BG Group, BG Group.
- Assign the VCA as BG Master and ensure the following are part of that group:
- BG Bed
- BG Object 18 thru BG Object 40
- Name the MX Group, MX Group.
- Assign the VCA as MX Master and ensure the following are part of that group:
- MX Bed
- MX Object 41 thru MX Object 44
- Name the AltMX Group, AltMX Group.
- Assign the VCA as AltMX Master and ensure the following are part of that group:
- AltMX Bed
- AltMX Object 45
- AltMX Object 46
- Name the Master Group, Master Group.
- Assign the VCA as Master and ensure the following are part of that group:
- Eng DX Master
- Ger DX Master
- Frch DX Master
- FX Master
- BG Master
- MX Master
- AltMX Master
- Assign the Master as VCA
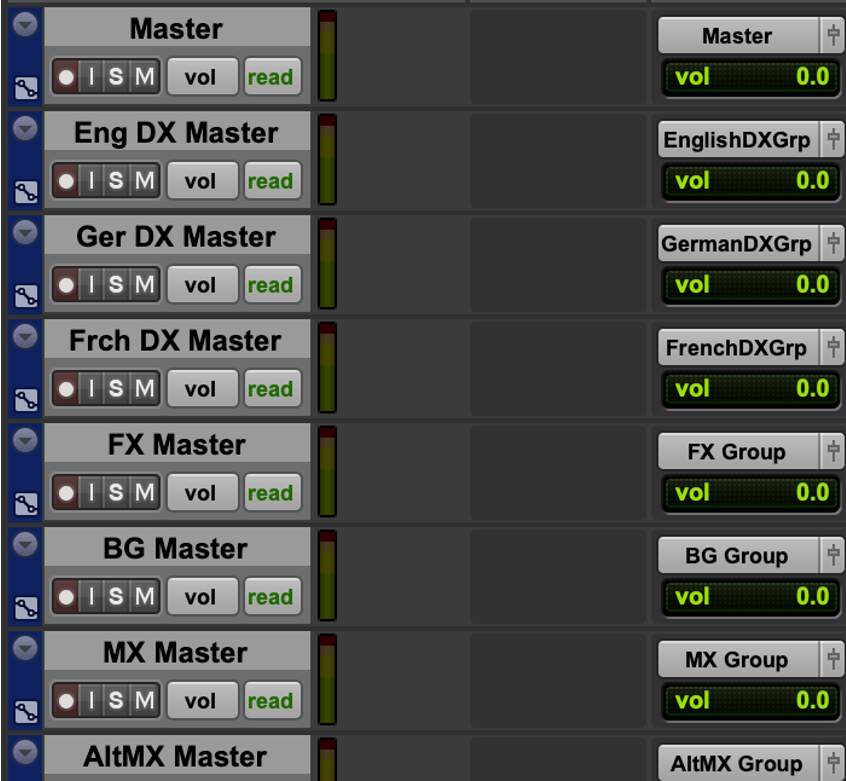
They should appear as shown in the Edit window.
Optional Additional Steps
Import the proxy video to the Pro Tools session:
- Add a Video Track (Track>New or press Shift+Cmd+N).
- Import Video (File>Import>Video or press Option+Shift+Cmd+I).
- Navigate to A Sound Proposal 1920×1080 23.mp4 in the unzipped Exercise Content 4-7 folder. Click Open.
- From the Video Import Options Dialog:
- Set Destination as Main Video Track.
- Set Location to Spot.
- Do not check Import audio from file.
- Click OK.
- From the Spot Dialog enter 01:00:00:00.
- Enable the video device or open the video window – Window>Video or press Cmd+9.
- Verify playback with the video device or Video window.
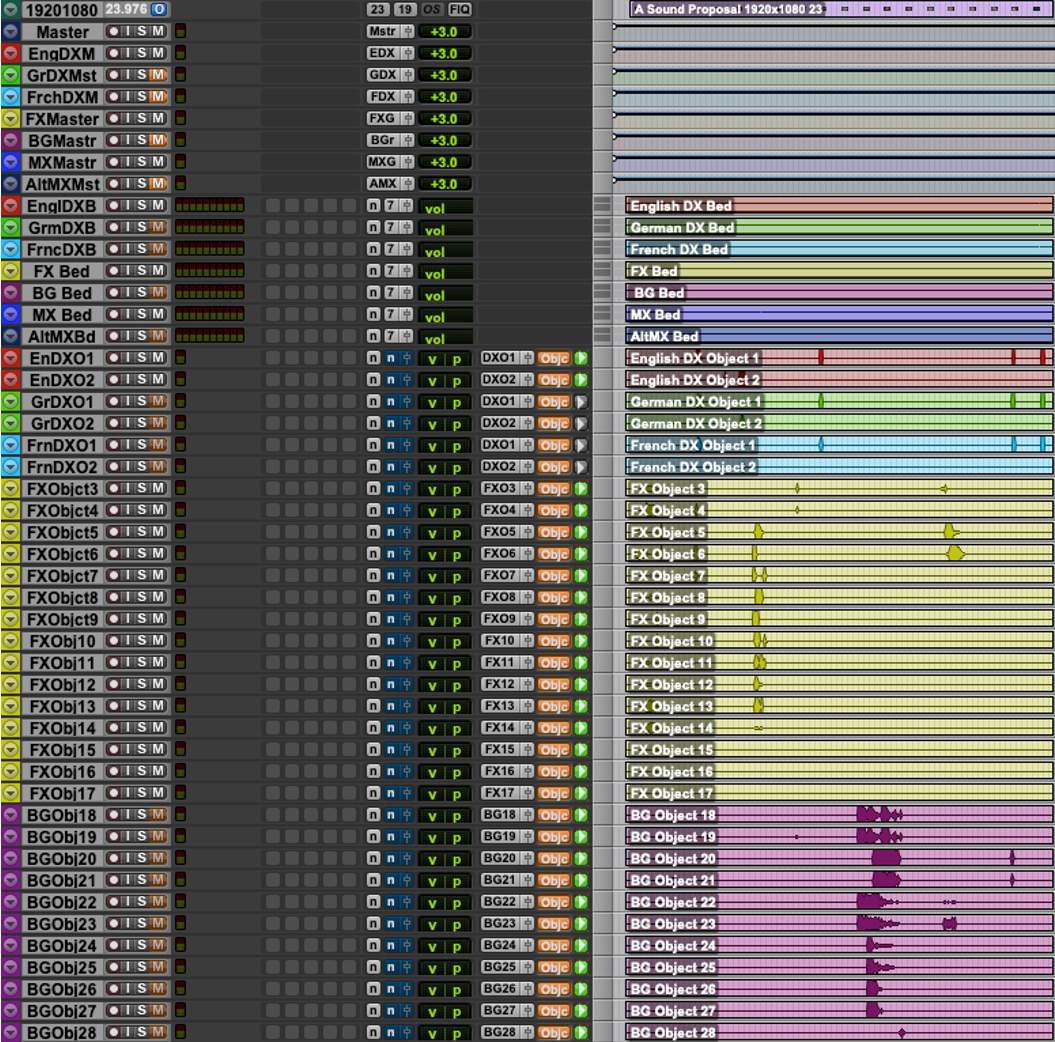
Using color coding for Stem tracks (VCAs, Bed, Objects) and Clips in the Edit window can make it easier to navigate the session. You can do this by choosing Window > Color Palette.
Saving Your Work
Be sure to save this session and/or save as a template. Future exercises can use this template as a starting point.
Part 3: VCA Mixing to Loudness Targets
Lesson 3 of 4
The objective for this part is to use VCAs to mix to a target loudness level, so as to meet delivery specifications. The supplied content “A Sound Proposal” was originally mixed to a target loudness level of –24LKFS using integrated loudness. For this exercise, A Sound Proposal needs to be delivered to a streaming service that specifies a target loudness level of –27LKFS using integrated dialog measurement.
This will begin by performing a loudness analysis of the supplied ADM BWF, and then use the Renderer’s real-time loudness meters with playback from Pro Tools to determine what changes need to be made prior to remastering the content.
Setting Up the Dolby Renderer
Follow these steps in the Renderer:
1. Launch the Renderer.+
2. Launch the Renderer Remote application.+
3. Close any open master files.+
4. Verify the Renderer I/O and synchronization configuration.+
5. Set frame rate to 23.976 fps.+
6. Set up the Renderer Input Configuration.+
7. Set up the main Renderer window.+
Choose File > Open to open A_Sound_Proposal_English.wav ADM BWF master file.
Open the Analyze Loudness window by choosing Window > Analyze Loudness or type Command+L (Mac) or Control+L (Windows).
Analyze loudness:
- Set the Analysis in/out to Set manually to remove the 2 seconds of pre-roll.
- In – 01:00:00:00
- Out – 01:03:33:03
- Click Analyze Loudness.
As the Integrated (dialogue) level is –31LKFS, this means that 4dB of gain should be needed to achieve the required level of –27LKFS. However, due to the True peak measurement of 3.5 dBTP, care needs to be taken to avoid clipping.
- Close the Loudness Analysis window.
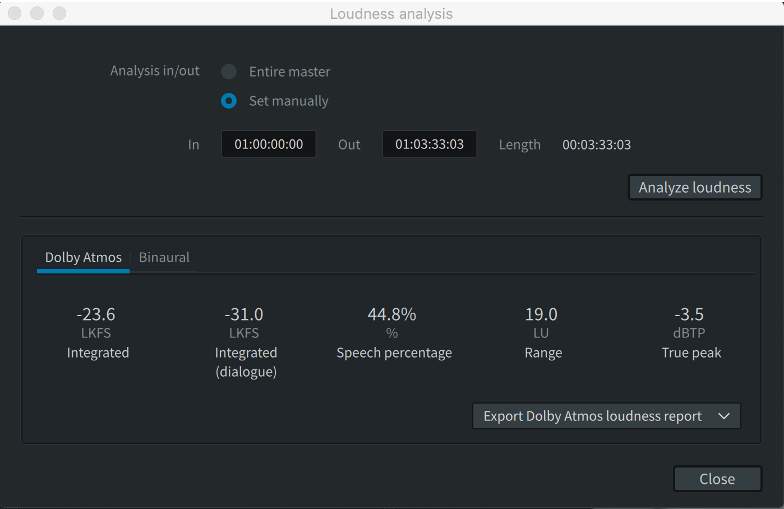
- Set the Renderer Source back to Input.
The Input Configuration is defined by the master file, which will match the source of the session you will open. - Enable Synchronization (LTC chase) by clicking on the Sync button (clock icon).
Setting Up Pro Tools
Follow these steps in Pro Tools.
- Open the saved session named A_Sound_Proposal_Exercise.
- Using the VCA mutes, mute the German, French, and AltMX masters. Ensure the VCA mutes for English and MX master are not muted.
- Leave the VCA masters at 0.
- Play the session from start to finish.

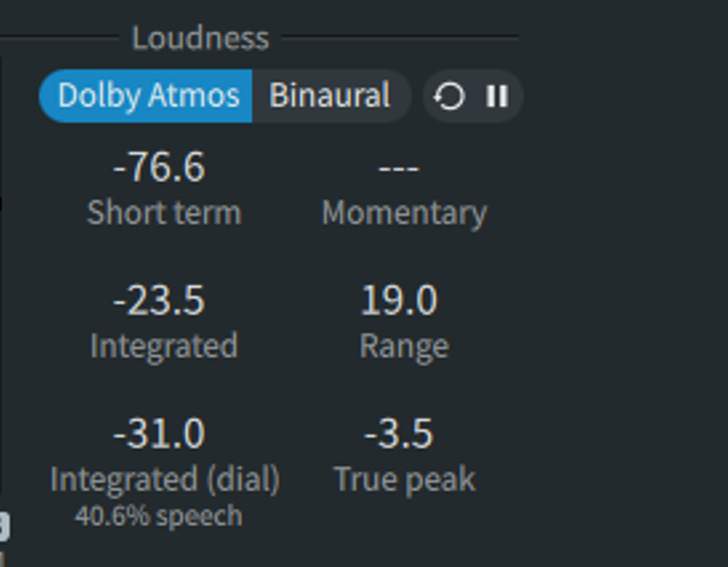
At the end of content playback, the Renderer’s real-time loudness meters should show similar results.
- Adjust the master VCA to +3.
- Reset the real-time loudness meters in the Renderer by selecting the refresh button, and play the session from start to finish.
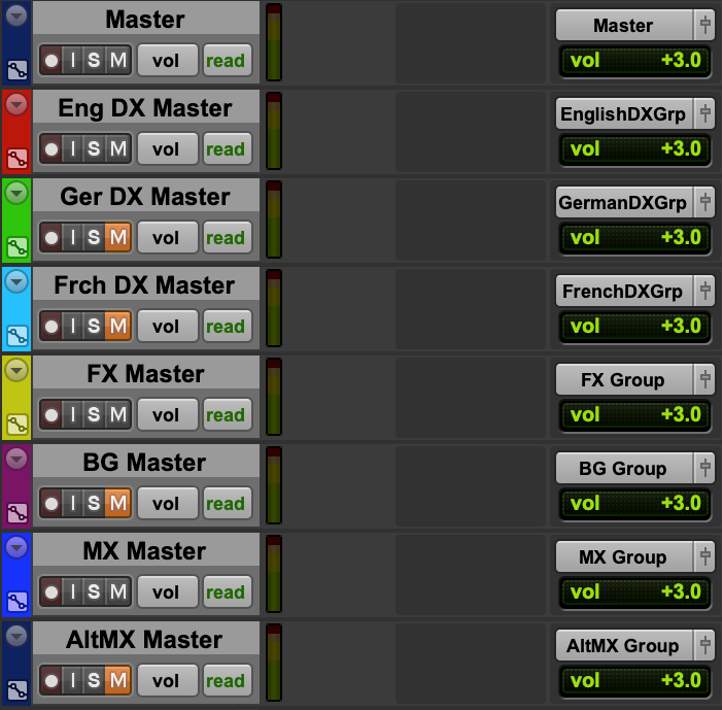
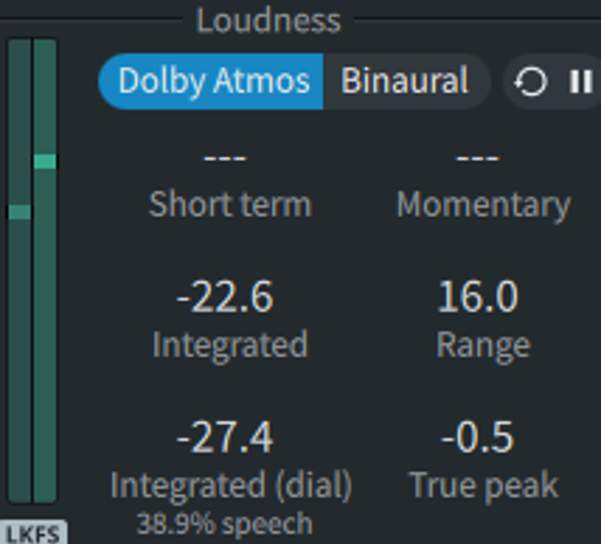
3 dB of gain is sufficient to get the measured level to 27.4 (acceptable with rounding), while keeping the True peak at –0.5 dBTP. This avoids the playback limiter and is below the threshold of the encoding limiter.
Summary
Mastering the content and running an offline analysis of the new master will likewise reveal acceptable levels.

A Loudness Summary log can be exported to be included with the deliverable from the Loudness Analysis window in the Renderer.
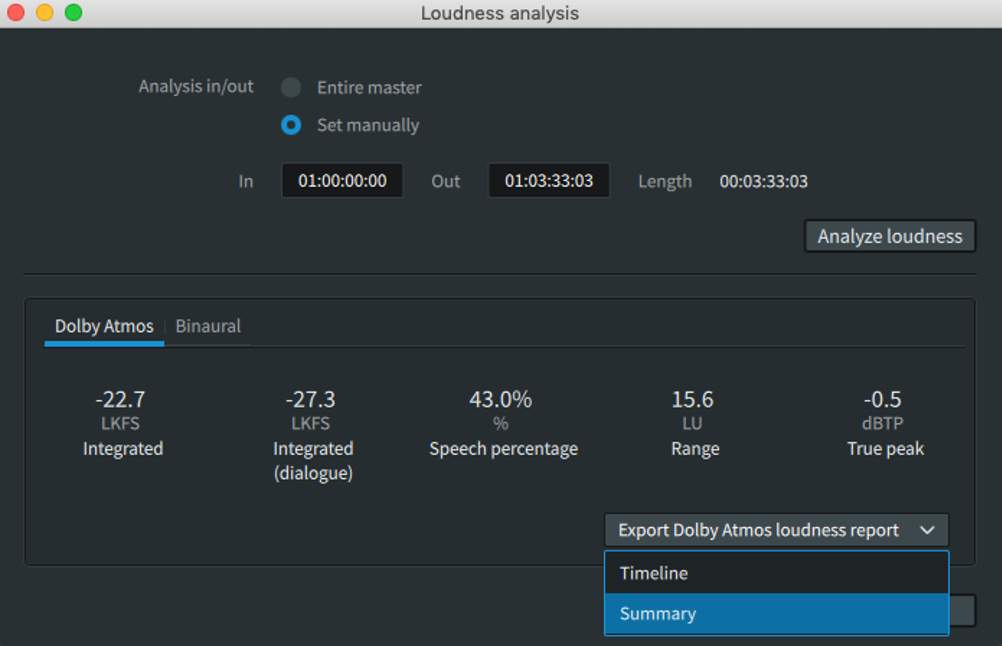
Saving Your Work
Be sure to save this session and/or save as a template.
Download the Exercise Files
Lesson 1 of 6
Exercise Files – Required
Download the PT210D_v2022_Exercise 3.zip file to the Pro Tools workstation by clicking the link below. After download, unzip the contents onto the media drive.
Click the link to download the zip file containing content that you will use for this exercise. DOWNLOAD
If the download link provided above does not initiate the download, right-click the link and copy the link address and paste it into a new tab or window in your browser to initiate the download of the media.
Setting Up the Dolby Renderer
Lesson 2 of 6
Follow these steps in the Renderer:
Step 1
Launch the Renderer
If you see alerts for “Audio Driver Error,” click OK. You will change these settings in preferences later.
Step 2
Launch the Renderer Remote application.
If using an external Renderer, also launch the Renderer Remote application from the Pro Tools workstation and establish communication by entering the hostname or IP address in the Server Window.
Verify the connection status is green.
Step 3
Close any open master files.
Close any previously opened master files in the application.
Step 4
Verify the Renderer I/O and synchronization configuration.
Open the Dolby Atmos Renderer Settings/Preferences window and verify that the Renderer I/O and synchronization configuration are set correctly for the configuration in use.
Step 5
Set frame rate to 23.976 fps.
Set frame rate to 23.976 fps. (If using a Windows-based MADI RMW, verify the correct frame rate is set in the Hammerfall DSP Settings Control Panel TCO tab. This must be done on the RMW.)
Step 6
Set up the Renderer Input Configuration.
Open the Renderer Input Configuration window. Click Use Default and Accept.
Step 7
Set up the main Renderer window.
- Set the Source Input/Master toggle to Input.
- Enable the Synchronization button (clock icon).
- Verify that no mute or attenuation is applied in the Renderer.
Setting up Pro Tools
Lesson 3 of 6
Follow these steps in Pro Tools:
Step 1
Launch Pro Tools if closed.
Step 2
Click Cancel from the Dashboard.
Press Cancel to close the Dashboard without opening a session.
Step 3
Establish Connection with the Renderer.
Establish Connection with the Renderer in Setup > Peripherals > Atmos.
- Use localhost for an internal Renderer.
- Use hostname or IP address if an external Renderer is being used.
- Verify the connection status is solid green.
Step 4
Establish synchronization.
Establish synchronization in Setup > Peripherals > Synchronization.
- Enable Gen LTC if using a SYNC HD or SYNC X.
Step 5
Set or verify the correct Playback Engine is in use.
Set or verify the correct Playback Engine is use in Setup > Playback Engine.
- Dolby Audio Bridge for running the Renderer internally.
- HDX for using an external Renderer.
Step 6
Configure Session>Setup.
Configure the Session > Setup dialog box
- Set the timecode rate to 24.
- Set the session start to 00:59:50:00.
Creating a New Session
Lesson 4 of 6
Create a new session by choosing File > Create New or by pressing Cmd+N, saving and closing any already open session.
From the dashboard:
- 11Name the session T210D Exercise 2 (Multiple Beds) – [Your Name] [today’s date]
- 22Uncheck Create from Template if checked.
- 33In the I/O Settings drop-down menu select Last Used.
- 44Set the File Type to BWF (.WAV).
- 55Set the Sample Rate to 48kHz.
- 66Set the Bit Depth to 24-Bit.
- 77Click Create.
There are a few settings to make in the Session Setup dialog box:
- 88Open the Session Setup dialog box.
- 99Set the timecode rate to 24.
- 1010Set the session start to 00:59:50:00.
- 1111Choose File > Import > Session Data.
- 1212Browse to the location of the supplied A_Sound_Proposal_German_AltMusic.wav ADM BWF file, select the file, and click Open.
Now, let’s take a look at an ADM BWF file:
Inspect the Tracks pane of the Import Session Data dialog box – do not import at this point.
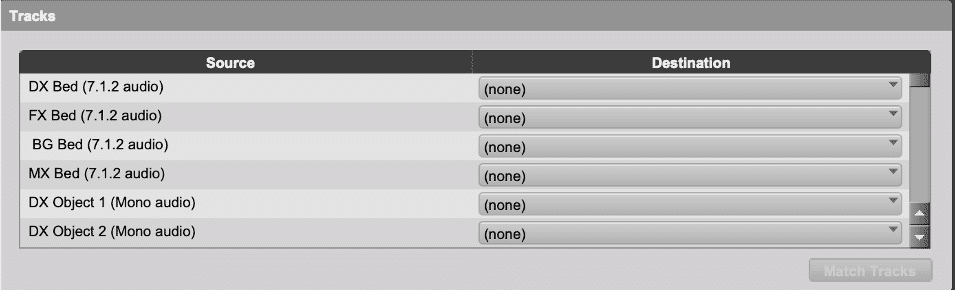
From the track names, note that the session will require:
- 4 x 7.1.2 outputs for the four stem beds in the order of DX, FX, BG, MX
- 46 x mono outputs for Object audio
From the track names, note the distribution and order of Objects among the stems:
- 2 x DX Objects
- 17 x FX Objects
- 23 x BG Objects
- 4 x MX Objects
- 2 x AltMX Objects
- Click Cancel to cancel the ADM Import.
- Leave the Pro Tools session open.
Renderer Input Configuration
Lesson 5 of 6
Manually Recreate the Input Configuration:
- 11Choose Window > Input Configuration.
- 2
- Add 3 x 7.1.2 Beds in addition to the default Bed.
- Choose the Assignment drop-down of inputs 11, 21, and 31 and select 7.1.2.
- 3
- Enter the name “Background” and click Add group.
- Next, add Groups for Dialog, Effects, and Music.
- Close the Groups dialog.
- 4
- Assign 1–10 to the Dialog Group.
- Click within the input description of any channel from 1 to 10 and enter DX Bed.
- Assign 11–20 to the Effects Group.
- Click within the input description of any channel from 11 to 20 and enter FX Bed.
- Assign 21–30 to the Background Group.
- Click within the input description of any channel from 21 to 30 and enter BG Bed.
- Assign 31–40 to the Music Group.
- Click within the input description of any channel from 31 to 40 and enter MX Bed.
- 5
- Assign 41–42 to the Dialog Group.
- Click within the input description to add “DX Object 1” to input 41.
- Hold Option+Cmd (Mac) or Ctrl+Alt (Windows) and press Enter to sequentially name the input description.
- Assign 43–57 to the Effects Group.
- Click within the input description to add “FX Object 3” to input 43.
- Hold Option+Cmd (Mac) or Ctrl+Alt (Windows) and press Enter to sequentially name the input description.
- Assign 58–80 to the Background Group.
- Click within the input description to add “BG Object 18” to input 58.
- Hold Option+Cmd (Mac) or Ctrl+Alt (Windows) and press Enter to sequentially name the input description.
- Assign 81–84 to the Music Group.
- Click within the input description to add “MX Object 41” to input 81.
- Hold Option+Cmd (Mac) or Ctrl+Alt (Windows) and press Enter to sequentially name the input description.
- Assign 85–86 to the Music Group.
- Click within the input description to add “AltMX Object 45” to input 85.
- Hold Option+Cmd (Mac) or Ctrl+Alt (Windows) and press Enter to sequentially name the input description.
- Inputs after 86 can be set to null.
- Highlight (Shift-click) Inputs 86 – 128 and use the Assignment drop-down menu to select Null (–).
The result will look like this:
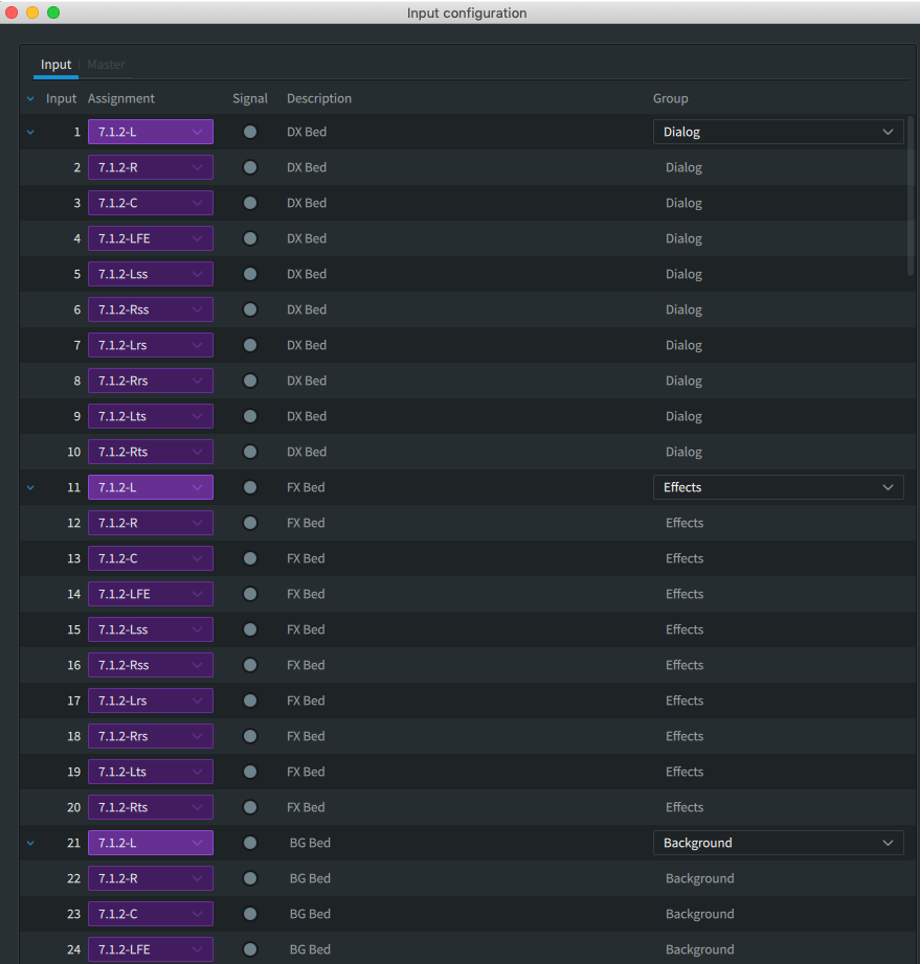


In this case, the Object numbers are sequential across stems. In other cases, the Object numbering will restart with each stem. This depends on personal preference.
Export the Input/Binaural/Re-render Config to the same location as the ADM BWF files:
- Choose File > Export Input/Binaural/Re-render Config or press Option+Shift+E.
- Name the config A Sound Proposal.
The resulting file will have the extension .atmosIR.
Use the Dolby Renderer to Create Pro Tools’ I/O Setup
Lesson 6 of 6
- 11Choose Setup > I/O Setup > Bus tab.
- 22Click within the Bed/Object Group column in the Bus tab to bring up the Manage Bed/Object Group Names window. Set Manage Bed/Object Group Names and Assignments to Dolby Atmos Renderer.
- 33If all bus paths are already deleted in the Bus tab, create a new path and map it to the Renderer to create an entry in the Bed/Object Group. column to click on and bring up the Manage Bed/Object Group Names window. Set Manage Bed/Object Group Names and Assignments to Dolby Atmos Renderer.
- 44Click OK.
- 55Delete all existing Output paths from the Output tab.
Use the drop-down menu to the right of the Default button to select Use Atmos Renderer.
Click Default.
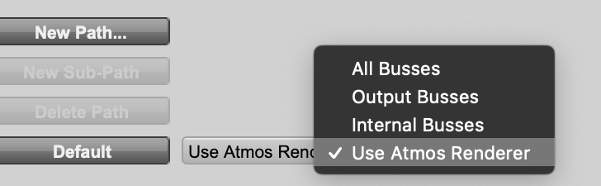
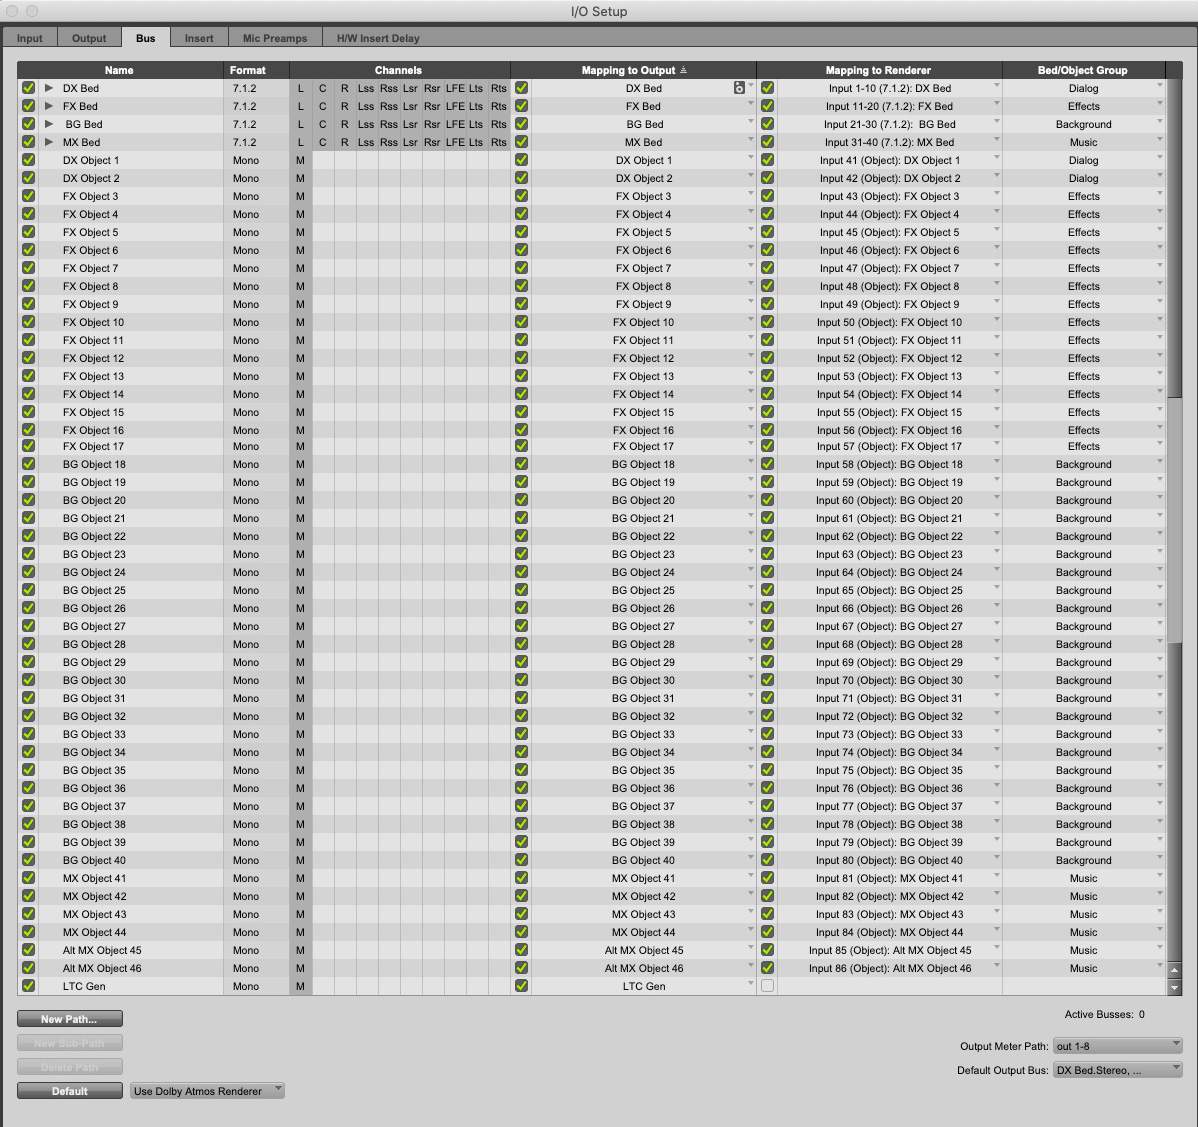
The Output and Bus tabs of the I/O Renderer will be populated according to the Renderer Input Configuration.
Click OK.
- 66Import the supplied A_Sound_Proposal_German_AltMusic.wav ADM BWF file as session data: Import>Session Data or press Option+Shift+I.
- 77Navigate to the directory containing A_Sound_Proposal_German_AltMusic.wav.
- 88Set all tracks to New Track (Option+click).
- 99Click OK.
- 1010Delete all existing Output paths from the Output tab.
In the Custom Data pane, check the following:
- Import:
- Object Output Assignment
- Object Pan Data
- Add Bed/Object Group Name is grayed out as the Dolby Atmos Renderer was set to Manage Bed/Object Group Names
- Click OK.
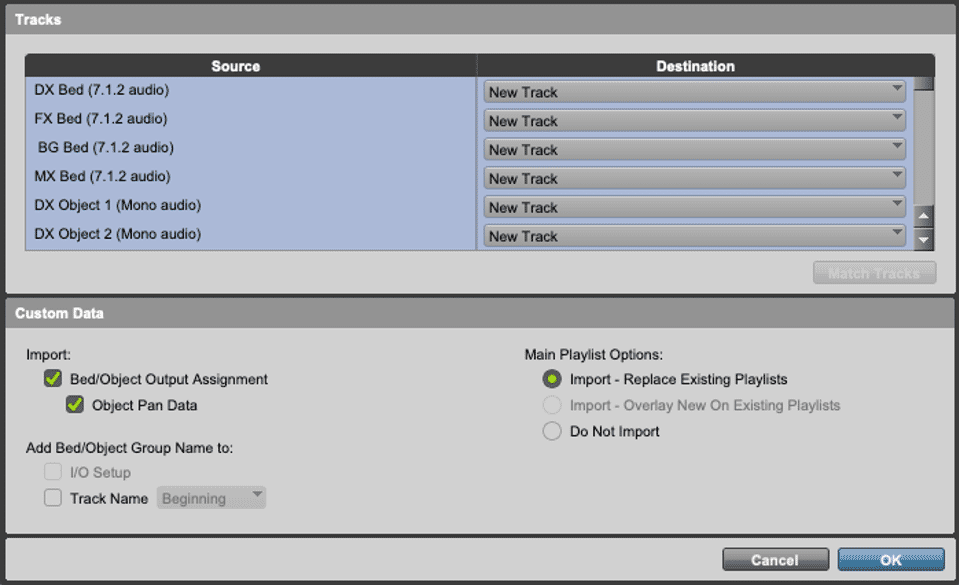

A Session Notes dialog will appear that calls out that existing matching paths and mapping from the I/O were used instead of being created from the ADM Import.
Click No.
All mono Object audio tracks in the Edit window should be set to Object (orange).
If not, Shift-Click to select the mono Object audio tracks and Option Click on any of the Bus/Object toggle switches to set all mono Object audio tracks to Object.
The track names, assigned Object bus names, and audio files names in the Edit window will be named identically.
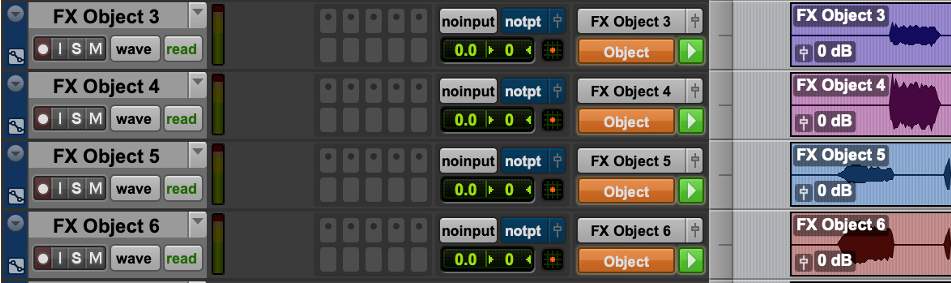

The bus and output names in the I/O Setup Bus tab will also correspond to the Renderer input configuration descriptions.
Additional Steps
If the LTC Gen plug-in will be used for synchronization with the Renderer, another output, bus, and mono Audio track will need to be created:
- Choose Setup > I/O Setup > Output tab.
- Add new path: 1 x mono output and name it LTC Gen.
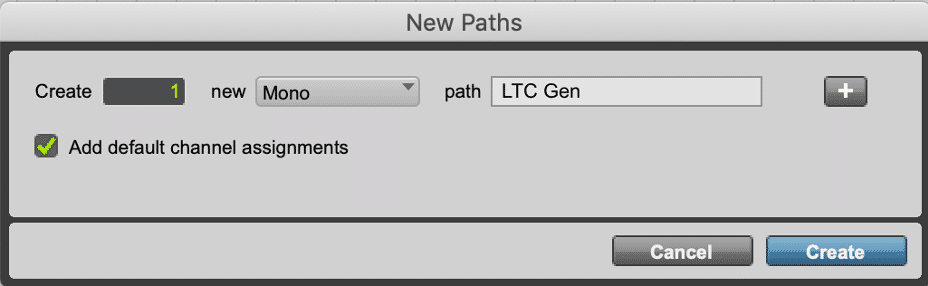
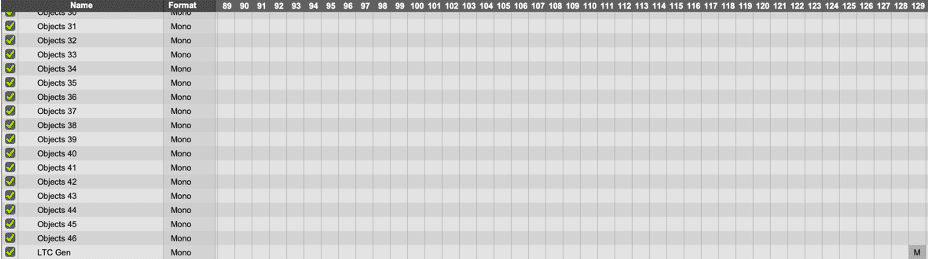
- Click and drag the output to 129 and ensure that the same channel is used for LTC input in the Renderer (set in Preferences /Settings).
- Click OK.
Add 1 x mono Audio track in the Edit or Mix window, name the track LTC Gen and insert the LTC Generator plug-in.
- Choose Track > New or type Shift+Cmd+N.

Saving Your Work
Be sure to save this session and/or save as a template. Future exercises can use this template as a starting point.
Dolby Atmos Glossary
Lesson 1 of 3
AC
Alternating Current.
ADM
Audio Definition Model. A metadata specification for describing channel-based, object- based, or scene-based audio.
ASCII
American Standard Code for Information Interchange.
ASIO
Audio Stream Input/Output. A soundcard driver protocol from Steinberg Media Technologies GmbH that allows musicians and sound engineers to access PC soundcards directly without going through Microsoft Windows.
Array
A grouping of speakers. Example: 3 individual speakers grouped as the Left Surround channel instead of 1 speaker.
AU
Audio Units
Bed
A logical grouping of tracks/inputs/outputs in relation to a speaker configuration. Bed audio can range in width from stereo to 7.1.2. An example in post-production could be: 7.1.2 Music Bed, 7.1.2 Dialog Bed, 7.1.2.
BIOS
Basic Input/Output System. A type of firmware used to perform hardware initialization when a computer starts up.
BWF
Broadcast Wave Format. An extension of the Microsoft Waveform Audio Format (WAV) file format to include metadata important to broadcast applications. This format is specified in EBU Tech 3285. B‐ format
A speaker-independent representation of a soundfield.
CAF
Broadcast Wave Format. An extension of the Microsoft Waveform Audio Format (WAV) file format to include metadata important to broadcast applications. This format is specified in EBU Tech 3285.
Channel configuration
A standard for describing a sound system with front, surround, and overhead channels. The first numeral represents the number of front channels, the second represents the number of surround channels, and the third represents the number of height channels. For example, 3/2/2 indicates that there are three front channels, two surround channels, and two height channels.
Container
A formatted file (such as an MP4 file) comprising one or more multiplexed elementary streams and including format-specific metadata.
Core Audio
Built in audio subsystems of MAC OSX
CPU
Central processing unit.
DAMF
Dolby Atmos Master File Set. A three file master set comprised of .atmos, .atmos metadata, and .atmos audio.
DAW
Digital audio workstation. An electronic device or computer software application used to record, edit, and produce audio files.
dBFS
Decibels full scale. The amplitude of a signal relative to a digital full-scale signal.
dBTP
Decibel True Peak
DCP
Digital Cinema Package
Dolby Audio Bridge
A core audio emulation that provides 130 channels of DAW output.
Dolby Digital Plus
An advanced perceptual audio-coding system that expands and improves Dolby Digital coding technology, with higher bandwidth efficiencies, support for additional channels, and enhanced metadata capabilities.
Dolby RMU
Dolby Rendering and Mastering Unit.
DSP
Digital signal processor. A specialized microprocessor optimized for digital signal processing.
DVI
Digital Visual Interface. A video display interface used to connect a video source, such as a display controller, to a display device, such as a computer monitor.
EQ
Equalization. The adjustment of audio frequency responses for practical or aesthetic reasons.
FFOA
First frame of action. The point on a film reel or corresponding file at which the program content begins.
FPS
Frames per second. The number of unique consecutive images (frames) an imaging device produces in one second.
Frame
In audio, a series of PCM samples or encoded audio data representing the same time interval for all channels in the configuration. Metadata pertaining to the frame can be carried within the frame or separately, depending on context.
HD
High definition.
HTML
HyperText Markup Language
I/O
Input/output. The communication between a system and an entity outside the system, such as another system or a human being.
IAB
Immersive Audio Bitstream.
IMF
Interoperability mastering format.
Immersive Stereo
A technology that delivers a virtualized immersive experience to headphones or stereo speakers through a Dolby AC 4 bitstream with appropriate stereo content and metadata that converts the stereo signal into the virtualized experience.
IP
Internet Protocol.
IP address
Internet Protocol address. A numerical identifier assigned to a device that is a member of a network that uses the IP for communication.
JOC
Joint Object Coding. Dolby Digital 5.1 Dolby Digital Plus bitstream with the addition of specific metadata to carry Dolby Atmos. The 5.1 “core” contain all the audio present in the Dolby Atmos mix and is backwards compatible with non-Dolby Atmos use cases.
LFE
Low-Frequency Effects. A band-limited channel specifically intended for deep, low-pitched sounds.
LKFS
Loudness, K-weighted, relative to full scale.
Lo/Ro
sums the rear and side surrounds in equal measure.
LTC
Linear timecode. A timecode developed by the Society of Motion Picture and Television Engineers (SMPTE) that provides a time reference for editing, synchronization, and identification.
Lt/Rt
Downmixes from 5.1 to 2.0
LU
Loudness Units (decibels)
MADI
Multichannel Audio Digital Interface. A communications protocol for an interface that carries multiple channels of digital audio, defined by the Audio Engineering Society. Also known as AES10.
MPEG‐4
(MP4)
An MPEG standard (ISO/IEC 14496) for a group of audio and video coding formats and related technologies.
MTC
MIDI Time Code
OAMD
Object Audio Metadata. Positional X, Y, Z, panning coordinates recorded along with object size.
OAR
Object Audio Renderer. Used during mixing with the Dolby Atmos Renderer and for Dolby Atmos Master File playback. The OAR “renders” the Bed to available speakers and the Object audio to spatial coordinates supplied by the OAMD.
Object
An audio signal plus associated object audio metadata.
OEM
Original equipment manufacturer. A manufacturer that provides a complete hardware and software system to the consumer.
PC
Personal Computer.
PCI
Peripheral Component Interconnect. A local computer bus that supports functions in a standardized format.
PCM
Pulse code modulation. A method that is used to convert analog signals into digital, binary, coded pulses by sampling the analog signal, quantizing each sample independently, and converting the resulting quantized values into a digital signal.
Playlist
An extended .m3u8 file that contains one or more uniform resource identifiers (URIs). A URI can point to another playlist or to a media file.
ProLogic IIx
A matrix encoding technology originally developed for encoding rear surrounds of 7.1 mixes into 5.1 to provide 7.1 playback in home theatres from 5.1 sources.
Rendering
Processing of audio content to adapt it to specific speaker layouts, such as 5.1 and 7.1 speaker feeds, or headphones and sound bars.
RMU
Rendering and Mastering Unit.
RMW
Rendering and Mastering Workstation
SMPTE
Society of Motion Picture and Television Engineers.
Spatial Coding
A process that dynamically groups nearby audio from Beda and Objects using loudness and positional algorithms into “elements” that contain their own OAMD.
UI
User interface.
UPS
Uninterruptible power supply.
USB
Universal Serial Bus. A standard that defines the cables, connectors, and communications protocols used in connections between computers and electronic devices.
WAV
Waveform Audio Format. An audio bitstream file format.
Appendix A: Dolby Atmos Codecs
Lesson 2 of 3
Delivery Codecs
There are three codecs used to deliver Dolby Atmos content to the home.
Dolby TrueHD
Dolby TrueHD is a lossless codec for both channel-based and immersive audio. It is used exclusively for Blu-ray disc delivery. When encoding a Dolby Atmos master to TrueHD, the disc author can choose to use spatial coding with 12, 14, or 16 elements. The decision is largely determined by the increased file size that results from using 16 elements and the available “bit budget” for the disc. The object audio renderer (OAR) is used to render a 7.1 presentation from the spatial-coded elements, and both the 5.1 and Stereo bitstream on a Blu-ray disc can be downmixed from the 7.1.
Dolby Digital Plus with Dolby Atmos Content
Dolby Digital Plus with Dolby Atmos Content (also referred to as Dolby Digital Plus JOC) is a high-efficiency lossy codec used for streaming delivery as well as terrestrial broadcast. Dolby Digital Plus JOC can be used for both channel-based and immersive audio. The number of elements used by spatial coding is determined by the bit rate of the encode. A bit rate of 384kbps uses 12 elements, while bit rates of 448kbps and above use 16 elements.
Dolby Digital Plus is the primary delivery codec for Dolby Atmos and will be discussed in further detail.
After the spatial coding process, the OAR renders the audio to 5.1, or first to 7.1, which is then downmixed to 5.1. All of the audio from the Dolby Atmos master is present in the 5.1 downmix. This is done so that Dolby Digital Plus JOC is backwards compatible with regular channel-based 5.1 Dolby Digital Plus. If a bitstream with Dolby Atmos content is presented to a consumer playback device that is not enabled with Dolby Atmos — it will decode the 5.1.
In addition to the object audio metadata (OAMD) for the elements there is a supplementary type of metadata created by a process called Joint Object Coding (JOC). This is used to calculate the delta between the spatially coded elements.
The graphic below illustrates the process.
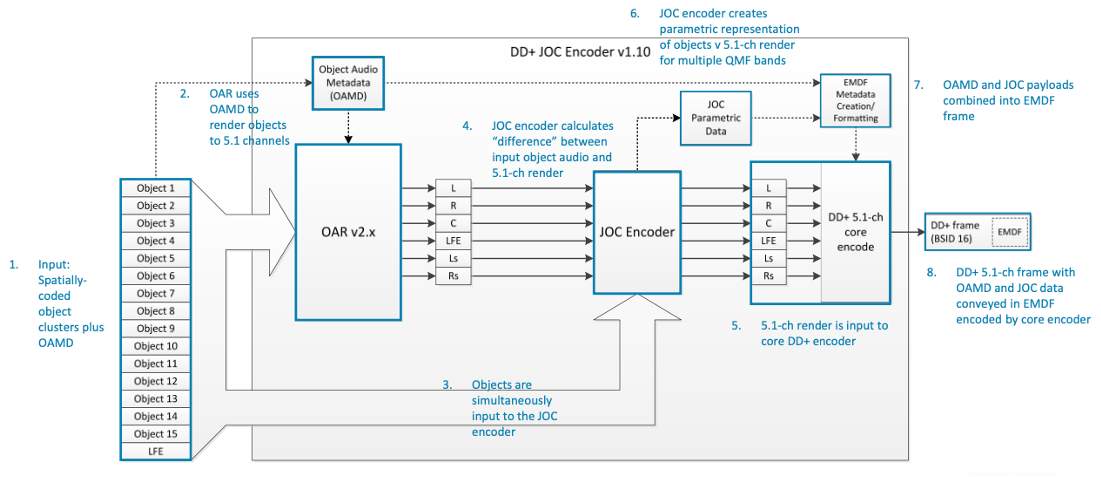
The JOC and OAMD metadata is packaged as an Extended Metadata Format (EMF) and inserted into “skip frames” between audio blocks in the Dolby Digital Plus bitstream. Since the EMF occupies what was empty space, devices that are not enabled with Dolby Atmos ignore it. This preserves backwards compatibility as devices enabled and not enabled with Dolby Atmos can both decode the bitstream.
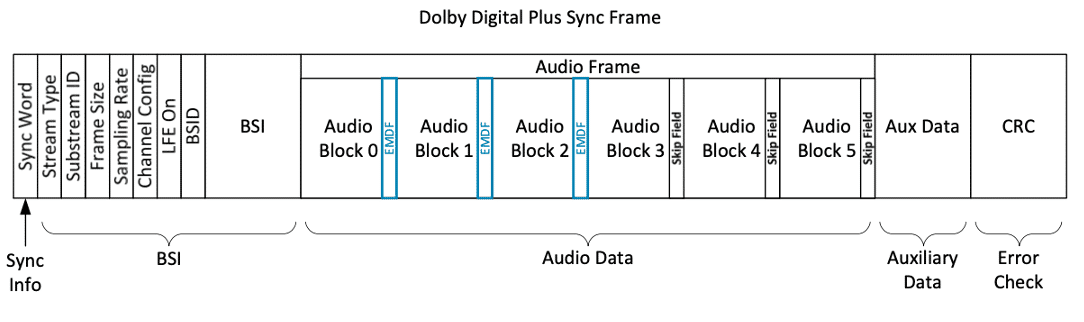
When a consumer playback device enabled with Dolby Atmos receives a Dolby Digital Plus JOC bitstream, the 5.1 is decoded, a JOC decoder recreates the elements, and the OAR uses the OAMD from each element to render audio to the device.
Dolby AC-4 IMS (Immersive Stereo)
Dolby AC-4 IMS (Immersive Stereo) is a next generation audio Codec. Dolby AC-4 IMS is used to carry Dolby Atmos at extremely low bit rates. Dolby AC-4 IMS uses Binaural metadata created during the Dolby Atmos mastering process to create a bitstream that is compatible with standard stereo playback devices as well as a virtualized immersive Dolby Atmos experience on mobile devices using headphones or speakers.
Spatial coding is not used in the AC-4 IMS encoding process.
As the AC-4 IMS adoption rate increases, it is important for the mixer to also monitor with headphones using the onboard binaural render in the Dolby Atmos Renderer.
Appendix B: Dolby Atmos Content Delivery Signal Flow
Lesson 3 of 3
OTT Streaming Delivery of Dolby Atmos
The basic premise of over the top (OTT) streaming delivery is Adaptive Bit Rate Streaming (ABR). Video content is encoded at different resolutions and at different bit rates within each resolution. Audio is encoded as Mono, Stereo, and 5.1 at various bit rates per channel width using HE-AAC and Dolby Digital Plus.
Encoded media is segmented into individual files not exceeding 30 seconds. A manifest is created that describes the “ladder” of video and audio encodes. All of the media and the manifests are pushed to a Content Delivery Network (CDN), then out to “edge servers” depending on how popular the content is and where it is being requested from.
Client players request playback of content from the CDN, providing information on the capabilities of the playback device and the bandwidth currently available for streaming. The goal is to provide uninterrupted playback best suited to the device while adjusting for fluctuations in available bandwidth.
These days, there are two main streaming protocols – Apple HLS and MPEG-Dash. Between the two protocols, all playback devices are represented. Different file containers are used by each protocol, but starting in 2016, both can use fragmented MP4 (fMP4). fMP4 can be used as the packaging source so that the content does not need to be encoded twice.
Packaging is also where Digital Rights Management (DRM) occurs to prevent piracy. There are three main brands of DRM – Apple FairPlay, Google Widevine, and Microsoft PlayReady. These three DRM solutions cover all playback devices.
Dolby Atmos encoded as Dolby Digital Plus JOC is packaged at the top tier of any audio ladder and is often a completely separate tier bundled with 4K Video and Dolby Vision. The bit rate of Dolby Digital Plus JOC Dolby Atmos content on most streaming services reflects its premium status. It is generally encoded at 768kbps (using 16 elements in Spatial Coding), which is far above the minimum viable bit rate of 385kbps.
Dolby Atmos is only available to devices that are capable of decoding and rendering it. In the case of a phone or tablet with virtualized Dolby Atmos playback, the device will request a bitstream encoded with Dolby Atmos. A Dolby Atmos stream will also be provided if there is a device enabled with Dolby Atmos connected to a streaming device via HDMI. HDMI connections use Extended Display Identification Data (EDID) to signal their playback capabilities to the player application. If a device such as an AVR or soundbar enabled with Dolby Atmos is connected via HDMI to a Digital Media Appliance (DMA) device, e.g., Apple TV 4k, Roku 4, or Amazon Firestick/Cube, the streaming service player application will know to request the Dolby Atmos bitstream from the edge server.
Below is a simplified graphic of the delivery path.
Dolby Atmos OTT Streaming Delivery Signal Flow

Blu-ray Delivery of Dolby Atmos
Delivery of Dolby Atmos via Blu-ray is likewise often considered a premium offering and is often used for UHD Blu-ray releases.
Dolby Atmos is encoded as lossless Dolby TrueHD for Blu-ray. The number of elements used during Spatial Coding is 12, 14, or 16 and depends on the “bit budget” for the disk. There is a finite amount of capacity on a Blu-ray disc, so the amount of space allocated for audio varies depending on the length of the title, the encoded bit rate of the video, and how many “extras” the disc author needs to include. In addition to Dolby Atmos TrueHD, there are 7.1, 5.1, and stereo versions included. 5.1 is encoded as Dolby Digital to ensure backwards compatibility.
Dolby Atmos OTT Streaming Delivery Signal Flow