
Wet Vs Dry Orchestral Samples
Because this post is part VII of my Intro to Orchestral Sample Libraries series, I need to call out that the use of reverb brings us back to the very first topic in this series: Wet vs Dry. Reverb is the “wet” in that context. Because we use reverb to help create a sense of space, if we are using samples that are recorded dry (no room sound), then, we will likely be needing to use reverb more aggressively in order to create a room inside of our computer. Meanwhile, if we have samples that include the sound of the room in which they were recorded (for example Spitfire libraries often include the sound of Air Studios in their samples), then, we might be needing less reverb. In the second scenario, as we will discuss below, reverb can help glue the orchestra with the other instruments in our production. (For example: instruments that were not part of the same “wet” sampled orchestra.) This first conversation is a big one, and, if you are new to orchestral sample libraries, I’d encourage you to read my first post in this series and then come back here to continue the fun!
What Is Reverb?
There’s a big scientific answer to this question (that you can read about here); but, for the purposes of our Orchestral Sample library world, reverb is used to give the listener a sense of where our instruments are being performed. Reverb is the “sound” that we hear when our source sound (eg a violin section) hits a surface and sends back small sound reflections . Those many, many reflections create what we often describe as a “wash” or “tail” of sound that follows the initial sound source.
It’s All About The Room
In the context of a room, a violin sound wave would hit numerous walls, the ceiling and floor (likely at different distances). Unless the room was made out of absorbent material, most surfaces would “bounce” parts of that violin sound back where it would hit other surfaces and create more reflections. The “sound” of all those bouncing reflections, from different surfaces at different distances, is what tells a listener what type of room the sound is inside of. Is the room absorbent (less reflections) or is it super reflective (more reflections.)
For example: a violin performed inside a tiny bathroom will hit a wall very quickly. Because it is a bathroom, that wall is likely made out of tile, glass or other highly reflective surface. Therefore, that violin sound will not be absorbed and, instead, will bounce back quickly with a vengeance! Even worse, it will hit the opposite bathroom wall quickly as well. This can cause many little rapid echos that can create a “slapping” sound (often referred to as slap back echo). Sometimes, this slap back echo can be a cool effect that we want – like on an electric guitar for example. For a large orchestra, all these rapid echos can make it difficult to hear the original sounds sound clearly. This one reason why most orchestras never perform inside tiny bathrooms!
On the other hand, let’s imagine that same violin now inside a large church or symphony hall. In this room, the walls are much farther apart and likely not covered in hard, reflective material. Therefore, more of the sound is absorbed and the sound that is reflected will take longer to return to the source.
What About Echo?
Echo is the extreme example of the reflection example above. With an echo, those reflections are separated enough to create a “copy” of the original sound coming back to us that we can ear distinctively. Imagine being inside of a large cave shouting “Hello.” After a few milliseconds or so (depending on the size of the space) we hear that same “Hello” come back to us….maybe even another, softer “hello” right after it. With reverb, those refections are so close together, and there are many of them, that it ends up creating a “blur” of all those copies. Ultimately, we hear it as more of a “tail” to the original sound. The characteristics of this “tail” of reverb, is what helps us identify the size and material of the room, and how far away our sound source is from the surfaces of that room.
Types Of Reverb: Algorithmic Reverb Vs Convolution Reverb
So now let’s step inside of our computers and talk about the type of reverbs we might have available to use in our productions. There are 2 main types of digital reverb that we come across as plugins in our DAWs (Digital Audio Workstations): (1) convolution reverb and (2) algorithmic reverb. (If you’re using Logic Pro, you can check out Space Designer to see both options in 1 plugin!)
What Is Convolution Reverb?
Convolution reverb is created by “sampling” a real room/space. A sound is generated inside of space, and the reflections made by that sound is recorded. The “reflections” recording is then analyzed and a blueprint of the reverb of that room is digitally create/stored. Then, when we use that convolution reverb for our own sounds, we are hearing the characteristics of those room reflections. In other words, we are hearing what our sound(s) would sound like inside of that room. Therefore, a convolution reverb can enable us to place our instruments and sounds inside of a real room. How cool is that?
While convolution is extremely accurate (and extremely cool), it also uses up a lot of CPU and can be taxing on our computer’s resources. As well, convolution reverb can be more difficult to customize as we are basically “stuck” with the sound of the room that was recorded. Once we start to tweak that original room sound, we are messing with the digital “blueprint,” and, assuming the reverb plugin even allows this tweaking, we can run the risk of distorting the sound of the reverb. As a comparison, it’s not too unlike stretching/shrinking an audio waveform.
What Is Algorithmic Reverb?
Algorithmic reverb is created entirely by code using math algorithms that simulate reflections to “sound” like reverb . We might think of it as a “synthetic” reverb. Where convolution eats up our CPU and offers less ability to customize our reverb, algorithmic reverb is much more light on our computer resources and allows for lots of control over the sound.
| Convolution reverb | Algorithmic reverb |
|---|---|
| HOW: sample of a real place | HOW: “synthetic,”algorithms that simulate reverb |
| Examples: Altiverb, Quantum Leap Spaces, Waves IR | Examples: Lexicon, Valhalla, Eventide Blackhole |
| PRO: sounds more realistic (as it’s a sample of a real space) | PRO: better on CPU vs convolution reverb |
| CON: usually more difficult to customize / less control | PRO: more control over reverb sound, easier to customize and create unique sounds |
| CON: more CPU heavy / taxing on your computer | CON:technically not as accurate as convolution |
| BEST FOR: Realistic sound. Placing sounds inside a real room. | BEST FOR: More customized, unique sounds. Longer reverb time. “Gluing” multiple room reverbs. |
When And How To Use Convolution Vs Algorithmic Reverb
For orchestral productions, it can be helpful to use both a convolution and an algorithmic reverb. One popular technique is to place a single instance of a convolution reverb on an aux channel and then route signal from each instrument to the that aux channel. Because we are only using a single instance of the convolution reverb, it won’t bog our computer down. If you have more computer power, an improvement to this would be to use an instance for each instrument sub group: Strings, Brass, Winds, Percussion, Choir, etc. Assuming these are your main groups, you’d now have ~5 instances of convolution reverb and the ability to tailor the sound per instrument group.
Once we get our orchestra sounding good inside of a real space with the convolution reverb, then, we can use an algorithmic reverb across the entire mix. This will help glue all the pieces together as well as allow for a longer reverb tail (because algorithmic reverbs can have longer, customizable decay times.)
This technique is particularly useful if we use samples from different sample libraries that were recorded in different rooms. Ideally, each sample library would allow us to use only the close microphones (or close as possible to remove the original room sound in the sample.) Then, we could place all the different instruments into a new room, via the convolution reverb. And finally, we seal it all up with a light sheen of algorithmic reverb to glue them all together.
The “How To Use Reverb With Orchestral Sample Libraries” Cheat Cheat
If you are using a digital reverb, chances are you will come across some of the terms/features listed below. Referencing what we’ve learned above, here is a quick rundown of what the things are and how you can use them to create a space for your orchestra:
Pre Delay
This is the length of time before reverb starts. If you can imagine, there are milliseconds of time before the sound hits a surface and reflects back. In this time, there is no reverb. Referencing the small bathroom example above, if a sound source is close to the walls, it will reflect much faster than in a large room. Therefore we can use pre delay to help create a size for the room we are in. Pre delay is also used to create more clarity for a sound: If the reverb is separated from the original sound, it can help it from getting lost by a lush, long tail of reverb, so, we often add extra pre delay to allow the original sound to punch through a dense mix.
- Shorter pre delay = Creates smaller room
- Longer pre delay = Creates larger room
Early Reflections
These are the very first reflections that come back to the listener after a sound has been created. They can be used to help show the size of the room the sound is placed inside of.
- Less Early Reflections = larger room (because it would take longer to hit the walls in a larger room and more of these early reflections would get absorbed before returning.)
- More Early Reflections = smaller room (because the sound would reflect immediately after hitting the smaller room’s walls.)
Diffusion
We often hear reverb as a big wash of sound (the blending of all those reflections.) If we were to single-out each little reflection “spike” inside of that wash of reflections, we would start to understand how diffusion is used to define the size of the room the sound is in.
- More diffusion = larger room (because we hear individual reflections and more of the “wash” of them all blended together.)
So Many Dimensions
And, it’s not just about the sound of the musical ensemble in the room (the full band or the full orchestra). Reverb can help create dimension and space between individual instruments as well. For example: Is the violin closer to the front (of the stage), while the brass is further back? Much of this concept of space is wired into our brains. While we might not be aware of it, our ears have been trained to associate big, lush reverb, with a sound coming from a big open space. A sound with no reverb is heard as being “up front” and close to us, while a sound with reverb will sound further away.
With these concepts, you can probably already begin to imagine how you’d use reverb to:
(1) create the overall environment/room size
(2) position each instrument within that room (eg move an instrument up close or further back in the room.)
Yes! This is why reverb is so important – especially for orchestral music. If your goal is to recreate the sound of a real orchestra, it’s important to be aware of where each instrument sits on the stage and then use reverb to help “position” those sounds within your mix.
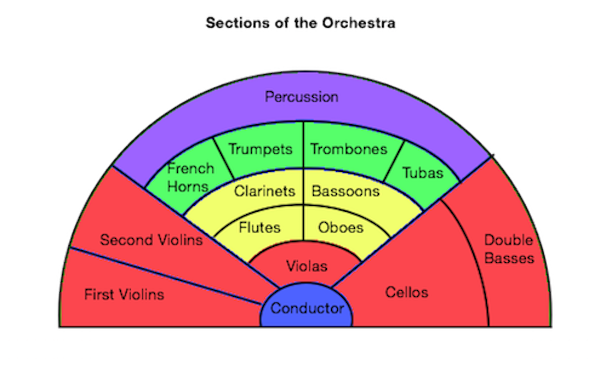
Below is a common layout for an orchestra. The bottom of the graphic is closest to the audience, while the top of the graphic is furtherest away from audience. Note that the strings, specifically the first violins, cellos and double basses are the closest to the front while the percussion and the brass are the furtherest away. Therefore, following the concepts we’ve discussed so far, we’d expect to use more reverb on the percussion and brass instruments as this will help create the sound of them being further away in our mix. Meanwhile, we’ll likely use less reverb on the strings in order to “move” them forward.
This is a preview of what we’ll be discussing in part 2 of this lesson. Come back soon to check that one out!
How To Create Mixes With Depth? What Is Mix Depth?
As music producers, we have likely used the left (L) and right (R) pan controls on our mixers often:

These tools allow us to move sound from the left to the right sides of the stereo field. But, in “real” life, we hear sounds from more than just the left and right dimensions. For example, we might hear a sound as being closer to us, while another sound seems farther away. These sounds could be coming from the left, or the right, or the center of the stereo field, but, what we are concerned with here in this topic is the sound’s depth: where they sit in the 3D space as a distance from the listener. Is the sound closer to the listener or far from the listener? Understanding this is the first step to creating mixes with depth!
For example, please refer to the graphic below that shows a common orchestra layout. This shows where each instrument sits on the stage from left to right AND from front to back. The conductor is smack in the middle with her/his back to the audience. The first violins are are on the far left and, along with the cellos and double bases (on the right), make up the the instruments that are closest to the audience. Meanwhile, the percussion covers a good section of the center field way in the back of the stage, so it is therefore the farthest away from the audience. The rest of the players fill out positions in the middle (both the stereo left->right, AND the depth front->back.) True 3D sound space!
Life In 3D Sound
While x and y have traditionally referred to the horizontal (up/down) and vertical (left/right) placement of a sound or visual, we use “z” when speaking about the depth, or “front-to-back” placement of a sound or visual. (In fact, we often call it the “z-depth”.) Therefore, you might hear the term “z” or “z-depth” when someone is talking about the depth of a sound or a visual element. They are referring to where a sound sits on this z axis.

But There’s No Mix Depth Control In My DAW?
As you can see now, to create mixes with depth, we need to be concerned not only with the left and right, but, also the front and the back. So, you might be asking yourself, “hey, how do I turn on the depth control in Logic Pro X?” Unfortunately, at least to my knowledge, our recording software and systems, do not include a mix depth control equivalent to the pan knobs. Instead, we have to create the sense of depth ourselves. And…..this is where reverb comes in!
Mix Depth In Action
If you are a user of Spitfire sample libraries, you have probably used their simple microphone mixer / stage tool which is a great way to visualize this depth concept. As you can see in the screenshot from Albion One below, there is a graphic of an orchestra layout (similar to the one I put above.) To the right of this graphic is a slider with 2 labels: Close and Far. Moving the slider up brings the audience closer to the orchestra, while moving the slider down will move the audience further away. Behind the scenes, Spitfire is (likely)adjusting microphone positions: turning up/down the microphones that are either closer or further away from the orchestra, etc. In doing so, we hear either more reverb from the room (far position) or, less reverb and more instrument (close position.)
So, now we see how reverb comes in to help control the depth of a sound.

Of course, this graphic shows the entire orchestra moving together as a giant unit – which, when using ensemble samples, is the case because we can’t separate-out each individual instrument (learn more about ensemble samples in my Part II of this series, here). However, imagine following this practice with each individual instrument patch: (1) load up the first violins only and move the slider to “Close.” Then (2) load up a percussion patch and move the slider to “Far”. Now, you’ve just started to recreate the orchestra layout above by moving the first violins up to the front and placing the percussion in the back.
**It is my understanding that Spitfire records each instrument in their ideal orchestral position. This means that when you load up all the different patches for each instrument: violins, cello, woodwinds, percussion, etc, Spitfire has already “placed” them at their depth based on how the orchestra was set up: violins up front, percussion in the back (as in the orchestra layout above.) Therefore, if you’re using all Spitfire instruments from a specific library (Eg all Albion) you likely don’t need to tweak these mic positions to much in order to create a sense of depth, because, that depth is already baked into the samples as recorded. However, understanding these concepts is the key point here (which is why I like using the Spitfire interface tool as an example) and, I have found that even when using a single Spitfire library in this way, I still need to use these techniques to create more depth within my mix. In other words, I will still go in and push the percussion back and bring the violins forward.
So, if you don’t use a sample library like Spitfire that includes this control, or, if you need to blend your instruments with another reverb to make them sound “together, in the same room” (see part 1 of this post here), then, you can use reverb to help control each sound’s depth (z position) as it’s effectively doing the same thing as the Spitfire’s microphone mixer to move your sounds close or farther away from the listener. As I refer above, this is what I end up doing regardless as I find I need to create even more depth and space between instruments.
How To Use Reverb To Create Mixes With Depth
If the concepts above are making sense, you can now use reverb to create a sense of depth, for any instrument ensemble. While perhaps more pronounced and traditional for an orchestra, these concepts work the same for a rock band, jazz ensemble, choir, sound design, atmospheres, etc. In a simple nutshell: more reverb means the sound is pushed farther away, less reverb means the sound comes closer. So, along with our trusty left (L) and right (R) panning knobs, we can now use reverb to complete the design of a complete 3D sound space!
Wow, I typed a lot of stuff above, just to come to that short, simple conclusion!
But what…..there’s more…..
Don’t Forget The EQ
Just when I thought I was becoming a master at this stuff, I learned that I was missing one powerful tool to use with reverb to help control the depth of a sound: EQ. Imagine a tuba blowing a loud note 5 feet in front of you. Now, move that tuba 30 feet away. Not only will you hear more of the room response (the reverb), but, that tuba will not sound as full and bold as it did when it was close to you. This is because as a sound moves farther away from the listener, it will start to loose body (low end) and air/detail (high end.) If you simply add or remove reverb to an instrument, you’re not really recreating the true sound it would have if it was closer or further from you. Remember too: the sound of the instrument changes first (as we describe here), and then the reverb is added to that new sound.
Referring back to the Spitfire stage tool mentioned above, what is important to remember is that they aren’t just turning reverb up or down depending on how close the orchestra is to the listener; they are controlling the volume of the different microphones that captured the sound of the instruments in that room. So, a microphone placed far back in the room, will hear the sound of a tuba as it really sounds to a listener who was sitting that far away: with less low end and less high end, verses the microphone that was placed up close on that same tuba.
If we want to create a similar effect using our own tools and reverb, then, we can use EQ to help simulate this impact of distance on a sound. This is done by lowering both the low end, and the high end of a sound as you want to move it back in the mix. The more drastic the cuts, the more the sound will loose it’s body and detail and sound further “back” in the mix. Of course, ideally you will be mirroring this by increasing the reverb that’s being added. So, the EQ and the reverb are working together in this way.
Below is a screenshot of how this might look using the Logic Pro EQ.

What Comes First The EQ Or The Reverb?
One of the biggest questions when using this technique is the signal chain: do we add the reverb first and then the EQ? Or vice versa? I believe this gets a little more complicated because of the various routing options available in various DAW mixers and producer approaches. For example, if you set up a single reverb on an Aux channel, and then SEND the instrument signal to this Aux channel. Are you sending the signal pre or post fader? Do you have a single reverb that all the instruments route to in this way, etc….
While it might get confusing in practice, let’s first agree on the the concept. As I (once again) reference the Spitfire microphone mixer/stage tool, let’s remember that the microphones are picking up the sound, (close or far) in the room as the sound is made. And, this sound comes first and the reverb is created FROM that sound. Therefore, a thinner sound will have a different reverb sound than a fuller sound. So, in my opinion, to better recreate this effect, we want to EQ the sound first and then add the reverb (however you choose to use the routing and options within your own DAW.)
One common approach is to create a separate reverb Aux channel for each section of the orchestra: violins, violas, cello, bass, woodwinds, brass, percussion. Each Aux then has its own reverb and EQ to create the “depth” and therefore, creating a position for that group within the 3D sound space. For example, the reverb for the percussion might be larger and its EQ cuts more dramatic in order to move the percussion further back. Meanwhile, the Aux for the first violin will have a smaller reverb and the EQ cuts will be minimal as we need to “hear” this instrument up closer.
On the surface, this is a great approach, and one that I use myself, but with one major caveat/checkpoint: I make sure I’m not ruining this effect by letting too much of the original, non-EQ’d original sound sneak into the mix. For example, if you SEND signal from the percussion channel to this new aux channel to do the work of creating a sense of depth via reverb and EQ as we described here, be sure that you are not also letting the original, un-processed sound of the percussion leak out either via it’s channel fader or some other effects/routing. This is super common when starting out, and will ruin the sense of depth as you’ve now brought back the “up close” sound of the percussion to compete with the “far away” sound. In some cases, this might be needed in order to introduce more clarity to an instrument that has been pushed back in the mix (although, I’d argue: why not do this via the Aux track by decreasing the reverb or lessening the EQ cuts?)
No More Solo Button!
The success of this approach can require us to truly alter the original source sound. In the case of pushing a sound far back in the mix, we might need to make serious cuts to the low and the high end, which, if heard on its own, out of the context of the full mix, could sound thin and maybe even muffled. This can seem surprising and crazy for some producers at first, as we all strive to make our sounds the best they can be. And, this is another reason to never use the solo button when mixing! (That’s for another post!)
Thanks again for stopping by and reading all this fun stuff! I hope you were able to take away some good concepts and techniques for how to use reverb to create mixes with depth. Mixes are not just the left(L) and right (R) – don’t forget the “Z”!
