Orchestral sample libraries for the beginner | Part I: Wet vs Dry. This will be my first in a series of posts where I share some of the key concepts that I use when composing and producing orchestral-based music using orchestral sample libraries. Please note: This series is orchestral sample libraries for the beginner. If you are just getting started, and you’re interested in learning more about how to compose orchestral music using your DAW (digital audio workstation), and you want to understand some of the basics of orchestral sample libraries, then this is for you
To kick things off, I’m going to start at the source, and talk about how the samples are recorded and what this means to us as composers and producers. To be clear, I’m not going to get into the microphone, EQ or preamp selections, I’m more talking about the space the orchestra is in. One thing that surprised me when I first started getting into orchestral work, was that the room that an orchestra is recorded in, is a big part of the overall sound. When you go to the Symphony to hear an orchestra perform, you’re not just hearing the sound of the instruments, you’re also hearing the sound of the room (i.e. Symphony Hall). All that lush, beautiful reverb contributes to the overall experience. This is why so much effort is put into the acoustic treatment of a Symphony Hall and why music can sound dramatically different from room to room. When you’re sitting in the Symphony Hall listening to an orchestra perform, you’re never just hearing the sound the of instruments alone – you are hearing the sound of the room as well.
Wet Sample Library
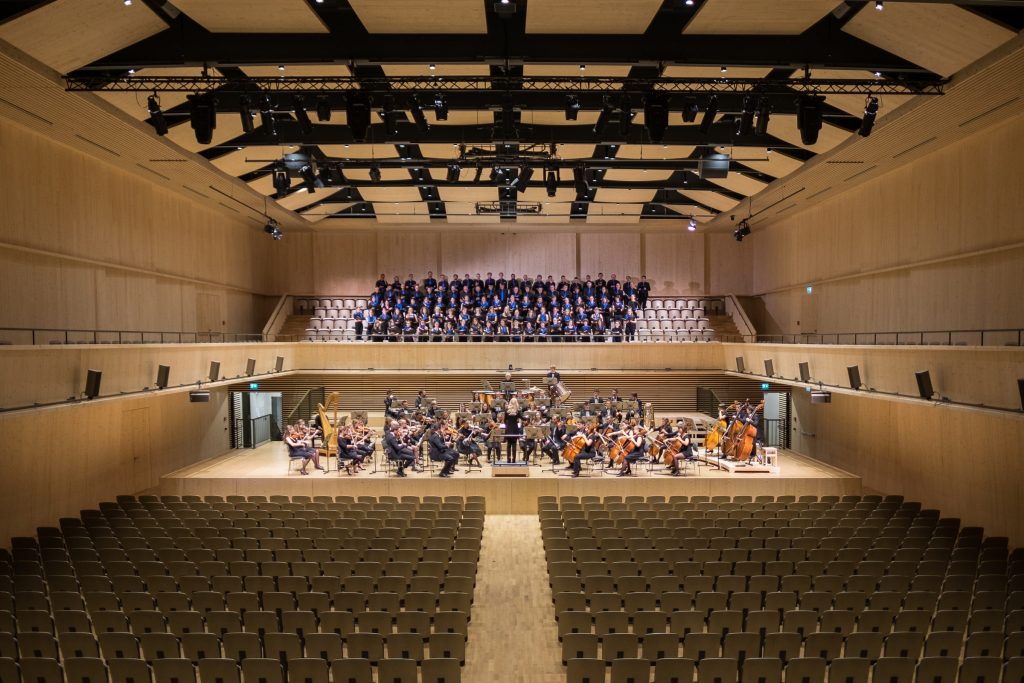
Looking at the photo of an orchestra on stage below, imagine them playing a single short note and how it would sound within the room. You would not just hear the instrument, you’d be hearing all the room ambience (reverb, reflections, echos) as well.

To relate this directly to the sample world, a sample library that includes the sound of the room in the sample itself, is referred to as a “Wet Library;” or, more specifically: “The samples are recorded Wet” so they will include the room sound. The company Spitfire records many of their orchestral libraries in Air Studios in London. As the room sound is so important to an orchestra, sample library companies will often call this out as a selling point – as Spitfire does:

Another popular sample library that is recorded wet, is the Metropolis Ark series (1-4) from Orchestral Tools. In this case, these libraries were recorded at the Teldex Scoring Stage in Berlin.

And the Cinematic Studio series is yet another great “Wet” library.

Mic Placement – Wet Library
I’m not going to go into detail about mic placement, but, one could assume that when Spitfire and other companies record their orchestras “wet,” they are likely placing microphones both near the instruments, as well as throughout the room itself – thereby capturing both the instrument and the space at the same time. Many sample libraries that are recorded this way, will include buttons and sliders in the software’s interface to control the volume of these various microphones so that you can hear more, or less, of the room. Keep in mind that many libraries will also charge extra for these additional microphone controls. At first it might not seem like a big deal, but, having the ability to turn the room sound up or down can help you dial in the sound you are after – particularly if you are trying to blend with other samples that were recorded in completely different rooms – so you don’t hear too many reverbs washing around when the different room sounds are heard together. (Think about it: how many orchestras are recorded in completely different rooms?) Speaking of the benefits of less room sound, lets talk about sample libraries that are recorded dry….
Dry Sample Library
So, if a wet sample library includes the sound of the room, a dry sample library would be described as a recording that does not include the room sound. In the case of a dry recording, you are hearing just the up-close, direct sound of the instrument itself – no reverb. Then, you as the composer/producer will add your own reverb to the dry samples and place the orchestra in a new room of your own!
Mic Placement – Dry Library
It would seem that recording a dry sample should require less microphones, because, the goal is to place the mic as close to the instrument sound source as possible. Therefore, there is no need for additional mics to capture the sound of the room. Again, this is not a through review of mic placements, and I’m sure the engineers are using a wide array of different mics in different positions for both styles of recording, but, the main idea I’m trying to get across is that the goal of the dry sample is to get as close to the sound of the instrument as possible.
Examples of Dry sample libraries include LA Scoring Strings by Audio Bro (aka LASS) as well as the Vienna Symphonic Libraries.


Another very popular Dry library is Hollywood Strings by East West Quantum Leap.

Blending
What about using both? In fact this is my method. Especially if I’m working on a denser mix, like an epic trailer type piece, I find that I really do need both styles. I will often use the Wet library as my main sound, but, as more instruments are added to the mix, and the orchestra gets lost trying to compete with so many sounds, I will then raise up the sound of the dry mix to bring the orchestra forward. The attack and definition the dry library is so important and has a much more dramatic effect vs just adjusting the mic placement of a Wet library. The balance of these two is really powerful.
Wet vs Dry: Why pick one over the other?
So, why would you choose a wet library vs a dry one? If a wet library already includes the reverb, and it’s a natural reverb from a real room, wouldn’t that be better than having to add your own (digital) reverb to a dry sample? On the other hand, if you want to mix sounds from various different libraries, which were all recorded in different rooms, could it be difficult to manage all the different room reverbs and wouldn’t that start to sound unnatural – as if the orchestra is not playing in the same room together? Both of these opinions are valid, which is why the selection of using one or the other becomes a matter of choice and best answered by your own personal workflow and the sound you are attempting to achieve.
For example: I believe it can also depend on the style of music and production you are after. If you are planning to do more traditional orchestral music, particularly a less “epic” or dense style which can have many different instruments competing for attention, I think the Wet style could work well for you. It will likely give a more natural, lush sound and, to be honest: it will can be much more inspiring dry library. (Dry libraries can sound harsh out-of-the-box until you work to add your own reverb.) As well, Wet could work with slower pieces, or pieces that are cinematic in nature (e.g. pads, ambient, new age, etc).
On the flip side, if you want to do more epic music, or mixing hybrid styles and/or music with lots of instruments, I find that the Wet libraries can get a little lost in the mix. Because, their built-in reverb, gives the Wet library a more “set back” sound; this is because reverb naturally moves the sound source back in the mix and can reduce it’s attack and definition. And, as referenced above, if you are mixing many different Wet instruments, orchestral or otherwise, all that different room sounds might start to cloud the mix even more and make it more difficult to create a cohesive sound. (I will emphasize here: it could make it more difficult, especially when you are first starting out; but it’s certainly not impossible to make blended Wet libraries sound fantastic!) Also, intimate music, like a smaller quartet, or even solo instruments, often sound “more intimate” when the sound is closer and less washed out by the sound of the room; so, that’s another option for the Dry library.
Summary
As I mention above, I do use both Wet and Dry libraries together in the same piece, particularly for a more denser mix with lots of instruments. I like the big, natural sound of the Wet library, however, I find that I need the attack and definition of a Dry library to help the orchestra cut through the mix. Blending the 2 approaches gives me the perfect sound. However, as this post is about orchestral sample libraries for a beginner, and assuming you don’t want to run out and buy one Wet and one Dry library, I’d probably suggest starting with a library that is recorded Wet. For one, they usually do include various mic positions, so you should be able to turn the room sound down if you want a dryer sound. (Keep in mind: i find that even when turning the room sound way down, I can still hear it much more than in a library that is recorded 100% Dry.) As well, I find that Dry libraries can take more time to make sound “good.” You’ll need to buy a very good reverb (ideally an convolution reverb, like Spaces, that helps recreate the sound of the instruments inside a room). You might have to play around with EQ, along with MIDI parameters (e.g. velocity) as well as the reverb, to get the Dry samples to blend well with the rest of your mix. This is something you’ll eventually master, but, as a beginner, it can be a bit daunting. A Wet library will allow you to install and go – they sound great out-of-the-box and can be very inspiring to play.
As a reminder: the Wet libraries will give a more natural yet “set back” and less defined sound, while the dry library could be less warm and “big,” sounding, but provides the attack of the instrument and therefore moves the sound more “up front” in the mix.
What Do We Mean By “Ensemble Vs Sections” In Orchestral Sample Libraries?
If you are new to orchestral composition using sample libraries, you might be wondering what an ensemble is, or what a section is in the context of this work. What we are talking about here, is how the instruments are provided to you, the user, inside the sample library. For example, if a sample library says that it is providing the sounds of the orchestra as “ensembles,” this usually means that they are bundling up several instruments (an ensemble) as a single unit to work with within your DAW (digital audio workstation.) Within your sample player (eg Kontakt), this unit is referred to as a “patch.” So, you might see a patch for “Strings High,” which could include all the violas and violins together, while the patch called “String Low” is likely just the bass and cellos together. Note that I’m not 100% sure what is included in each patch, because, the idea here, is that you are getting a broad section (“String High”) vs specific instruments separated out.
Screenshot below shows the patches provided in Spitfire’s Albion One (legacy). Note the “String High” and “String Low” patches, as well as how the Brass and Winds are also broken out in ensembles. The main drawback to ensembles, is that there is no way to really write specific lines for specific instruments. Eg: the cellos will play these phrase while the basses play a different phrase. Even if you aim to do this by composing in the appropriate registers for any single instrument family, the reality is that there is cross over in their ranges; eg: the higher notes of the bass overlap the lower notes of the cello, etc.

This leads me to the next options: “sections.” Sections, as the name implies, is when the instruments are provided as broken-out instruments per patch. So, in this case, you would see a “bass patch”, “cello patch,” “viola patch,” and “violin 1” and “violin 2” patches as shown in the screenshot from Cinematic Strings below. Of course, in this approach, you can write specific music for specific instruments: The viola can play something completely different from the violin.

How To Choose Between Ensembles And Sections?
It’s probably easier to understand the benefits of the section approach: why would you NOT want to have more control and be able to write for a specific instrument? And, yes, this is the main selling point of a library that provides instruments as sections. If you are a composer who writes specific parts for each instrument, then, you would probably need to get a section-based library for sure. Keep in mind, with this control comes more work as well! As each instrument lives inside it’s own patch, your job now expands to not only maintaining all the music and mixer routing within each part, but also, requires more production duties because now, you need to blend each instrument in a way that sounds like a single, cohesive orchestra. This could mean specific EQ tweaking, compression, panning and reverb in order to make each instrument “sit” within the context of the full orchestra as well as within the mix overall. As you progress in your composition skills, and if you are planning to do more orchestral-based music, then, you most likely want to use section libraries.
However, this is also where the value of ensembles come in. If you are a composer or a producer who is either just starting out, or perhaps not sure if you’d ever need to be writing for individual instruments, it might be easier to simply load up a String a great-sounding ensemble patch that is more or less “out of the box” and ready to go. Also, for people who focus on less orchestral-heavy music, for example: Hybrid styles blending orchestra with rock, hiphop, electronic or pop, an ensemble library might be all you will ever need. Metropolis Ark I from Orchestral Tools, is very popular sample library used by professional trailer composers who produce Epic, Hybrid music, blending big orchestras with other styles, and it provide only ensembles (high strings, low strings.) So, don’t feel like you need sections in order to be a “pro” and produce music at that level. It’s more about your preferences as a writer and producer.
What About Combining Ensemble And Section Patches?
What about combining sections with ensembles? If your budget allows, and assuming you need the control that a section library provides, this is what I would suggest. In my workflow, I usually always start a new piece using an ensemble patch. For one, this is a super quick way to get a great sound and also have a full orchestra at my finger tips from the start (eg inside a single patch. ) When starting a new piece, I often don’t know what parts of the orchestra (or even String sections) that I want to focus on, so it’s great to have the full sound from the start. More important to me, is the sound I get from the ensemble patch. For some libraries, like Albion One for example, the ensembles sound so good, they inspire me to want to write! I’m not distracted by having to tweak different instrument patches, route their mixing paths, add EQ, etc – all these things slow me down and get in the way of inspiration and creativity. You shouldn’t forget this important part of composition: remove the barriers that get between you and your ideas.
Then, after my piece is written, it’s great to have the option of bringing in specific patches that allow me to write new phrases, or even emphasize existing phrases, for specific instruments. Not always, but often, sections have less ambience (reverb) in their samples (see my previous lesson, in the Orchestral Sample Libraries for Beginners series, on Wet vs Dry Sample Libraries) which means they can provide more definition to an instrument within a larger production (with many instruments competing for attention.) One of my favorite combos is to use Albion One as my ensemble patch, and then use the individual instrument patches from LA Scoring Strings to write custom music for each instrument and to provide more definition to each instrument that the ensemble is not able to do. This combo is like the best of 2 extreme worlds: Albion is lush complete String sound, full of ambience (natural reverb), easy to set up and inspiring to play, but also can get lost in a larger production as the definition of each instrument is more “blurry.” On the other hand, LA Scoring Strings sounds almost “cold and harsh” out of the box. There is absolutely no reverb (100% dry) and it can take some serious producer skills to get a full orchestra sound up and running. However, this is also where LA Scoring Strings can help. Because it provides the individual sections, and because they are recorded so dry, they provide outstanding definition to each instrument and helps them pop out in a busy mix. This is also referred to as the “attack” of the instrument. For big ensemble libraries like Albion One, the attack of each instrument can get lost; we then use dry, section-based libraries like LA Scoring Strings, to bring that attack back up front.
Summary
I hope this was helpful for anyone who is just starting out with composing orchestral music and wanting to understand more about the different concepts of sample libraries. In summary: a section-based library will provide each instrument as it’s own patch, allowing you to write different music for each instrument. This is ideal for a composer who needs that control to customize the sound and musical phrases of each instrument. However, it also requires more set up time and producer-type work to make the various patches sound like a cohesive orchestra. If you are just starting out, or, if you don’t think you’ll be needing to write music for specific instruments of the orchestra (violin, cello, trumpet, etc), and you want a great sound “out of the box,” you might be fine to stick with an ensemble-based library.
STRINGS ARTICULATIONS
Long String Articulations
Long strings, like the name implies, is when the note is held (longer) – this is usually referred to a sustained note. Within this Long category, you might find variations of Long articulations, and/or see different names used such as “arco,” “legato,” “portamento,” “tremolo.” Regardless of the term used, and I will go into more detail about the sound of each below, the main point I’m making is that a Long string articulation means that the note is held verses stopping the sustain from ringing out as in a “short”.
Common Long String Articulations
Sustain
This is probably the most common, well-understood articulation as it is easy to imagine the string section playing a single note with their bows and then holding it (sustain). You might also see this called “Arco” or “Arco Strings” – which means, “play with bow.”
Good for: All purpose, multi-genre. Creating melodies with longer notes that need to be held for a period of time, verses many notes played rapidly together.
Legato
What makes Legato special, is that it captures the transition between two sustain notes. Imagine a string player starting on an “A” note and then moving to a “C” note with a single bow. Legato has the effect of creating a softer attack of the transition note(s) – often referred to as a “blurring” – verses two totally separate notes played one after the other. In the context of a sample library, the library creators will actually record every possible transition between two notes, and then use the programming language of the sample software to control how the notes and transitions are triggered. This is all in order to make the transitions between notes sound more realistic. Yes, this is A LOT of work for the people making the sample library, and it has become expected for any modern sample library that wants to be competitive in the marketplace. Still, not all libraries include legato, so if this is important to you, make sure you check before you buy!
Good for: All purpose, multi-genre. Creating melodies with longer notes that need to be held for a period of time, verses many notes played rapidly together and for creating realistic transitions between notes.
Tremolo
Very useful for creating suspense in music, the Tremolo articulation creates a vibrating, “tremble” effect by rapidly playing a note. Imagine a string player moving their bow back and forth very quickly (in very small movements). Instead of the smooth, flowing sound that comes from a sustained note, the sound that is produced from a tremolo articulation, sounds very active and “nervous” as the sound “trembles” back and forth. While some could argue that tremolo is a bit of an effect, and might be called decorative, I find that tremolo articulations are usually included as “long” (sustained) notes, and, within the context of a score, often get used in a similar way as a sustain articulation would.
Good for: Creating suspense, tension, and adding texture and color. Common in horror music! Usually better for longer notes held over a period of time, vs shorter repetitions.
Vibrato
Similar to the tremolo, and often confused with tremolo, vibrato is a rapid variation in pitch of a note. This variation could be both above and below the note (a little higher and a little lower).
Good for: Creating suspense, tension, and adding texture and color. Usually better for longer notes held over a period of time, vs shorter repetitions.
Portamento
A glide from one note to the next. Imagine the player sliding into a note – it almost gives that “tuning in” to a note sound when tuning the instrument! Portamento is often used interchangeably with Glissando (see below), although, Glissando is usually more used as an effect (decorative.)
Good for: All purpose, multi-genre. Adds more realism to transitions as it recreates the natural “slide” into notes that many players do.
Con Sordino (not necessarily “long,” can be used on “short” articulations as well)
Muted playing that can create a softened, more “darker” sound.
Good for: All purpose, multi-genre. Creating a soft, darker, muted sound. Sometimes strings can get too loud, harsh or distracting when many are played together – particularly in the higher registers. Playing some of the higher notes as Con Sordino, can reduce the “harsh” sound, as well as help other instruments poke through the score.
Short String Articulations
Having talked about Long strings above, can you guess what Short would be? Did you guess: Short notes? That is correct! We have to remember that instruments are capable of playing a wide range of sounds: long and sustained, as well as short and quick. A Short articulation is when the note does not sustain out – it is a short, often “bite” of a sound. I use the term “bite” because that is often what I think of when using Short articulations. Because the notes are not ringing out longer (eg not sustaining) they tend to have a tighter sound with more attack that is used for faster lines where lots of notes need to repeat quickly. Short articulations are interesting in that they often have a percussive feel that can even overshadow the tonal aspects in some instances.
Common Short String Articulations
Staccato
This is what I think of when someone says “short” notes. Sometimes, I’ve heard people describe any short note as “staccato.”
Good for: All purpose, multi-genre. Often used in faster music (eg Action) and when creating melodies with shorted that need to be played rapidly together.
Staccatissimo
Like Staccato, but even shorter!
Good for: All purpose, multi-genre. Often used in faster music (eg Action) and when creating melodies with shorted that need to be played rapidly together.
Spiccato
Short notes, like staccato, but with the bow bouncing off the string to create an even tighter, more percussive sound. I prefer Spiccato over Staccato for faster, more action-based compositions where I want the notes to cut through.
Good for: All purpose, multi-genre. Often used in faster music (eg Action) and when creating melodies with shorted that need to be played rapidly together.
Marcato
Strongly accented note with sharper attack (more emphasis.)
Good for: All purpose, multi-genre. Good for emphasizing certain notes in the melody and for melodies with shorted that need to be played rapidly together.

Effect Articulations (Some Of These Could Fall Under “Long” Or “Short” As Well)
I’m not sure if effect is an official musical term, but this is how I describe articulations that, might fit in the “long” or “short” category, but, their main purpose is to add color, and more realism to the sound.
Common Effect Articulations
Pizzicato
Plucking of the strings, creating a light, bouncy sound with no sustain and little body (short, and more percussive.)
Good for: All purpose, multi-genre. This sounds is heard all over the Dramedy (Drama+Comedy) genre, where the goal is to create a fun, light sound that implies mischief along with a sense of humor.
Barktok Pizzicato
Plucking the strings hard enough to create a sharp, percussive effect (more percussive than tonal.)
Good for: short notes. acting as a member of the percussion family! Can sound very “hard” and big when played at high velocities and often mistaken for drums.
Col Legno
Striking the strings to create a sharp, percussive effect (more percussive than tonal.)
Good for: short notes. Making short notes sound percussive. Can be played in a way where it sounds like two instruments: one playing the tonal melody, the other playing the percussion.
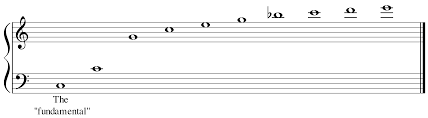
Harmonic
Just the overtone of the note (not the sound of the fundamental.) The overtone is much thinner and higher in pitch, so it gives a very light almost ghostly sound.
Good for: layering over the main melody (sustain) as the higher overtones add additional color and richness to the sound without “doubling/thickening” the main melody notes.
Sul Tasto (aka Flautando)
Flautando means “like a flute” – which is what Sul Tasto can sound like. Playing the strings over the finger board to create a softer, lighter sound.
Good for: Similar to harmonic to layer on top of sustain notes and give more character, richness to the sound.
Your Orchestral Programming Doesn’t Sound Realistic, Dude
So…….maybe, it’s not that my samples are bad, it IS my bad programming! This was great news. In addition to the fact that I knew that I hadn’t wasted money on all those samples, I now had some idea how to address my issues. Some of these concepts are very obvious and basic, but for me starting out, this was a huge breakthrough in my orchestral programming. I had been too sloppy before: I had assumed that a “short” articulation didn’t need to have a short note length, so I would let some notes be longer than others. As well, I had assumed that I should be pushing my louder musical moments higher by increasing the velocity on the note…sometimes, to the ear-piercing max! (What was I thinking?)
Choose The Right Articulation – First!
If you didn’t read my previous post on orchestral string articulations, I would strongly suggest you read that first as the first step in creating realistic orchestral programming is to make sure you’re always first choosing the right articulation for the job. Then, we use the various programming tools, like velocity and note length, to improve the overall sound. and make it sound more realistic. To segue into this topic, I’ll be using the example of needing a short, fast string sound with sharp attack. Imagine a piece of action music. There are often fast, repeating string lines (called “ostinatos”) that are used to create a sense of excitement, anticipation and action. As these notes are moving so fast, we need them to start quick and end quick (short.) Referring to my bad programming example above, this is where I messed up. First, I was often using staccato articulations. When you read my orchestral string articulation post, you’ll learn that while staccato is indeed short, it is not the shortest articulation — spiccato is the shortest. So, if we are after that quick, short string sound, we usually want to use spiccato articulations.
Wait, you mean it’s still not “short” enough?
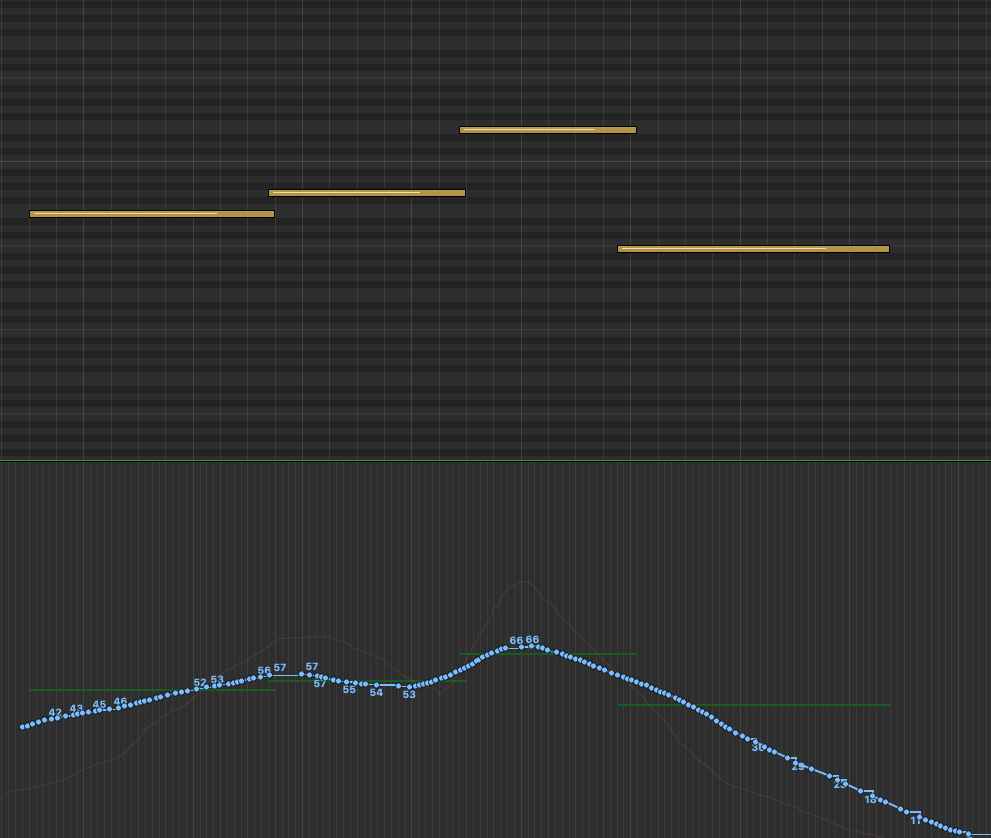
So this is where things get tricky. Just for reference purposes, let first look at two MIDI notes that each trigger sounds:

Not All Samples Are Created Equal
The first thing to be aware of is that different instruments and sounds react to MIDI notes in different ways. For this exercise, we will be focused on how most string instruments will respond. Be aware that you might purchase a library of some exotic instrument one day that follows its own use of the MIDI note lengths. When your DAW is playing back a piece of MIDI music and sees a MIDI note, like the two in the screenshot above, it will immediately start playing the sound that is assigned to that MIDI channel. The MIDI knows nothing about the sound (in this case a sample), or how it’s been delivered by the creators of the sample library. Think of it like pressing play on a tape recorder and then pressing stop when the note length ends (if you can remember what those tape recorder things are!) Referencing the screenshot above, if you are wanting to play a longer, sustained note that plays over a period of time, you would want to use a longer MIDI note like the one on the bottom. If you used a short note, the long sustained sample would start playing, but would stop making sound as soon as the MIDI note ended.
This seems straight forward, right? If you want a long note to play, then you make sure to use long MIDI notes that last as long as your note. In the case of the action style referenced above, where I really needed the notes to be quick with a sharp attack, I had forgot exactly what I just described above: The sample will play until the MIDI note is gone. I assumed that a “short” articulation, like staccato, would just play a quick note and be done. While it IS doing just that, the fact is, the full sound of the instrument hitting the strings can last longer than we want. As well, it can include the sound of the room (reverb), which might not seem like much, but, it can give the impression of a longer note when played fast.
Give It A Nudge
And, depending on the sample library, there could even be a split second of sound or space right before the main attack of the string. For example, if you imagine a string player pulling their bow back and striking it across their violin, there will be a brief run-up as the bow crosses the strings. This has the effect of making the full attack of the string hit just a split second after the MIDI note is triggered and not on the beat. If the music is going quite fast, as in the action music I was doing, these samples can start to blur together, as each note could be hitting their “attack” sound after the down beat and then ringing out a tad too long. The results can be not enough clarity between notes. To fix this, I first made sure I was using the shortest articulation, spiccato. Then I went in and nudged each note ahead of the actual beat. This would have the effect of making the string “hit” hard on on the beat as the brief space before would now kick-off earlier. Once I had each note moved over and sounding in-time with the music (this takes awhile to tweak), I then shortened each MIDI note to make sure only the main hit of each attack was being played. (Must make sure it sounds natural of course — we don’t’ want to just cut the notes off either!) So, for a quicker-pace run of music, it might look something like the screenshot below. Look closely to find the gray beat marker lines. This is where the rest of the instruments are “hitting” their downbeats. You’ll see that I’m starting each string note just slightly before each of those lines so that the attack that comes after it will then be in-time with the rest of the music and sound sharper.
Nudging the notes and cropping their length like this is something you’ll need to experiment with for each sample library. This is because different companies use different amounts of this “pre space” based on how their players perform and how ultimately process their samples. And, as I mentioned above, you want it to sound natural and realistic of course! This is just as important for long articulations. Especially for legato where there is usually a longer period of time from the start of the MIDI note to when the full attack of the performance is heard. So, a legato transition might look more like the screenshot below. Note how far ahead of the beat that the MIDI note is starting. This give time for the bow to move into its full attack. Also, you’ll see that the 2 notes are overlapped. This is because with legato, we need to capture the transition from one note to the next. This tells the sample library scripting to “play” that transition from the first note to the second.
Before we move on, just a reminder that note length is also important for long notes where you want to make extra sure that the note is indeed long enough to play the entire string line.
In Orchestral Programming, Velocity Goes To 127!
If you’re not familiar with what the numbers 0 to 127 mean in the world of MIDI, I’ll quickly describe it here as being the range of a single note’s intensity. In other words: how hard the player plays the note. Each level of player intensity is given a number from 0 to 127. In the case of a drum, a velocity of 20 would be a soft hit on the drum, while 120 would be a loud, forceful BANG on the that same drum. Sample libraries go through and sample lots and lots of each intensity hit, in order to give us a different sound for each velocity number we select. I’m not sure if they literally record 128 different hits (0 to 127), but I’m pretty sure they usually get close to that! This is one of the distinctions that can make a sample library sound more realistic over another. It’s also important to know that not all sample libraries are the same. A velocity of 50 for one instrument made by company A, might sound more like the velocity of 70 for the same instrument created by company B. I’ve also found that percussion can be pushed much harder than most other instruments. It’s not uncommon to see most of a percussion sequence maxing out at 120-127. Meanwhile, if you try that on high strings, you will have someone tell you that “your strings are piercing our eardrums”. Even for my most loud and intense music, I rarely push my strings over 75/80 — I’ve found the higher velocities are just too harsh for most of my music. So, the lesson here is: You need to audition velocity for each and every instrument you use and not assume that louder, more powerful needs to mean 127 velocity.
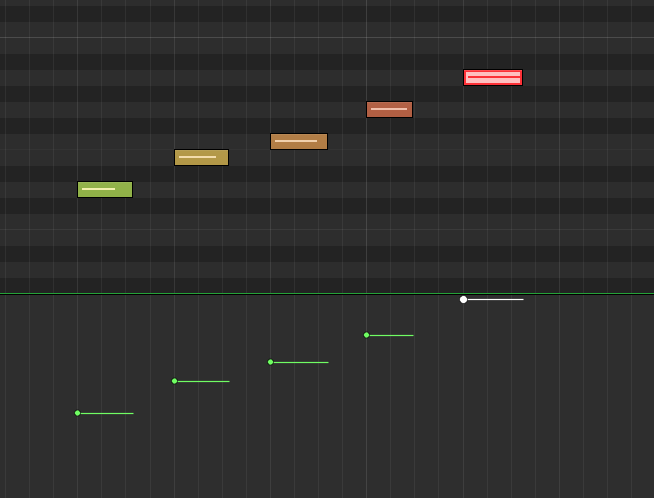
Most DAWs use color or some other visual indicator to display the velocity of a given note. Below is a screenshot from Logic Pro. The softer velocities start as green, and move up to red as the most intense. You can imagine a drum roll that is building up to a big chorus might employ this exact technique. For me, I find that the lighter oranges are about as intense as I push most of my orchestral samples — the darker oranges and red (high velocity) seem to always sound too harsh, for me. As I mentioned above, even when I want the strings to sound loud and forceful, I find myself keeping them at these lower velocities in order to create the realistic orchestral programming I’m after. Meanwhile, I find that I need to push my drum and percussion samples up into the higher velocities to get the sound I’m after. Of course, this is all dependent on your style of music and the sample library you are working with.
Conclusion
I hope this was helpful in learning some techniques to create realistic orchestral programming. Much of it is common sense. If you want a note to play longer, then make sure it is (physically) longer! And for a short note? Hmmmmm….yes, make it short! However, within these basic concepts is a lot of nuance and detail. It took me time to really understand how, exactly, the sample libraries were responding to the MIDI notes I programmed. Many times, especially when you want to recreate a realistic orchestral performance, you’ll need to experiment, tweak and be critical of the note length and velocity setting for every single note in your piece. It can take time to get just right, but in the end, it’s worth it when your orchestra sounds (more) realistic.
Quick Re-Cap: Velocity
In our previous lesson, Note Length and Velocity, we talked about velocity being a measurement of how “hard” a note is being played. As a quick recap, imagine a drum that can be hit as a soft tap, and with each hit, increasing that force all the way to a full-on BANG of that same drum. In a sampled instrument, the velocity parameter gives us the ability to chose how hard EACH note is being played. This is a key distinction: velocity can control EACH note. No matter how many notes you have, you can assign a different velocity value to each one. Again, imagine a drum roll that starts soft and builds up to a loud powerful final HIT. To do this, in MIDI language, we assign velocity values from 1 to 127 (1 being the soft tap, 127 being the LOUD bang.) Below is an example of how this might look in Logic Pro X, where the use of color (green = soft velocity and the red = high velocity.)
It’s Not Just “Louder”
Now that we’ve done a refresher on what velocity is, let’s not move too far until we first remember that the “sound” of velocity is not only about “quiet” vs “loud.” Thinking in only those terms, we might confuse it with volume: if you want the drum quieter, turn down the volume, etc. But in fact, the way an instrument is hit effects more than just volume. For example, if you hit a drum very soft, it will have a completely different timbre and texture than it does when hitting that same drum hard. So, when we talk about velocity, and it will be the same for modulation, we are not just talking about volume (although sound level does get impacted of course). Instead, we want to be aware of how these various parameter settings effect the tonal qualities of the instrument. Indeed, these wide variants are what make instruments so expressive and using them correctly is how we make our sample-based orchestral projects sound more realistic (there’s that word “expressive” — with lowercase “e”.)
As mentioned above, velocity can be set for every single note in your piece! However, it cannot change within the duration of that note. What does this mean and why is it important? In the example above, a short hit, like a drum, usually only lasts for that brief moment as the instrument is struck. Compare this to a long, sustained note performed by a string section. In this case, velocity can only impact the first “strike” of that long sustained note. However, when playing a sustained note, a string player will actually be changing their velocity throughout the duration of the sustain; in fact, this is exactly what makes instruments sound more “realistic” as it introduces more human expression. For strings in particular, many sustained notes start softer as the player begins the bowing, and then swells up to a louder velocity before coming back down as they fade or transition to the next note — all with a single note! Another way to envision this, is to imagine a crescendo/decrescendo.
Modulation To The Rescue!
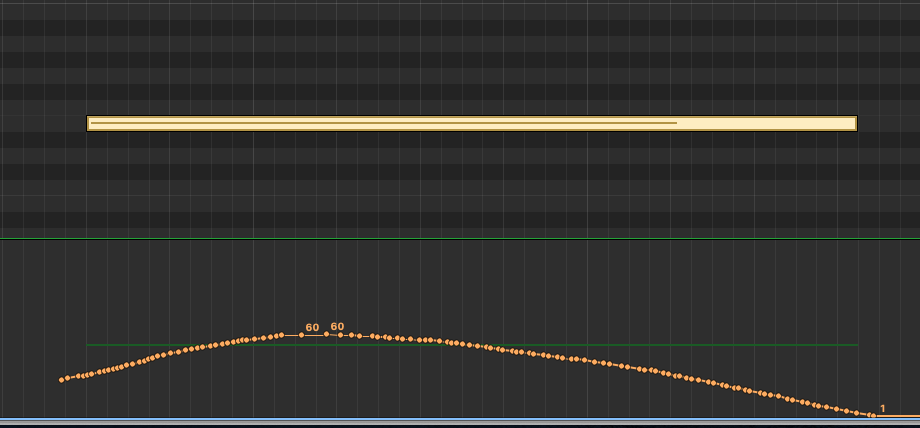
How can we accomplish the sound of these very common articulations, if we only have velocity impacting the very first hit of the note? This is where modulation comes in! Modulation can be adjusted throughout the entire duration of a note. We can start soft, swell to more force (crescendo) and then slowly fade back down to a whisper all within the span of a single note! Wow. How do we do THAT? Please refer to the screen shot below, taken from the Logic Pro X MIDI editor. On top we see a single sustained note (that yellow bar). Below the note, notice the orange dots that make up a curved line – this is the modulation for this single note. You can see that the tone starts soft and continues to rise up and then slowly fades back down. No string player would play a note of this length using the exact same velocity for the entire duration of the note. He/she would be varying the velocity as the note sustains, as in the effect shown below: creating a crescendo and then a decrescendo. This is how we breath life in to our samples!
Cool! But HOW Do I Do I Create This Modulation?
In the example above, I drew the modulation by selecting “modulation” inside of the Logic Pro X MIDI editor. Then, after I found the notes I wanted to modulate, I held down the COMMAND key, which allowed me to draw this shape into the modulation window. If you’re using another DAW, I’m sure you’ll have the same ability, but perhaps using different key commands. I knew I wanted the sound to start soft, swell up and then do a gradual fade down. So, that’s what I drew!
That’s What A Physical Controller Is For!
Another, more natural way to do this, is to use a physical MIDI controller. Many MIDI keyboards include faders that can be mapped to the modulation parameter inside of your DAW. In fact, because the modulation parameter is so important, many MIDI keyboards have a controller that is already mapped to edit modulation. This is usually called the “mod wheel” on your keyboard and it has the universal MIDI number (aka “code”) of #1. You will often see the term “CC1” – this refers to “continuous controller #1″ which is mapped to the MIDI parameter “Modulation.” For reference, the Expression parameter, which we will discuss next, happens to be CC #11.
With a physical controller, instead of using a mouse to draw your modulation, as I just did, you can also use these faders to record a modulation performance as the notes are playing. Many composers prefer this method as it can create a more natural connection between the notes and the modulation performance as they are happening together just like playing a real instrument. Using the “mouse draw” method, it can often seem like you’re just drawing what you think it should sound like – not what you are feeling. Many composers will use MIDI controllers that have several faders which they can map to several different MIDI parameters: modulation, expression, vibrato, pan, sustain, etc; and, then they keep one hand on the controller faders, and one hand on their keyboard as they record a performance that includes real time adjustments of several parameters. This is too difficult for me. Too much multi-tasking! I prefer to get my notes entered first, without any concern for the MIDI parameters. After that, I will either enter the values using the drawing method described above, or, I will press record on my DAW and use a single controller to record adjustments as the notes play. Regardless of which method I use, I find that I always need to go into my MIDI editor and use my mouse to make fine-tuned adjustments at some point.
Modulation Between Two Notes
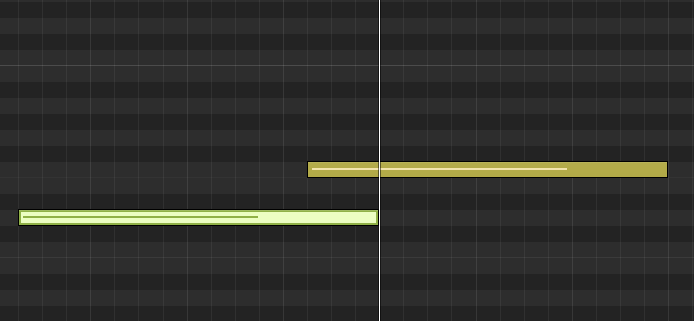
Of course, the real power of modulation is that you can modulate across an entire sequence of notes, creating a true performance that breathes and has emotion and dynamics. To see how a transition between two notes might look, check out the screen shot below. This would be a legato transition as the second note overlaps the first (see my previous post on String articulations for more about legato.)
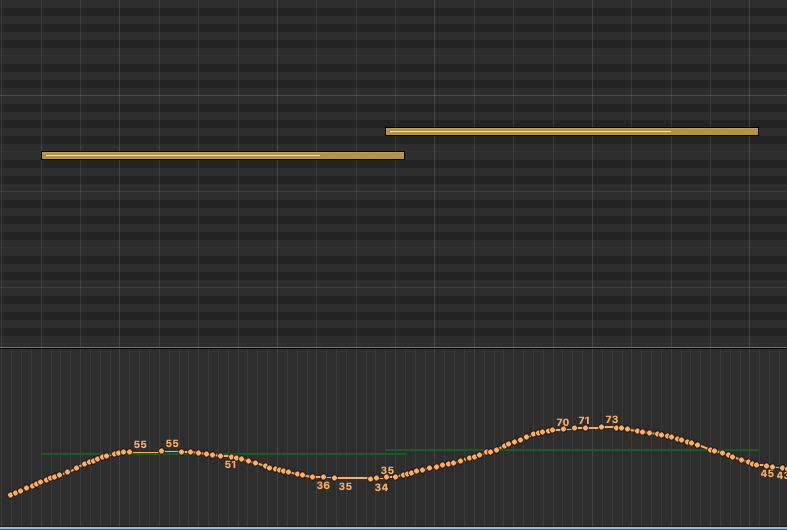
In the example above, the first note would start soft, swell up, fade down into the next note that would repeat this same “in and out” modulation. This would give the sound of a player who is fading in and out of each note. This is a good and common technique as it does recreate how a string player might approach transitioning between two notes. However, do be aware of the speed of your music in question as well as the lengths of each note. In other-words: if the transitions are too short, this type of “in and out” modulation can give too much of a pumping effect and start to sound unnatural. Like with everything we discuss in music: you need to play around with these parameters to get something you like!
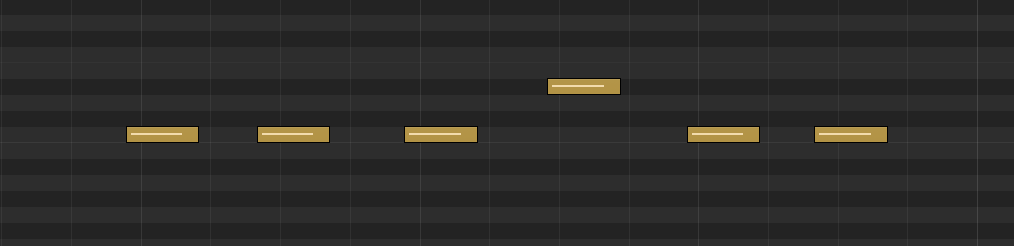
Modulation For A Phrase Of Music
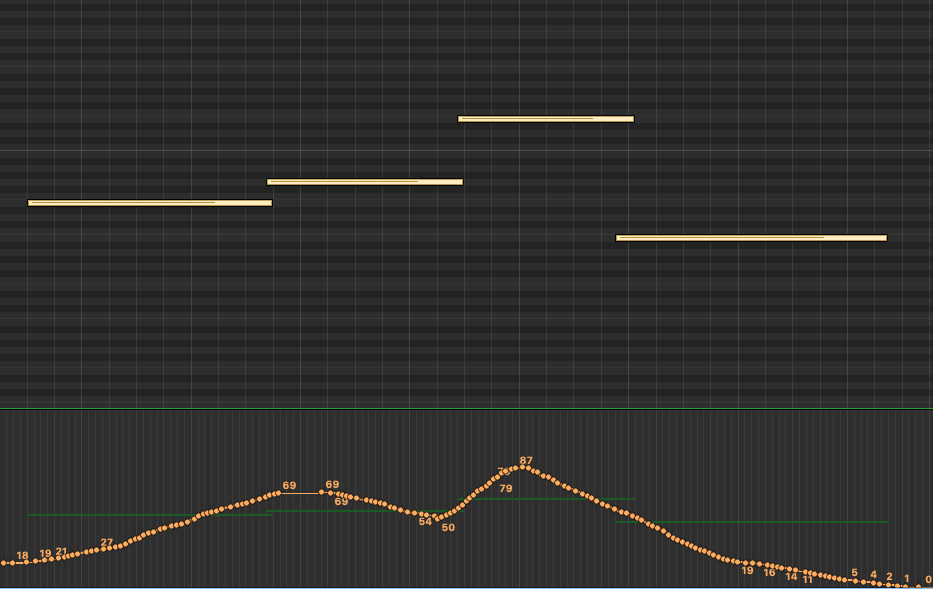
The example below is what a longer passage might look like. Here, we are allowing the modulation to develop and create a more holistic performance over time (vs from note-to-note.) Notice how it takes two notes to “swell” into the performance this time, and, just after it hits that first swell, it starts to fade down slightly before quickly swelling back into the third and highest note. After this high point, it quickly begins a slow fade down and out of the fourth note. This demonstrates one other key concept of modulation: you usually want the modulation higher on the higher note jumps, and the lower modulations on the lower notes. This is especially true in examples like what we have below, where the jumps between the second and third note is meaningful. Imagine a string player needing to transition from note 2 to note 3. That’s a 6th interval jump, so, they will likely be playing with more force, and with more speed, in order to hit that higher note; this means you want to recreate that using modulation.
But I Need More Expression
I think expression is the most confusing of all parameters. Partly because it’s name, expression, has so much meaning to us as musicians. We want all our music to be expressive; so, shouldn’t we just crank up that “Expression” parameter? Why would I ever want zero expression? Well, this is where the naming choice of “expression” might not have been the best (IMO). In MIDI terms, Expression (aka MIDI CC# 11) is used as another tool to control volume. There is a separate volume parameter (MIDI CC# 07) which acts as the overall master volume for the instrument. Then, within a MIDI performance, we use Expression (MIDI CC# 11) to adjust volume, creating ups (crescendos) and downs (decrescendos) as the music is played. This ability to control the dynamics of a performance is probably where the name expression came from. Without the Expression parameter, we’d need to use the master volume control to create these detailed volume adjustments. Then, when we needed to control the overall volume, we’d be stuck going back and adjusting all those changes we made to the master volume. Having 2 volume parameters, Expression (MIDI CC# 11) and (MIDI CC# 07), we can now use one of those (Expression) to control the volume within the master volume.
Wait…Isn’t Expression Also Kind Of Like Modulation Then?
You might be thinking “but doesn’t modulation also adjust volume — allowing us to create ups (crescendos) and downs (decrescendos) as the music is played? How many tools do we need for the same thing? Well, remember, modulation is more than volume: it is controlling the velocity of how the instrument is played; and this, changes the timbre of the instrument, not just the volume. Similar to the velocity parameter, when you are adjusting modulation, you are telling the sample library to swap out the actual samples that were recorded at each of those different velocities in order to truly create HOW that instrument should be played. Expression and Volume are only turning the volume up or down – the timbre and tone of the instrument stays the same.
How To Use Modulation And Expression Together?
I have found that my Expression values often follow my Modulation settings, and I usually start off by defining the modulation first. Remember, as MIDI programmers here, we are trying to recreate how a player would play their instrument. Modulation does impact the volume of the sound, but, as mentioned above, it does this by selecting the right sample for the velocity at any given time. Sometimes, this doesn’t always give you the dynamics you’re after. Sometimes, for example, you want to use the lower velocity samples, but, you also want the sound to be quieter and even fade out completely (as a real player would be able to do.) Modulation will not fade the sound to silent, it will only serve up the softest possible sample available. This is where Expression comes in. Expression can help make the performance even more dynamic, by allowing you to adjust the volume in such detail.
Refresh your memory by taking a quick look back up at the very last screen shot of those four note performance. Below is what the Expression for that might look like (in the blue lines). If you look closely, you can see the orange Modulation lines in the background. Notice how the blue Expression line follows the Modulation we did before, supporting the same musical flow and emphasis to provide additional dynamics to this performance. It does not have the same level of swings (up or down) as that would be like turning the volume up and down too much! So, we usually try to be more gentle with Expression. And, as a reminder, with Expression, that final fade down on the fourth note, will actually make the sound go silent (as Expression acts just like volume.)
Summary
I hope you can start to see how to use Modulation and Expression for making sampled orchestras sound more realistic. Think of these tools, as well as the other MIDI parameters that are available to us, as ways to “perform” your samples. This is key: to get more realistic sounding orchestral samples, you have to think like a performer, not a producers or a programmer. Of course, this does require having some understanding of how an instrument is played. So to this, consider spending time researching more about the instruments and how they are played. And, even better, if you have friends, classmates, or access to music schools where orchestra members hang out…introduce yourself and ask if you can ask them about their instrument. You’d be surprised how open musicians are and how much they want to talk about their passion. (Sound familiar? )So yes, you can really fine tune a realistic-sounding orchestral performance, that recreates how a player would approach their playing; it just takes time to tweak all these parameters!
Considerations When Layering Samples
Before we get started, let’s remember that we are layering for the purpose of achieving a specific sound. Therefore, what I describe here, and how I use these categories and terminology, is certainly not black and white and should not be seen as a “rule”. I am separating out these concepts as a starting point and as a way to explain the “why” and “how” of layering orchestral samples.
This is particularly important to remember when we discuss the layering of articulations. Using the right articulation for the right sound (at the right time), is a separate topic altogether and I cover that in my post here. What we are learning in this discussion, is how to layer articulations to create a specific sound that we cannot achieve by using a single sample “out of the box.”
What About Mixing Room Sounds?
One of the main challenges of layering samples is managing the reverb for samples that were recorded in different rooms. As I discuss in my previous post on wet vs dry libraries, sample libraries will usually record orchestras in large halls where the “sound” of the room (reverb) is included in the sample. This is an awesome feature if you are using samples from the same library (i.e. recorded in the same room) as you are truly hearing the sound of the orchestra inside a real room.
But, what if you want to layer a string section that was recorded in Air Studios with a string sections from a library that was recorded at the MGM Scoring Scoring Stage? Now, we’ve created a sound where part of the orchestra is in one room and the other part is in another room! While this immediately raises questions of authenticity, the other big problem, of course, is that the reverbs of the two separate rooms can often blur together and make the overall sound muddy and lacking a sense of a real space.
Because there are so many potential combinations of sample libraries and room sounds, it’s not possible to say that this will always be an issue: Maybe we WANT the sound that is produced by such a combination? Or, maybe, the combo doesn’t produce any noticeable issues….we can’t know for sure until we try. However, generally speaking, the immediate remedy for this is to reduce the room sound for each sample library. The goal is to get each as dry as possible — no reverb. This is usually done by turning down the room mics and turning up the close mics (if the library offers this functionality.) Once we have a dry sound coming from both libraries, we can then add our own reverb to both, which will now put them together in the same room. Magic! I will discuss reverbs in a future lesson, but, for this technique we usually want to choose a convolution reverb, such as EW Spaces, or AltiVerb, as these types of reverbs emulate the sound of an actual room vs an algorithmic reverb, such as Lexicon or ValhallaRoom.
 | + |  |
But Won’t There Be Too Many Players Now?
Another common issue that comes up when layering samples, is the size of the orchestra that is created whenever we layer samples. If sample library A has a 40-piece string section, and we layer it with sample library B’s 60-piece string section, now we have 100 string players in our orchestra! Is that realistic? Do we care? This is where “creative license” comes in!
Of course, the sound of 100 players will be larger than 40 players, but, in the context of an orchestral production, we might just hear it as a “fuller” sound. Meaning, after everything is mixed together with other instruments and effects the listener of our final production will not be counting the number of string players they are hearing. Instead, they will simply experience the sound of a full, impressive orchestra. It’s also important to remember that when layering samples in this way, we need to manage the volume of each. Often, the supporting sample is lower in the mix, and therefore, not dominating the overall sound.
Above everything, remember the type of music we are producing. Consider the differences between a recording of a Bach concerto vs a Hans Zimmer score for Batman. The Zimmer sound is very produced and rich with sounds that don’t even exist in a traditional orchestra (or even in this world at all!) When we have heavily produced pieces like Hans creates, we actually need to spend more time ensuing that the orchestral elements are full and able to “cut through” those kinds of dense and dynamic mixes.
Meanwhile, If you are want to create traditional classical pieces, where realism is paramount, then, you might not want or need to layer samples at all. So, in many ways, the need to layer samples often is driven by the style of music we are creating. That said, even traditional pieces can use some “layering help” as we discuss those techniques now below….
1. SITUATION ONE: Layering Samples For Color, Texture And/Or Fullness
What Helps Contribute To The Realism Of A Sampled Orchestra?
Believe it or not, one of the reasons we love the sound of a live orchestra is because of the unique sound that is created when many individual performers are all playing at once. It’s this magical blend of so many different performers that makes the sound of an orchestra so unique. I spent most of my career playing in small ensembles (indie, rock, jazz, acoustic, etc) as well as composing in my perfect “digital” world of keyboards, MIDI, quantization and pitch correction tools.
What I missed, and what I needed to learn to appreciate, was that an orchestra’s amazing sound comes from all the slight imperfections of each note as it’s being played. For example, if you have 8 violin players who all play a “C” note at the same time, chances are, each one will be just slightly off in terms of intonation, timing, expression or attack. (And don’t forget: violins don’t have frets!) When they all play together, these very slight variances are what create the full sound of an orchestra. The sound of pure perfection, is what we get from our MIDI programmed orchestras – but, this is also what makes those perfect world sound less realistic. We actually want to hear the imperfections as that is what makes it sound more real.
One way to help with the realism, is to layer samples from different libraries. Why does this work? Because, libraries recorded with different musicians, using different instruments, in different studios, with different microphones and room sounds (you get the idea) will mean that we are introducing more variances (potential imperfections) into the sound. For example, imagine a Long “D” note sampled from Library A. When this note was recorded, there was likely a lot of focus on making sure all the players were in-sync and as close to perfect as possible. Meanwhile, Library B, working on the opposite side of the world, with different musicians, creates their own Long”D” Note for their library. And they too, strive to make it perfect for the context of this single sample library. But, the chances of these 2 separate Long notes perfectly matching each other, is very slim! Maybe one team starts the note a 100 milliseconds before the other group? THIS is what creates imperfection. So, by combining both sample performances, we can introduce the effect created by less-than-perfect performances, which, as we discussed above, helps to make our sampled orchestras sound more realistic.
Example: Laying Samples For A Fuller Sound
This might be the most standard response to why we layer samples, and is really another result of what I just described above. Anyone who has been recording music for any period of time, knows that one of the best techniques for creating a stronger, fuller sound on any instrument (or voice) is to layer it. The history of recorded music is full of layered guitars, layered vocals, etc. When we want an instrument to really sound big and full, we often double-record it. It might be the exact same words that are sung, and the same guitar pattern that is strummed; but, because it was done as 2 separate performances they won’t be 100% perfect and identical. As discussed above, those imperfections of each performance are what create this new and fuller sound.
We All Have A Voice
Because not all of us have had the experience of playing in an orchestra, it can sometimes be difficult to appreciate the sound that such a large group of performers can produce. So, another way to think of all this, is to imagine a choir. What is the difference in sound between a 50-person choir and a single soloist? This is a ridiculous question, as we all know how different these two examples will sound. The soloist would be a much smaller sound, but, it would also be a clearer communication as we’d be able to hear every nuance of their voice. Because we all have voices and know what a single person sounds like when they sing or speak, we have an immediate reference point to know that adding 49 more voices will sound different. The large choir sound is much bigger, but it also has less clarity and detail and it is harder to hear every word clearly. The choir sound is more about the “experience” that this group of singers can make. A string section is no different. As a composer, we need to decide: are we trying to create a big, full sound with less detail, or, are we after a smaller, intimate sound with more clarity?
What Does This Have To Do With Sample Libraries?
So, bringing this back to orchestral sample libraries, if I need a string section to cut through a mix, or have a stronger melodic statement, I will often layer those parts with samples from another library. Often, the notes that are played are identical (although, even better if they are performed separately), but, because they are played on different strings (different string libraries), they will not sound perfect, and that is what helps create the fuller sound. Without going into a long discussion about every single orchestral sample library available, one thing we can say for sure: They each have their “own” sound:
- As I explain in my previous post, some are recorded wet(Spitfire’s Albion One) and some are recorded dry (LA Scoring Strings) (see below for example of how/why to layer these two specifically)
- Some use smaller groups of performers (Spitfire Chambers Strings) while others are enormous (8dio’s Majestica)
- Some libraries have a very “hot” upfront sound (eg Metropolis Ark 1), where others have softer attack and are more lush (Spitfire’s Albion One)
When you have the time, try to find free audio examples of these libraries online and listen to them side-by-side. This is when you will really hear the difference and will appreciate how blending two complementing samples could have a significant impact on the sound. The smaller, intimate sound of Spitfire Chamber strings, will give you a smaller sound, but it will provide more detail as you will be able to “hear” each instrument a better than a large 240 person orchestra like 8dio’s Majestica. The sound of Majestica will sound huge, like a Hollywood Blockbuster movie soundtrack; however, it will also provide less detail as all the instruments start to blend together to create that huge sound. So, it becomes the challenge of the composer to find the right balance between these extremes. Use Majestica when we need that enormous Hollywood sound, but, maybe layer Spitfire Chambers Strings to help provide more clarity and detail.
Example: Layering Samples To Add Texture And Size (Eg To Help A Sound Cut Through A Dense Mix Like Epic Music)
Spitfire’s Albion One is a beautiful-sounding library; it is one that I use constantly, particularly for sketches and for the base ensemble of a string section. It has what I describe as a regal and round sound with a “feathery” attack. It’s perfect for many styles of music. However, I find that for more “epic” pieces, where I really need the strings to cut through a dense mix, Albion can sometimes sound too soft and not “big” enough. This is a perfect of example of when I might reach for another library to layer over it and provide some added “girth” and punch to the sound.
Choosing the library to layer is a creative choice and often I will try several different libraries before I find one that just “works.” One initial approach is to consider using a library that has a sound that compliments the other. For the libraries I have in my arsenal, I would view Metropolis Ark 1 as a good compliment to Albion One.
The strings in Metropolis Ark 1 have a very “hot” and upfront sound to me. To my ears, it sounds like they have a lot of compression baked into the samples which adds a rich, colorful texture and allows them to punch out of the mix with a force! To be honest, I don’t really love the sound of Metropolis Ark 1 by itself. That hyper-epic sound can be too much on it’s own. However, it’s a great library for layering under a less punchy sound like Albion One. I usually blend it in very low, but even then, the Metropolis Ark 1 strings can add an interesting color and texture as well as give a a sense of force and urgency to the sound.
Example: Layering Samples To Create Movement For A Sustain
The long sustains that come out of our sample libraries can sometimes be too perfect! They linger on and on for as long as we keep our fingers on the keyboard! Sometimes, in these situations, it can be interesting to layer-in an articulation with some movement in it, to help break-up the straight sustain and to add texture and realism to the performance. Vibrato is the way a string player would do this naturally, and, we already have vibrato, modulation, expression and other parameters available to control via MIDI. For a more dramatic effect, try mixing in a soft tremolo articulation under the sustain note.
Be careful! This needs to be subtle, or the tremolo will quickly take over. While I don’t use this technique too often, I do find that when used sparingly, it can introduce a very cool effect that is more dramatic and “raw-sounding” than what vibrato can achieve. If you own libraries like the The Evolutions from Spitfire, Time Macro from Orchestral Tools, or Novo from Heavyocity, these have a plethora of “motion” patches to use for layering in this matter, and are far more customizable and generally easier to integrate verses a basic tremolo articulation. However, these libraries are not cheap! So, I wanted to included an option of using an articulation you likely already have in your current sample library.
Example: Layering Samples To Add Richness And Character To A Softer Passage
We’ve been talking a lot about epic sounds so far, and trying to make the orchestra bigger and “cut through” the mix. But, layering can also help with softer, more intimate performances as well. One nice treatment for this type of music is to layer a harmonic articulation, one octave above the sustain notes. As I discuss in my post on string articulations, harmonics articulation only includes the overtone of a note – no fundamental. So, by itself, it is very thin (and high-pitched!) But, this is perfect for softer, less-dense music, where we don’t want to beef-up the strings, we just want to add some color and additional sparkle.
The harmonics articulation will play the same notes as the main sustain articulation, however, it adds-in those higher frequencies that we don’t always get to hear, and does it without doubling the fundamental (doubling the original notes.) While this is not the perfect analogy, if you’ve ever used distortion to bring richness or sparkle to a sound, this is doing a similar thing. Distortion produces overtones to the original notes and that is what is creating the added color and texture.
The harmonic notes above the fundamental:
2. SITUATION TWO: Layering Samples For Detail, Focus Or To Control Mix Depth
Example: Layering Samples To Achieve The Right Attack
One of the best examples of layering samples for detail and clarity, and something I use all the time, is layering a short, up-close articulation in order to achieve the right level of attack. By “up close” I am referring to a sample with little to no room sound (close mics only.) My favorite library for this utility is LA Scoring Strings. It’s the most dry, up-close library I own. The samples sound like the microphone is sitting right on the strings! Because it contains no room sound what-so-ever, I find that I can layer the shorts of LA Scoring Strings into literally ANY other string library and it will help strengthen the attack and push the overall sound through the mix. This is most helpful when we need to have the down beat (attack) of note cut through a dense mix, such as an action-type piece, however, I find I use this technique in slower, less-dense pieces as well. Having the ability to introduce the raw sound coming off the strings, is so helpful in crafting a more realistic sound.
While I rarely use this technique with longer notes, it’s technically possible to do so for the same reason. A longer note will have a “softer” attack; which, by itself, is fine and often what you want. However, again, if the production is full of other instruments (guitars, drums, synths, etc), that “softer” long note can get lost.
By layering a short sample articulation (eg a marcato or staccato might be best), and mixing it so that it’s not too loud and obviously separate from the long note, we can get just a little more attack on each note, which can help the notes cut through the mix. Give this a try, but just be careful not to have the short notes poke out too much as it will likely sound unnatural.
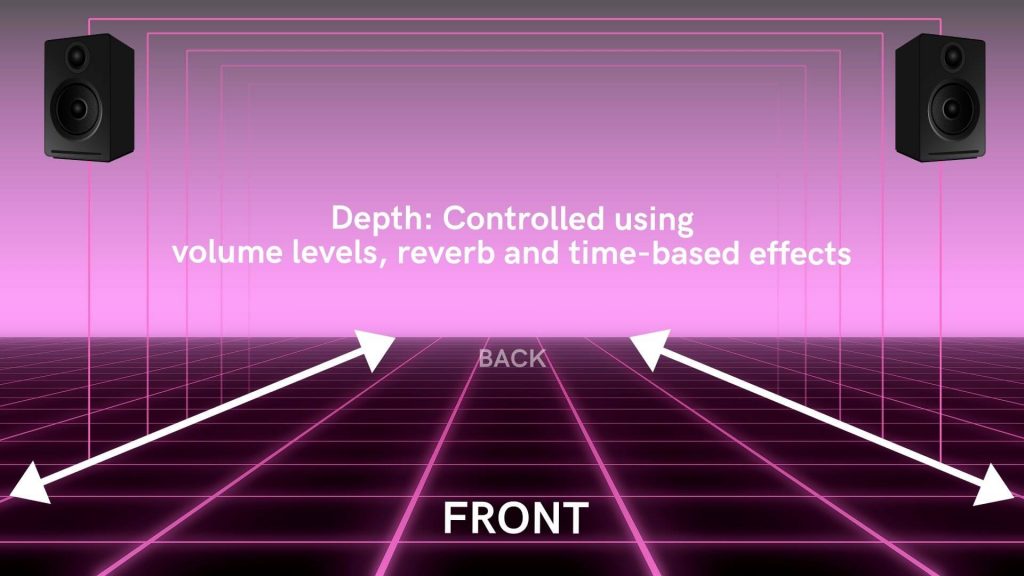
Example: Layering Samples To Help Manage The Mix Depth (Aka Z-Plane)
This technique involves layering 2 different short articulations in order to bring a sound more upfront in the mix (it also creates more attack). At first this might sound strange: “why would I want multiple versions of the same articulation? But this is where the differences between sample libraries comes to play. For example, some libraries are recorded wet (learn more about what this means in my post here) and they don’t always include the functionality to “move” the sound closer to the source (eg adjust the microphone position, aka “close mic”).
In this case, the short articulations they have provided might sound great on their own, or with a less dense productions, but, when mixed in with a busy production, their “wetness” and distance from the microphone, means that the sound will also be pushed “back” into our mix.
Dry Sample To The Rescue!
To help create more attack, and to move those sounds more upfront in the mix, I will layer another short articulation from a library that is recorded DRY. By balancing the two samples (one recorded wet, one recorded dry) I can better fit the notes into my overall mix.
One initial question might be “why not just use a single library that provides close mics?” And yes, this is one way to do it. I have found that most of the libraries I have used in the past that allow me to adjust mic positions, are still not as effective as using two separate libraries that were specifically recorded WET and DRY. A good example of this combo is a Spitfire library (eg Chamber Strings) and LA Scoring Strings. Even though Chamber Strings includes excellent mic placement options (including close mics), I still find that for certain types of music production, they are just not “upfront” enough. Meanwhile, LA Scoring Strings is recorded completely dry and extremely upfront (it sounds like the mic was placed right on the strings!) When I layer these two libraries together, I get the very best of both worlds and have more control over the final sound.
Example: Layering Legato Instrument(S) Over An Ensemble Performance
Using ensemble patches can be a great way to quickly sketch an idea. And, often, they work fine for the final production (especially if we are on a tight timeframe to get something done!) Ensemble patches, by definition, are polyphonic which means we can play multiple notes at once (obviously, this is how we play the full ensemble!) On the flip side, however, this also means that they are not able to produce legato transitions. Which means, depending on the music, the transitions between notes and chords can be less-smooth and not as natural sounding. One way to introduce smoother transitions between notes, is to layer-in legato articulations. This can be for just the melody line (eg if that was performed on a violin), or, it could be for each instrument. Of course, at that point, you might not need the original ensemble performance as you would have recreated it as separate instruments.
Example: Layering A Solo Instrument Over An Ensemble For More Intimate Detail And Clarity
This example is similar to the previous one, and could also fall into the orchestration or arrangement category, as, it is how to balance the sound of our instruments. Referencing our “voice” example above (where a single voice provides the most clarity, but less fullness), using a solo instrument to double instruments that we want to emphasize and/or punch out of the mix, will have a similar effect. If we have a main melody played on a large violin section, it might sound HUGE with all those players, but, it might also start to lose a little clarity when played with everything else.
So, one approach is to layer-in a solo violin playing the same notes. As with everything discussed here, I find that I really need to adjust the volume of the solo instrument so that it doesn’t overtake the full strings. This might sound weird at first: how can a single violin overtake the entire string section? This is because our ears will focus in on what is most clear (the solo instrument). Depending on volume, it’s possible the solo instrument will sound louder to us. Of course, this might be what you want for your music, so it’s hard to give a formula for this — but, just be aware and use your ears to adjust for what works.
3. SITUATION THREE: Laying Samples To Create A Unique/Original Sound
Perhaps the largest challenge we face when using sample libraries for our instruments, is the fact that all of our peer composers are using the same sounds! This means, we are all using the same violin, cello, bass drum, horns, etc. Literally, it’s the same instrument played by the same player just being heard in a different piece of music. Therefore, layering samples can be more than just a way to create a richer or more detailed sound, it can also be a way to create a sound that is unique to us as composers and producers.
By layering-in different instruments from different libraries at different volumes and velocities, configurations, etc, we are making it less likely that our final sound is something that has been created somewhere else. Of course, there is a limited number of sample libraries in the world, therefore, there is a limit to these unique combinations; but, this is a great way to create a sound identity for ourselves and make our final productions sound more original.
Be Creative!
While it’s difficult to give examples in this scenario, as it ultimately comes down to which libraries you have, and how you want to shape your own sound, I will say that one of the libraries that gets called out constantly is the very well-known (and well-used) percussion library, Damage by Heavyocity. This might be THE most used percussion-based library of all time and is probably in every single trailer production ever made (OK that’s an exaggeration!) Because of its unique and extremely recognizable sound, many composers will now layer several other percussion instruments on top of their Damage drums, in order to make a new and original sound.
