
First thing you need to decide on: to upgrade your setup to DAPS (DOLBY ATMOS PRODUCTION SUITE) or DAMS (DOLBY ATMOS MASTERING SUITE) with an RMW (Rendering and Mastering Workstation). The biggest difference is that DAP works only on a single system workflow. In this case, the Dolby Atmos Renderer works on the same Mac as your DAW. DAPS is a Mac Only application. DAMS is a multi-system-based workflow. The Dolby Atmos Renderer and your DAWs are on separate computers, this gives you more CPU power to edit/mix freely in your DAWs and render in real-time without compromising.
In this article, we’ll focus on the DAPS setup. If you want to learn more about the DAMS setup, please go to the next article.
For more information about DAPS and DAMS, please visit
https://professional.dolby.com/product/dolby-atmos-content-creation/dolby-atmos-renderer/
WHAT DO YOU NEED TO SET UP THE DOLBY ATMOS PRODUCTION SUITE?
Software and Requirements
- DOLBY ATMOS PRODUCTION SUITE (click for a 90-day free trial or purchase)
- Mac OS 10.13.6 to 10.15.7
- DAW (Digital Audio Workstation)
- Pro Tools Ultimate Software 12.8 or later
- Steinberg Nuendo v8, v10, or v11
- Logic Pro
- Ableton Live
Speakers
Based on the guidelines Dolby has provided, the minimal speaker configuration for a professional music production environment is 7.1.4. Ideal setup is 9.1.n. A pair of headphones is a good tool for checking atmos mixes, since the majority of consumers are experiencing spatial audio with their earbuds or headphones. If you use Headphones as your monitor, remember to change the Headphones Settings in Renderer to “Binaural”
Tuning
In order to translate your mixes everywhere across all platforms and environments. There are certain specifications for tuning the room/speakers.
IO Routings
- Audio Interface can support a minimal 12-channel of outputs
- Monitor Controller has enough inputs and outputs and it can individually control/solo/mute each speaker.
Eg. Focusrite Pro’s RedNet series Audio Interface and R1 Monitor Controller
DAW setup
- Pro Tools Ultimate
In this article, we’ll go over the quick start setup for Pro Tools. This setup uses Dolby Audio Bridge instead of Dolby Send/Return Plugins.
Step by Step setup for Pro Tools users
- Start with Dolby Atmos Renderer Software, and bring up the software preferences window (shortcut ⌘,) to set up Driver.
Settings: (For your reference)
Audio driver>Core Audio
Audio input device>Dolby Audio Bridge
Audio output device>your Audio Interface
External sync source>LTC over audio
LTC input channel>129
Frame rate> Follow the frame rate of videos if there are any pictures to sync to
Sample rate>48KHz
(As shown in Pic 1.)
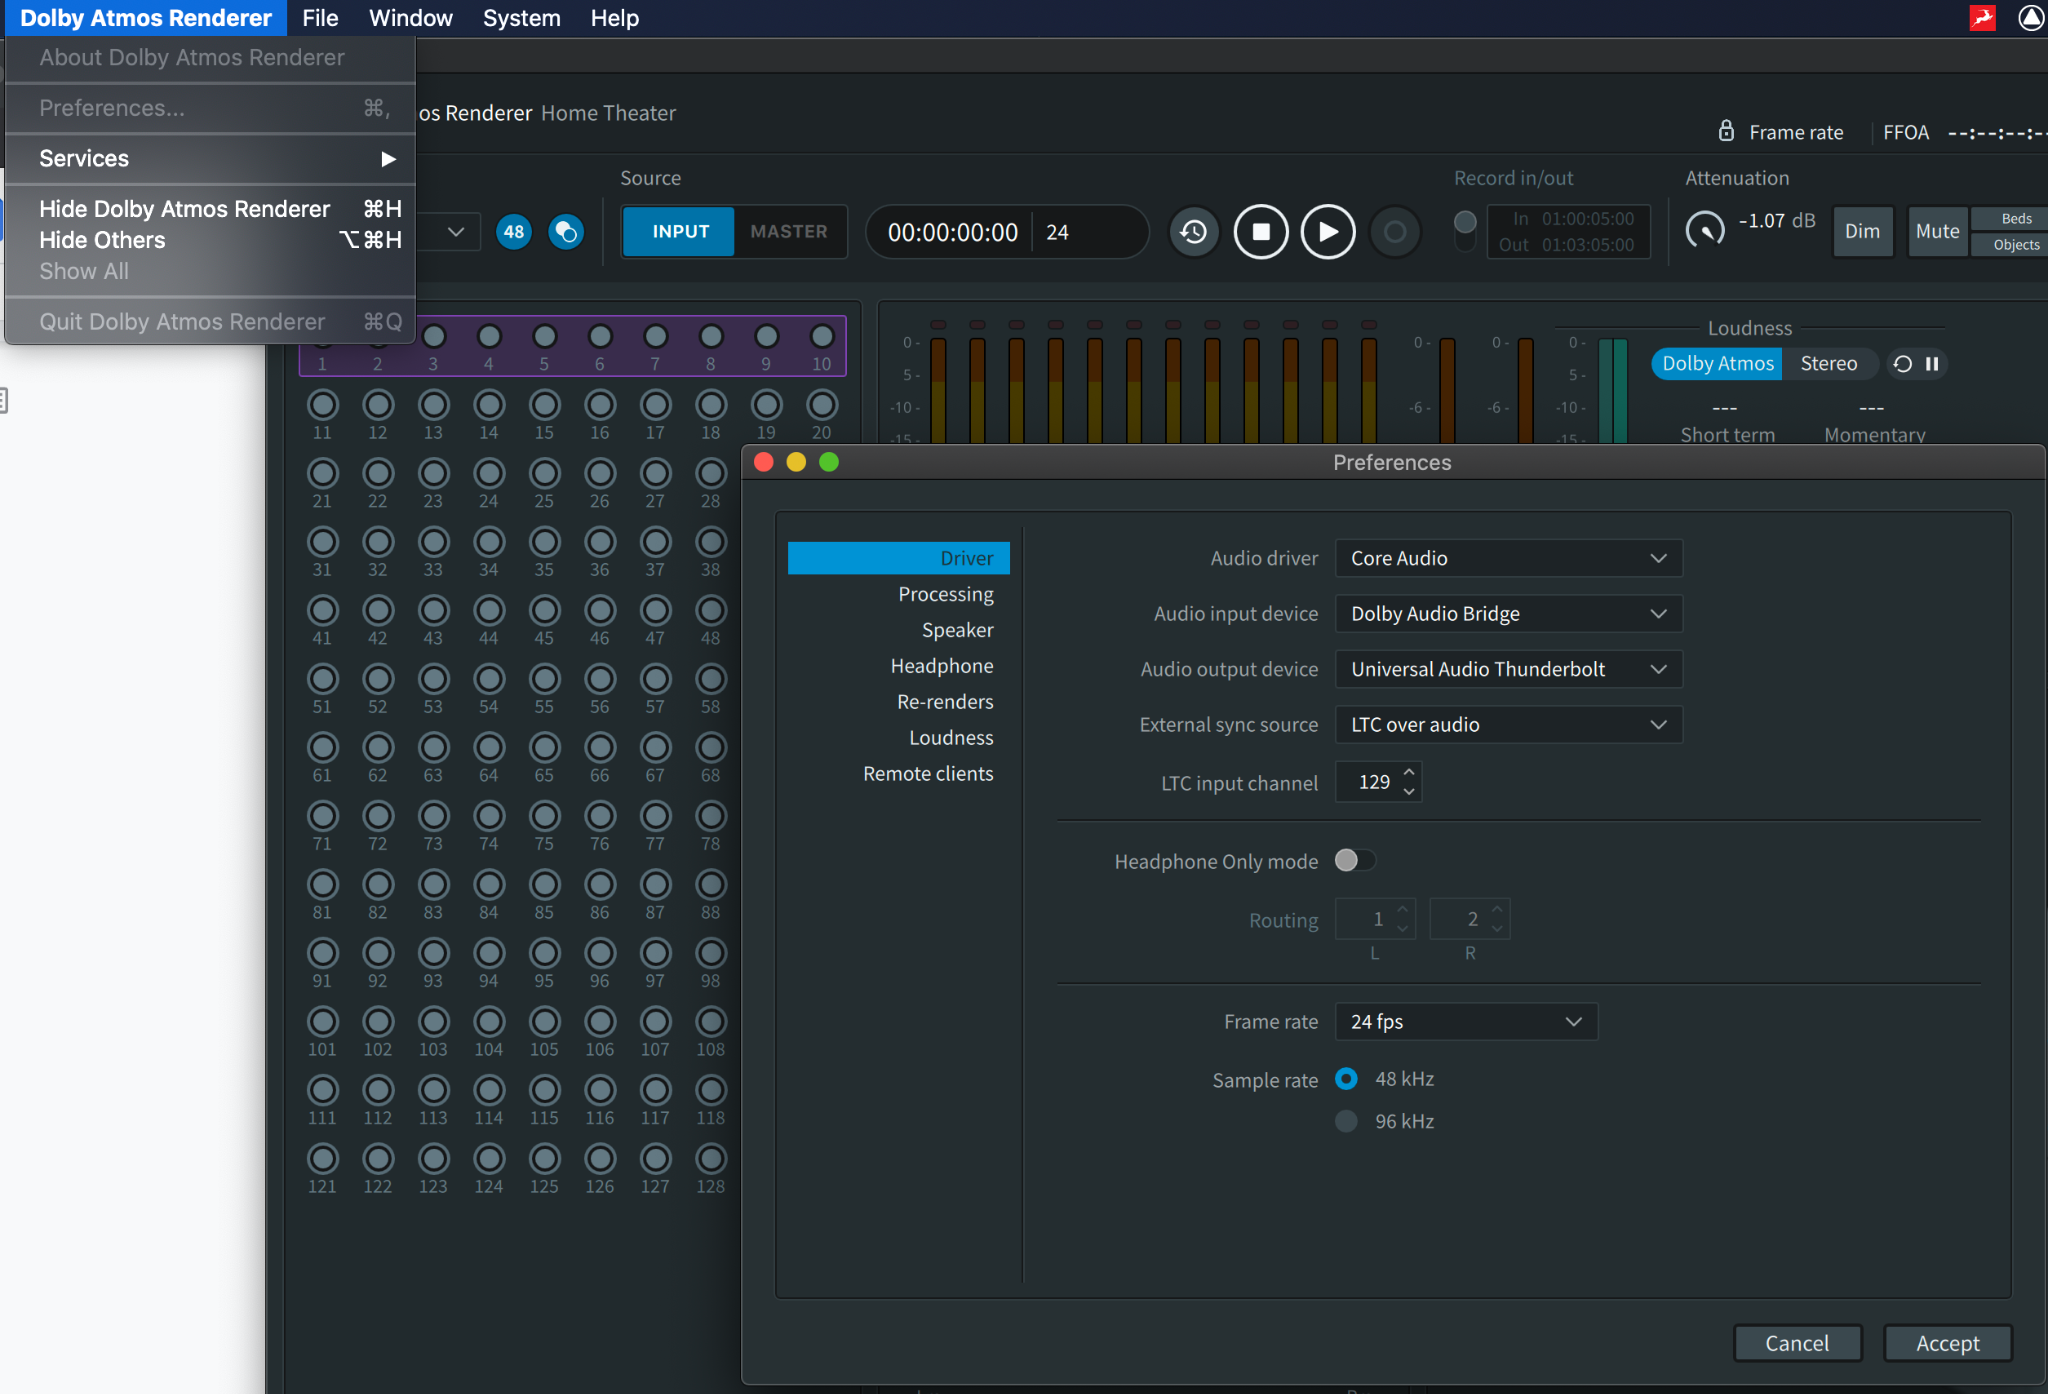
Pic 1.
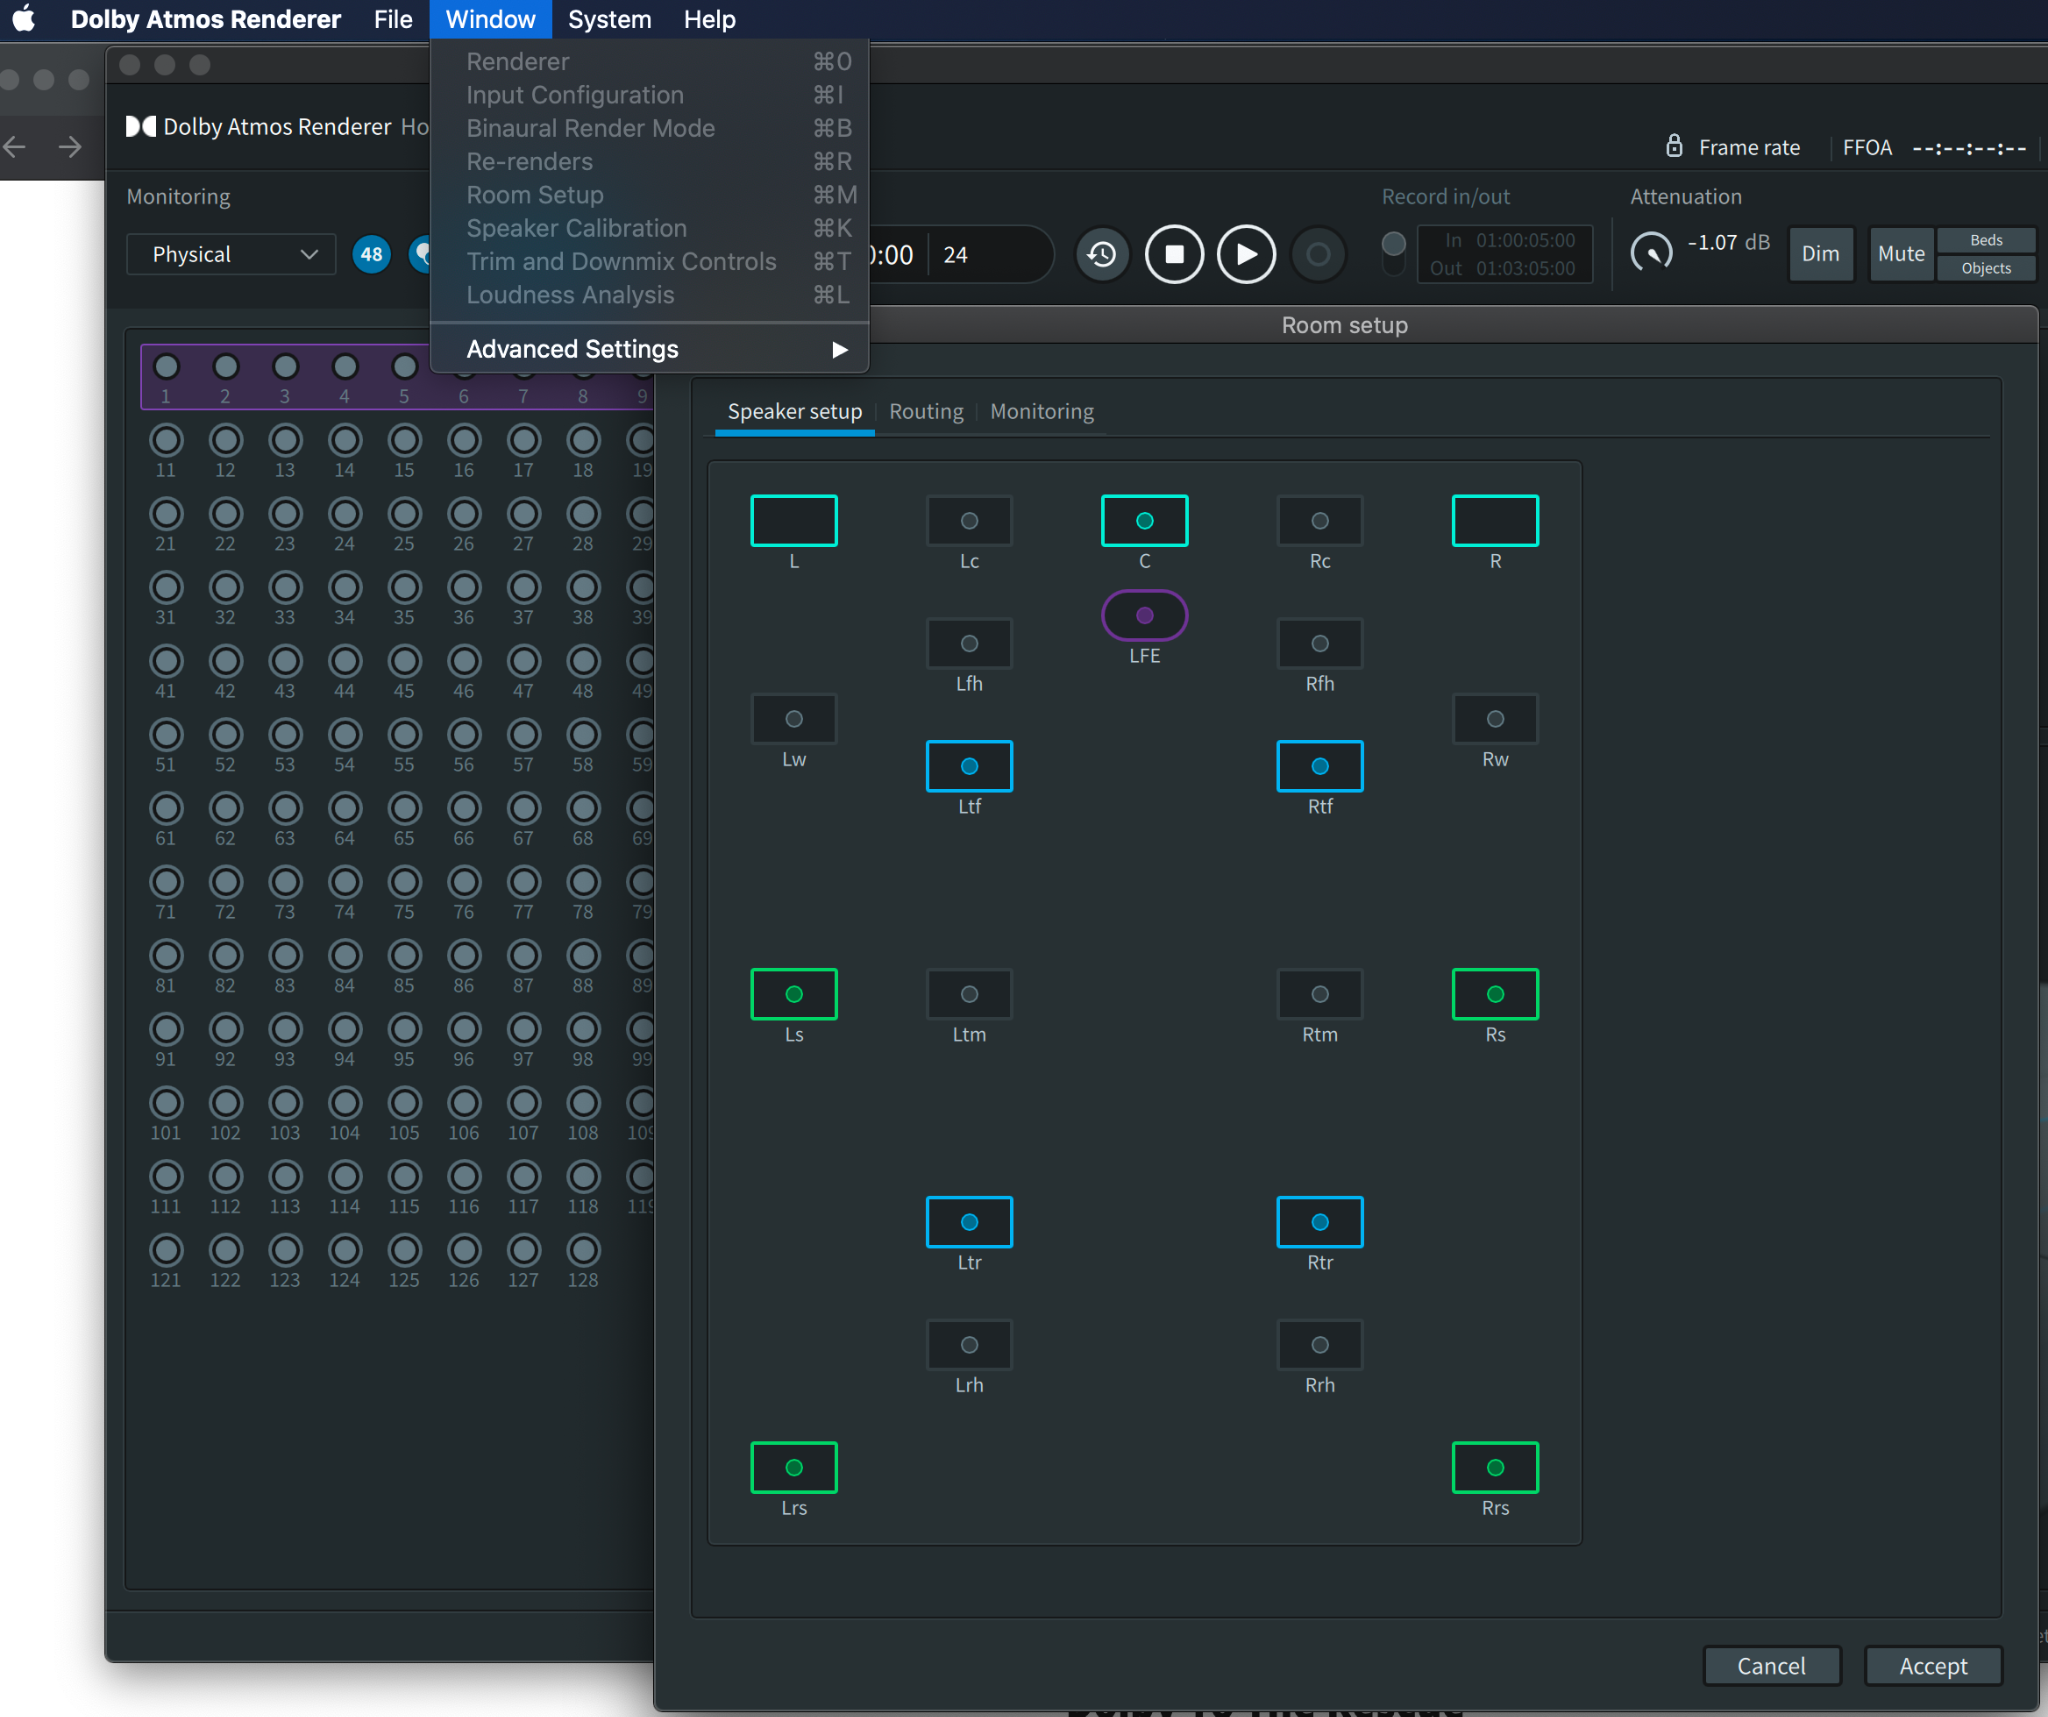
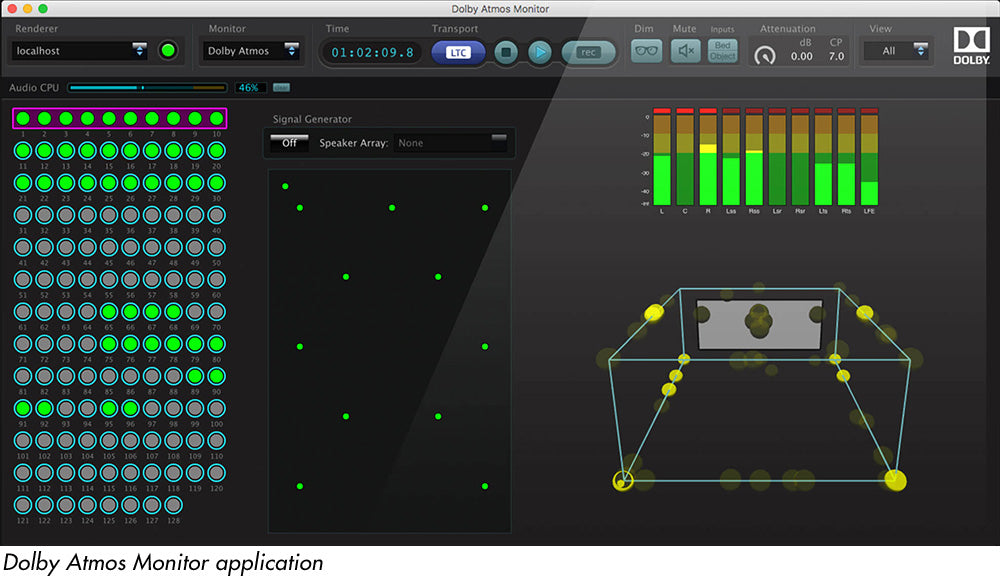
2. Now go to the top menu and select Window > Room Setup (shortcut ⌘M), Under the “Speaker Setup” tab, click on the speakers icons that correlate to your speaker setup to make sure the routing, IO settings, and monitors configurations are correct.
3.Next step – Open pro tools
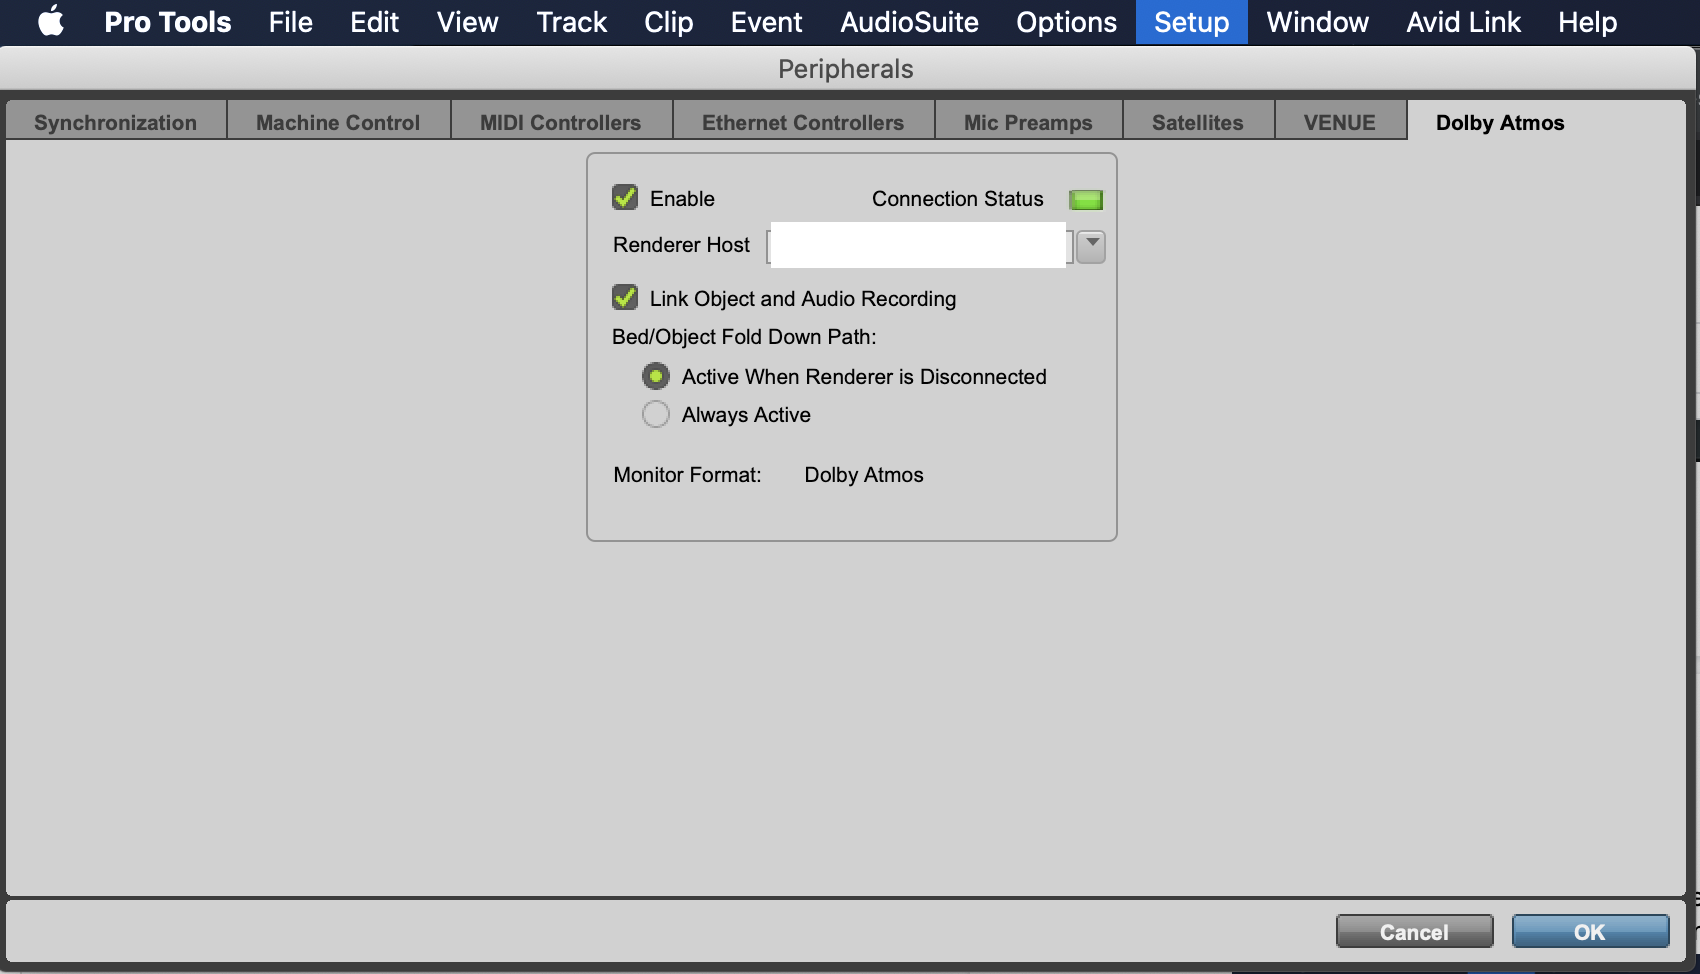
Go to Setup>Peripherals>Dolby Atmos (This tab only shows in Pro Tools Ultimate)
Enable and select the right Renderer Host. Connection Status will be solid green if all the setup is properly configured, it indicates that Dolby Atmos Renderer and Pro Tools have established communication.
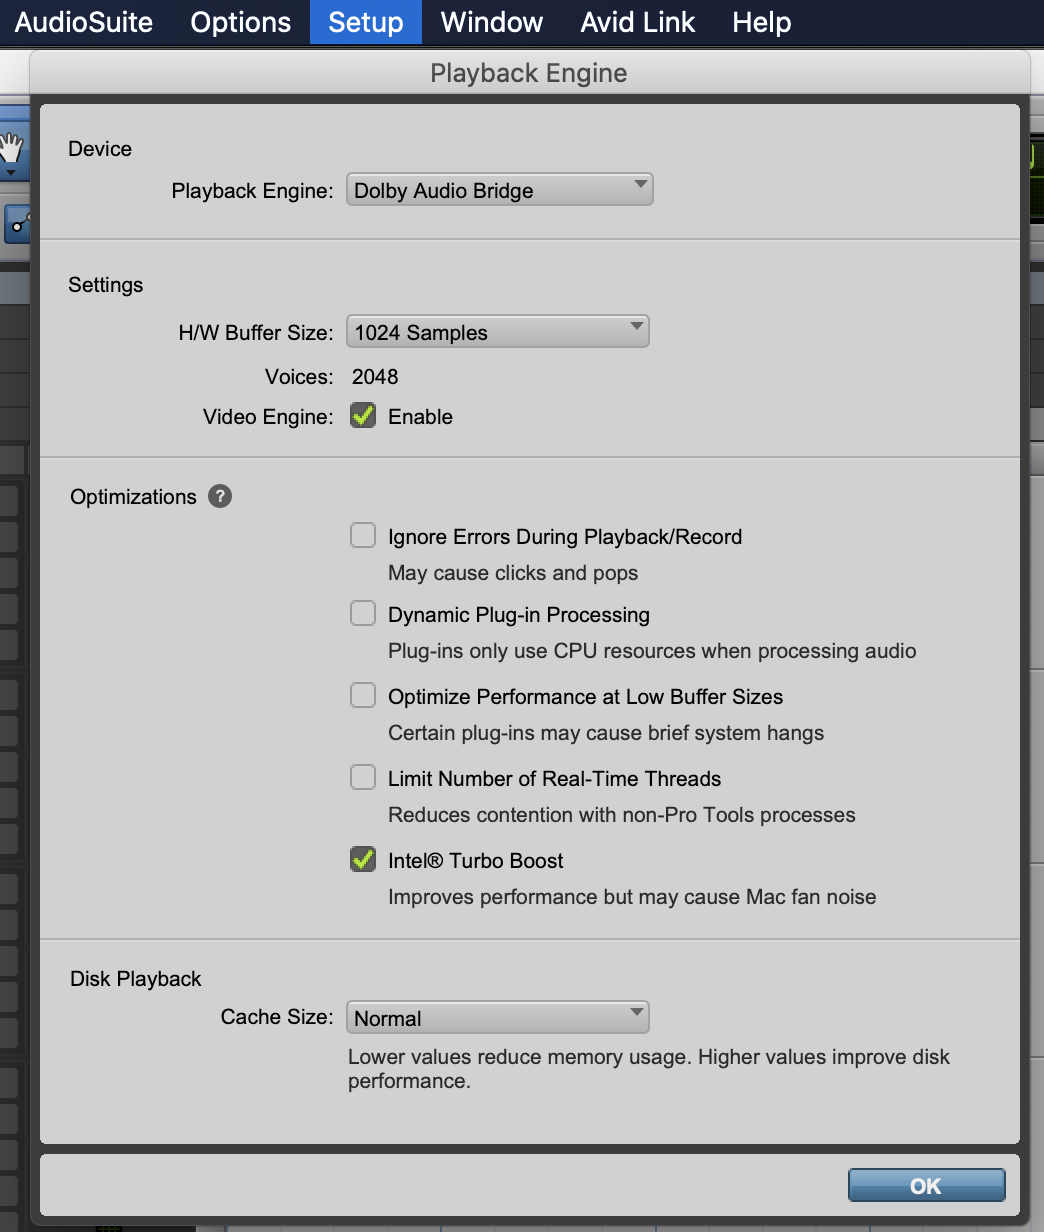
4. Pro Tools Playback Engine
Go to Setup>Playback Engine> Dolby Audio Bridge
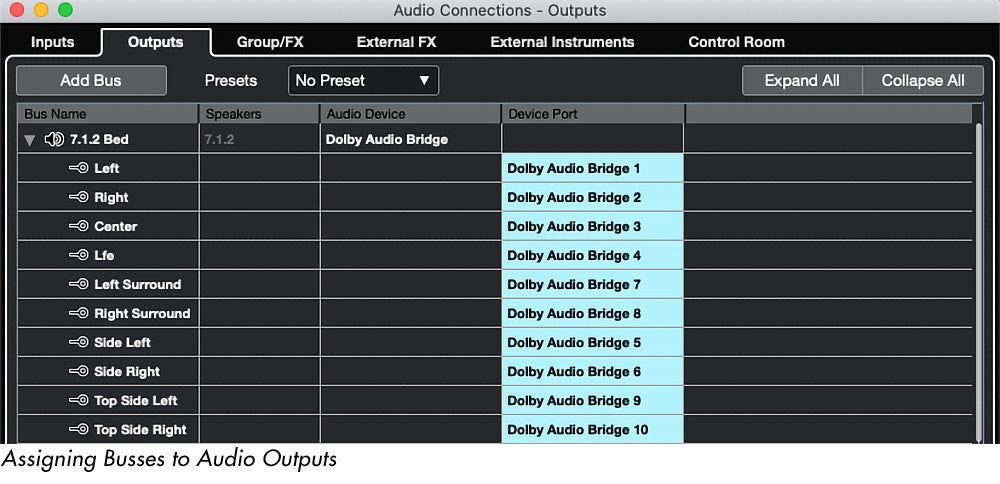
5. Pro Tools IO Setup and New Session
When just getting started, it’s good to use one of the session templates from Dolby Atmos Production Suite. After installing the software, the templates will show up in the session template group in pro tools.
Create a new session in pro tools (⌘N), select Create From Template, choose Dolby Atmos Music under Template Group, and change I/O Settings to Dolby Atmos Renderer Dolby Audio Bridge Stereo.

Now you have everything set up, ready to have some fun with Dolby Atmos.
Option 1 (Best Studio monitor and Subwoofer Combination for Dolby Atmos):
Studio Monitor: Neumann KH 120 A
Subwoofer: Neumann KH 810
Option 2 (Best Studio monitor and Subwoofer Combination for Dolby Atmos):
Studio Monitor: Genelec 8341A SAM Studio Monitor
Subwoofer: Genelec 7380A SAM Studio Subwoofer
By way of example, here’s a possible configuration that would work in a small room…
- Avid HD Native Thunderbolt
- Avid MTRX Studio
- 3x Neumann KH310 (LCR)
- 4x Neumann KH120 (Ls, Rs, Lrs, Rrs)
- 4x Neumann KH80 (Ltf, Rtf, Ltr, Rtr)
- 2x Neumann KH750 (LFE, clustered)
DOLBY ATMOS – A BEGINNERS GUIDE


Dolby Atmos appears to be the next “big thing” in audio reproduction. In this beginners’ guide our technical manager, Tom Shorter, covers the basics and explain the pros & cons of this groundbreaking new audio format…
Dolby Atmos offers a completely immersive listening experience with sound moving around you in a 360 degree space – and if you’ve ever sat in an Atmos-equipped room it’s almost impossible not be impressed by the results. However, the chequered history of attempts to introduce new audio standards is peppered with far more Betamax than VHS. Stereo sound became ubiquitous in the late 50s. Despite all the new audio formats introduced in the intervening 70 years, music is still listened to on a pair of headphones or two speakers for pretty much everything ever made.
It’s little surprise then that the market-hardened staff of KMR tend to be a little reserved when the latest in a long line of would-be visionaries introduces us to the most recent “revolutionary” format. It’s like 7.1 surround all over again. Which was like 5.1 all over again.
So why would Atmos be any different? Well, we’re not sure that it is just yet. But the advent of object-based mixing instead of channel-based is a fundamentally different approach with far reaching ramifications. And with Apple seemingly throwing the considerable weight of their Apple Music streaming platform behind it, now seems the right time to see what all the noise is about.
What is “Object Based Mixing”?
With a conventional stereo bounce (Channel-Based Mixing or CBM), you take a number of mono and stereo tracks and sum them together to create a stereo mix file. Once this is done, that mix is locked in place and you’re left with just the two interleaved files forever.
With Object Based Mixing (OBM), the key difference is that your sources remain discrete and aren’t merged into fixed output files. Instead, they are encoded as individual objects and assigned a position within a 3D space. Because this space is virtual and of a fixed shape, the position of that element can be applied as easily to a small home entertainment room as to a cinema, a stadium, or even just down to stereo playback.

“Objects” and “Beds“
An object refers to any single discrete element in a mix – eg. a kick drum, guitar, vocal etc. Think of it as Atmos’ equivalent of a channel. An object can be moved around freely inside the 3D space, including automation of position, height and size.
A bed is used to send sources to specific channels within the array. For example, if you had a stereo recording of a piano, you might then decide to send those two sources to just the L and R channels. Within the mix, you can have beds that output in any number of configurations including standards like 5.1 and 7.1. It’s also useful from a processing perspective as you can treat the bed as a single part.
What’s the easiest way to get into Atmos?
Home Entertainment is probably Dolby’s largest target audience. For Atmos, the minimum number of physical output channels for monitoring is 12, making a 7.1.4 system. This meets the “Home Entertainment” requirement which means you can mix for Netflix and Amazon and general small-screen TV content. More notably, this is what we use for music.

To offer a massive oversimplification, here’s the minimum system requirements:
- An interface capable of outputting 12 channels with ganged level control for each channel
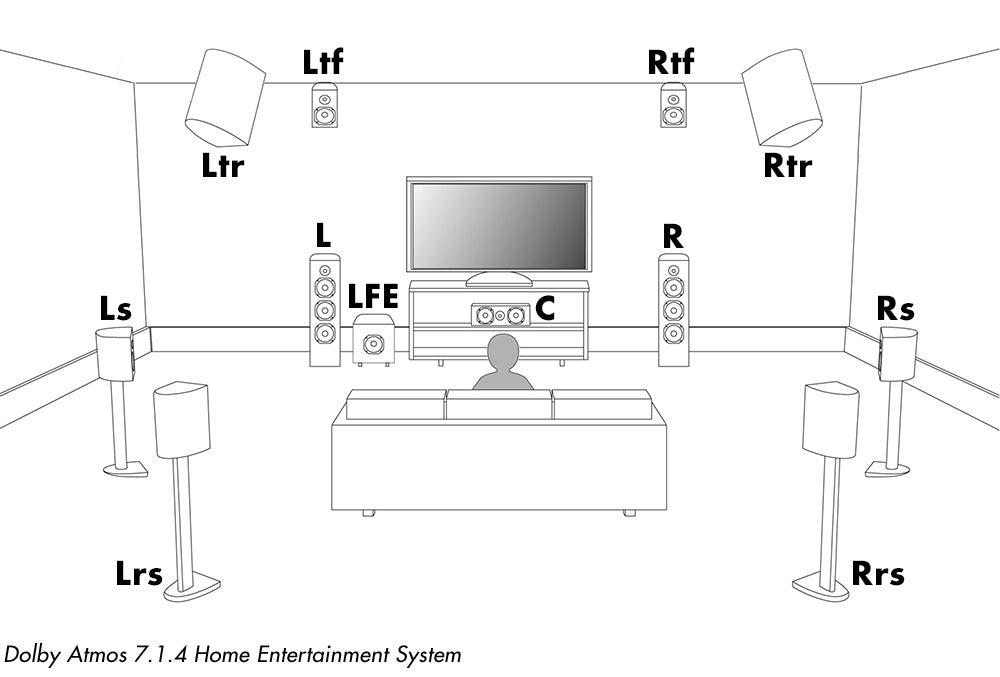
- 12 speakers; Left, Centre, Right, Left Surround, Right Surround, Left Rear Surround, Right Rear Surround and 4 Height channels above the listener, arranged in a square with the mix position in the centre.
- A way to time align all of these speakers and, if possible, calibrate them for the best possible full range output.
- A filter matrix on the outputs for applying the Dolby Curve.
By way of example, here’s a possible configuration that would work in a small room…
- Avid HD Native Thunderbolt
- Avid MTRX Studio
- 3x Neumann KH310 (LCR)
- 4x Neumann KH120 (Ls, Rs, Lrs, Rrs)
- 4x Neumann KH80 (Ltf, Rtf, Ltr, Rtr)
- 2x Neumann KH750 (LFE, clustered)
Apply the Dolby Curve
After your speakers are bolted to the walls and ceiling and are time aligned and calibrated, you’ll then need to apply Dolby’s curve to the system. The intention of the curve is to provide a common reference point between all Atmos applications. Because the RT60 (a measurement of the time it takes for the loudest noise in a concert hall to fade to the background level) of a small room would generally be much longer than a large treated theatre, the additional build up of bass skews the mix. The curve pulls out a carefully calculated amount of the low end in order to bring the perceived low end output of a small space in line with a full theatrical playback system.
Renderer vs. RMU
To get the audio out of Pro Tools and into Atmos, there has to be an intermediary encoding process. This can take two forms; either you can use Dolby Production Suite, which uses its own Audio Bridge to replace the playback engine within Pro Tools before addressing your output device directly, or you can use an external Rendering and Mastering Unit (RMU). The external units are normally approved standalone PCs, usually a Dell or Mac Mini, which run the software. We see RMUs come in to play more with broadcast applications but in music we’re mostly seeing mixers using the production suite.
Setting a standard
From the above, and our general travels in Atmos-land, it appears that Dolby’s goal was to apply a ubiquitous format that could work as well in a large theatre as it would on headphones. While I think the bones are in the right place, there are still some shortcomings in the standardisation that need clarification before the audio world can fully embrace it. The format is still heavily influenced by it’s theatrical background and much of the documentation refers to elements that have no relevance to music makers. That said, there does seem to be a rapidly emerging convention of best practice. Intrepid early adopters have already worked through the pitfalls of the non-specificity of the guidelines and there are now some generally accepted rules. What’s more, the labels have pretty specific delivery requirements where they even prescribe certain object placements and the general ethos toward approaching OBM.
Things to watch out for…
1. Bass management needs improving
In the context of Dolby, LFE refers to Low Frequency Effects, not enhancement. This channel was designed solely for making the floor shake when helicopters explode and, so far, seems to have next to no application for music makers.
Dolby specification dictates that the LFE can cross over at anything up to 250hz and has to have an additional 10dB on-band gain over the rest of the system. Bearing in mind the reference level for a home entertainment monitoring system has to hit 79dBC, that’s an extremely overspecified sub for a system of this size! The lack of specificity on the crossover point also means that your system might be crossing over at a sensible 80hz and the studio next door could be using that full, eye-watering 250hz. Needless to say, any bass-managed object would not translate between these two systems. It gets worse… with the higher crossover points especially, as you pan the object to the rear, the source of the LF information remains at the front, because that’s where the sub is. So you’d end up with a single source split between front and rear, compromising both its coherency and directionality. However, all speakers in an Atmos system are supposed to be full range, so you should be able to install the sub to tick the box and then largely disregard it – the downside that you are effectively left with a rather expensive coffee table!
2. Dolby Digital Plus JOC vs. AC-4 IMS
Mix engineers have found this a key source of frustration during the format’s early teething period. One of the biggest drivers for adopting the format was Apple’s announcement regarding the revised delivery specification for their streaming platform. If you wanted to get on to Apple Music, you needed to deliver an Object Based Mix. Apple then quietly brought out an iPhone update, not only adding the Spatial Audio tickbox in settings but also making it enabled by default. This, weirdly, meant lots of consumers with Airpods were suddenly listening to Atmos without even knowing it. The coup instantly made iPhone users with Airpods by far the largest demographic for consuming 3D audio – and likely multiplied the amount of people listening to Atmos by a factor of thousands!

However, this brought with it an issue: Apple used the older AC-4 format for their Spatial Audio, whereas Dolby in their Renderers and RMUs use DD+ JOC. This is of note because the two don’t fold to binaural in the same way. So, if you’re mixing a track through your Dolby monitoring system and have it folded down to Binaural for a headphone mix check, it won’t sound the same as it does on iPhone. The only way to get an idea of how your mix sounds on Airpods with an iPhone (again, by far the largest potential demographic), is to bounce the file as an MP4 and then play it back on an iPhone – not exactly slick. At time of publication, there is no way to monitor your mix as it would sound on iPhone in real time.
What’s next for Atmos?
As suppliers of studio monitors – and much as we’d like to believe otherwise – we think it’s highly unlikely that consumers are going to install 12 speakers in their living rooms to watch YouTube videos immersively. Simply speaking, the significant hardware investment means Atmos is unlikely to become a ubiquitous consumer format. However, the application benefits for being object-based are significant. Being able to apply any production automatically to any size of space or playback system is nothing short of unprecedented. It’s inherent compatibility with existing stereo and even mono playback also sidesteps the need for multiple delivery codecs for different systems.
Dolby Atmos may well be a game-changer for the film and post-production industries, but for music reproduction the future is perhaps not quite so clear. It’s worth bearing in mind that with 60,000 tracks being added to Spotify every day, it simply isn’t possible to replace the huge army of music creators out there with Atmos mixers overnight. So, while there is seemingly a fierce appetite for mixers and masterers that can deliver Dolby, I suspect the audio industry will end up in a place where the majority of content continues to be made in stereo and is then upmixed by a smaller community of Atmos engineers. Possibly even at the mastering stage.
Dolby Atmos is an exciting development and the end-user experience is unquestionably impressive. However, for the music production industry its success or failure will depend entirely on consumer demand. Let’s see where we are in 12 months time…
- Useful links
- DOLBY ATMOS MUSIC & POST KNOWLEDGE BASE: https://professionalsupport.dolby.com/s/dolby-atmos-music-and-post?language=en_US
- AVID ATMOS DELIVERY GUIDE: https://www.avid.com/resource-center/encoding-and-delivering-dolby-atmos-music
- DOLBY ATMOS STUDIO CONFIGURATION: https://developer.dolby.com/tools-media/studio-resources/Atmos-in-studio/
- DOLBY ATMOS TECHNICAL GUIDE: https://dolby.my.salesforce.com/sfc/p/#700000009YuG/a/4u000000lFHc/UYA0IZeD632SUXVmEPmUcr.wIuhpHp6Q7bVSl4LrbUQ
- Download a free trial copy of Dolby Production Suite here:
